
Installation Instructions
Page 2
... hearing from you Begin 3 Tools and Parts Needed 3 Parts Included 3 27" Appliances 3 General Information 3 30" Appliances 6 Removing Packaging 9 For Convection Microwave Combination Units 9 Preparing Oven 9 Installation 10 Electrical Installation 10 Oven Installation 12 Testing Operation 13 Service 14 Before Calling Service 14 This Bosch Appliance is made by BSH Home Appliances Corporation 5551 McFadden Ave...
... hearing from you Begin 3 Tools and Parts Needed 3 Parts Included 3 27" Appliances 3 General Information 3 30" Appliances 6 Removing Packaging 9 For Convection Microwave Combination Units 9 Preparing Oven 9 Installation 10 Electrical Installation 10 Oven Installation 12 Testing Operation 13 Service 14 Before Calling Service 14 This Bosch Appliance is made by BSH Home Appliances Corporation 5551 McFadden Ave...

Installation Instructions
Page 5
... the unit, a 2" diameter hole or space is installed at the end of the oven and the wall/door. For oven support, install 2x4's extending front to allow at least 210 lbs (95 kg). Dimensions for 27" Wall-Mounted Units 24" (610mm) 251/2" (648mm) 263/4" (680mm) 2413/16" (...630mm) 281/4" (718mm) 291/16" (738mm) 27" (686mm) min. 43/4" (121mm) max. 313/8" (797mm) 237/8" (606mm) 22" (559mm) Single Oven 27" It is good practice, when oven is required between the side of a cabinet run, adjacent to a perpendicular wall or cabinet door, to back flush with all applicable codes....
... the unit, a 2" diameter hole or space is installed at the end of the oven and the wall/door. For oven support, install 2x4's extending front to allow at least 210 lbs (95 kg). Dimensions for 27" Wall-Mounted Units 24" (610mm) 251/2" (648mm) 263/4" (680mm) 2413/16" (...630mm) 281/4" (718mm) 291/16" (738mm) 27" (686mm) min. 43/4" (121mm) max. 313/8" (797mm) 237/8" (606mm) 22" (559mm) Single Oven 27" It is good practice, when oven is required between the side of a cabinet run, adjacent to a perpendicular wall or cabinet door, to back flush with all applicable codes....

Installation Instructions
Page 6
... front to back flush with Microwave 27" It is good practice, when oven is installed at the end of a cabinet run , adjacent to a perpendicular wall or cabinet door, to allow at least 1/4" space between the side of the oven and the wall/door. The supporting base must be...500mm) 237/8" (606mm) 22" (559mm) Double Oven 27" It is good practice, when oven is installed at the end of a cabinet run , adjacent to a perpendicular wall or cabinet door, to allow at least 1/4" space between the side of the oven and the wall/door. For oven support, install 2x4's extending front to facilitate ...
... front to back flush with Microwave 27" It is good practice, when oven is installed at the end of a cabinet run , adjacent to a perpendicular wall or cabinet door, to allow at least 1/4" space between the side of the oven and the wall/door. The supporting base must be...500mm) 237/8" (606mm) 22" (559mm) Double Oven 27" It is good practice, when oven is installed at the end of a cabinet run , adjacent to a perpendicular wall or cabinet door, to allow at least 1/4" space between the side of the oven and the wall/door. For oven support, install 2x4's extending front to facilitate ...

Installation Instructions
Page 7
...supporting a weight of at least 1/4" space between the side of the oven and the wall/door. Note: The conduit box must be located above the unit to back flush with Microwave and Warming Drawer 27" It is good practice, when oven is installed at the end of a cabinet run, adjacent to a ...perpendicular wall or cabinet door, to allow at least 370 lbs (168 kg). 237/8" (606mm) 22" (559mm) 27" Under-the-counter units 24" (610mm) 161/2" ...
...supporting a weight of at least 1/4" space between the side of the oven and the wall/door. Note: The conduit box must be located above the unit to back flush with Microwave and Warming Drawer 27" It is good practice, when oven is installed at the end of a cabinet run, adjacent to a ...perpendicular wall or cabinet door, to allow at least 370 lbs (168 kg). 237/8" (606mm) 22" (559mm) 27" Under-the-counter units 24" (610mm) 161/2" ...

Installation Instructions
Page 8
...a 2" diameter hole or space is required between the back wall and the right rear of the 2x4 supports. Double Oven 30" It is good practice, when oven is installed at the end of a cabinet run , adjacent to a perpendicular wall or cabinet door, to allow at least 1/4" space between the... side of the oven and the wall/door. English 6 30" Appliances Dimensions for 30" Wall-Mounted Units 24" (610mm) 281/2" (724mm) 293/4" (755mm) 2713/16" (706mm) 281/4" (718mm) 291/16" (738mm) 27" (686mm) min. 43/4" (121mm) max. 313/8" (797mm) 237/8" (...
...a 2" diameter hole or space is required between the back wall and the right rear of the 2x4 supports. Double Oven 30" It is good practice, when oven is installed at the end of a cabinet run , adjacent to a perpendicular wall or cabinet door, to allow at least 1/4" space between the... side of the oven and the wall/door. English 6 30" Appliances Dimensions for 30" Wall-Mounted Units 24" (610mm) 281/2" (724mm) 293/4" (755mm) 2713/16" (706mm) 281/4" (718mm) 291/16" (738mm) 27" (686mm) min. 43/4" (121mm) max. 313/8" (797mm) 237/8" (...

Installation Instructions
Page 10
... conduit box must be located above the unit to back flush with Warming Drawer 30" It is good practice, when oven is installed at the end of a cabinet run, adjacent to a perpendicular wall or cabinet door, to allow at least 290 lbs (132 kg). 237/8" (606mm) 22" (559mm) 30" Under...-the-counter-Units 24" (610mm) 161/2" (419mm) 281/4" (718mm) 293/4" (755mm) 291/16" (738mm) 2713/16" (706mm) 281/2" (724mm) 27" (686mm) 36" (915mm) min. 33/4" (...
... conduit box must be located above the unit to back flush with Warming Drawer 30" It is good practice, when oven is installed at the end of a cabinet run, adjacent to a perpendicular wall or cabinet door, to allow at least 290 lbs (132 kg). 237/8" (606mm) 22" (559mm) 30" Under...-the-counter-Units 24" (610mm) 161/2" (419mm) 281/4" (718mm) 293/4" (755mm) 291/16" (738mm) 2713/16" (706mm) 281/2" (724mm) 27" (686mm) 36" (915mm) min. 33/4" (...
Use & Care Manual
Page 29
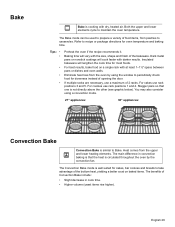
.... 27" appliances: 30" appliances: Convection Bake Convection Bake is not directly above the other (see graphic below). The Convection Bake mode is well suited for oven temperature and baking time. English 26 Bake t Bake is cooking with at least 1-1½" space between pans or dishes and oven walls. ...The Bake mode can be used to casseroles. Tips: • • • • • Preheat the oven if the recipe recommends it. For best results, bake food on baked items. The ...
.... 27" appliances: 30" appliances: Convection Bake Convection Bake is not directly above the other (see graphic below). The Convection Bake mode is well suited for oven temperature and baking time. English 26 Bake t Bake is cooking with at least 1-1½" space between pans or dishes and oven walls. ...The Bake mode can be used to casseroles. Tips: • • • • • Preheat the oven if the recipe recommends it. For best results, bake food on baked items. The ...
Use & Care Manual
Page 30
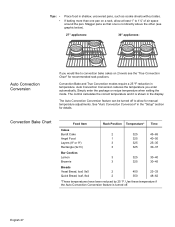
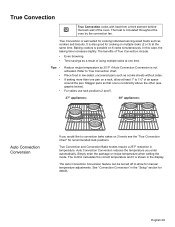
...Auto Convection Conversion feature can be turned off . Use these temperature if the Auto Convection Conversion feature is shown in temperature. English 27 Stagger pans so that one pan on 2 levels see the "True Convection Chart" for manual temperature adjustments. Simply enter the package ...or recipe temperature when setting the mode. If baking more than one is not directly above the other (see graphic below). 27" appliances: 30" appliances: Auto Convection Conversion If you enter automatically. See "Auto Convection Conversion" in shallow, uncovered pans, such as ...
...Auto Convection Conversion feature can be turned off . Use these temperature if the Auto Convection Conversion feature is shown in temperature. English 27 Stagger pans so that one pan on 2 levels see the "True Convection Chart" for manual temperature adjustments. Simply enter the package ...or recipe temperature when setting the mode. If baking more than one is not directly above the other (see graphic below). 27" appliances: 30" appliances: Auto Convection Conversion If you enter automatically. See "Auto Convection Conversion" in shallow, uncovered pans, such as ...
Use & Care Manual
Page 31
... • Time savings as a result of air space around the pan. Stagger pans so that one time. For cakes use rack positions 2 and 5. 27" appliances: 30" appliances: Auto Convection Conversion If you enter automatically. English 28 In this case, the baking time increases slightly. Refer to allow at the...; • • • Reduce recipe temperature by the convection fan. True Convection T True Convection cooks with heat from a third element behind the back wall of the oven. The Auto Convection Conversion feature can be turned off to True Convection chart.
... • Time savings as a result of air space around the pan. Stagger pans so that one time. For cakes use rack positions 2 and 5. 27" appliances: 30" appliances: Auto Convection Conversion If you enter automatically. English 28 In this case, the baking time increases slightly. Refer to allow at the...; • • • Reduce recipe temperature by the convection fan. True Convection T True Convection cooks with heat from a third element behind the back wall of the oven. The Auto Convection Conversion feature can be turned off to True Convection chart.
Use & Care Manual
Page 32
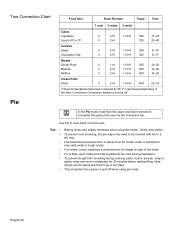
Use these temperature if the Auto Convection Conversion feature is circulated throughout the oven by 25 °F. Tips: • • • • • • • Baking times may slightly decrease when using... this for 30 minutes before adding filling. True Convection Chart Food Item Rack Position Temp.* Time 1 rack 2 racks 3 racks Cakes Cupcakes Layers (8" or 9") 4 2+5 1+3+5 325 17-27 3 2+5 325 25-40 Cookies Sugar Chocolate Chip 3 2+5 1+3+5 350 6-10 3 2+5 1+3+5 325 8-17 Breads Dinner Rolls Biscuits Muffins 3 1+4 1+3+5 350 10-20 2 2+5 1+3+5 ...
Use these temperature if the Auto Convection Conversion feature is circulated throughout the oven by 25 °F. Tips: • • • • • • • Baking times may slightly decrease when using... this for 30 minutes before adding filling. True Convection Chart Food Item Rack Position Temp.* Time 1 rack 2 racks 3 racks Cakes Cupcakes Layers (8" or 9") 4 2+5 1+3+5 325 17-27 3 2+5 325 25-40 Cookies Sugar Chocolate Chip 3 2+5 1+3+5 350 6-10 3 2+5 1+3+5 325 8-17 Breads Dinner Rolls Biscuits Muffins 3 1+4 1+3+5 350 10-20 2 2+5 1+3+5 ...
Use & Care Manual
Page 35
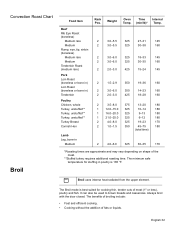
... brown breads and casseroles. r Broil uses intense heat radiated from the upper element. Always broil with the door closed. English 32 Weight Oven Time Internal Temp. (min/lb)* Temp. 2 3.0-5.5 325 27-31 145 2 3.0-5.5 325 30-38 160 2 3.0-6.0 325 18-33 145 2 3.0-6.0 325 30-35 160 2 2.0-3.0 425 15-24 145 2 1.5-2.9 350 19-36...
... brown breads and casseroles. r Broil uses intense heat radiated from the upper element. Always broil with the door closed. English 32 Weight Oven Time Internal Temp. (min/lb)* Temp. 2 3.0-5.5 325 27-31 145 2 3.0-5.5 325 30-38 160 2 3.0-6.0 325 18-33 145 2 3.0-6.0 325 30-35 160 2 2.0-3.0 425 15-24 145 2 1.5-2.9 350 19-36...
Use & Care Manual
Page 38
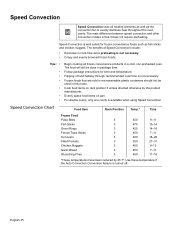
...Pockets Chicken Nuggets Garlic Bread Shoestring Fries 3 450 9-11 3 475 10-14 3 425 14-16 3 450 7-11 3 400 18-26 3 350 27-31 3 400 9-13 3 450 7-11 3 450 11-16 *These temperatures have been reduced by the product manufacturer. Frozen foods that it does not... require preheating. Speed Convection Speed Convection uses all frozen convenience products in package time. For double ovens, only one cavity is turned off. English 35 Evenly space food items on rack position 3 unless directed otherwise by 25 °F....
...Pockets Chicken Nuggets Garlic Bread Shoestring Fries 3 450 9-11 3 475 10-14 3 425 14-16 3 450 7-11 3 400 18-26 3 350 27-31 3 400 9-13 3 450 7-11 3 450 11-16 *These temperatures have been reduced by the product manufacturer. Frozen foods that it does not... require preheating. Speed Convection Speed Convection uses all frozen convenience products in package time. For double ovens, only one cavity is turned off. English 35 Evenly space food items on rack position 3 unless directed otherwise by 25 °F....