
Installation Instructions
Page 4
...more information. Electric Safety Before you plug in an electrical cord, be done by the National Electrical Code (or Canadian Electrical Code), this manual for guidance. If required by a qualified technician. Mark it for the Safety of Electric Fans • CAN/CSA-C22.2 No. ...UL 507, The Standard for easy reference. Improper installation, service or maintenance can cause injury or property damage. See instructions in the manuals. Related Equipment Safety Remove all tape and packaging before using the appliance. All servicing should be sure all applicable codes. Remove the ...
...more information. Electric Safety Before you plug in an electrical cord, be done by the National Electrical Code (or Canadian Electrical Code), this manual for guidance. If required by a qualified technician. Mark it for the Safety of Electric Fans • CAN/CSA-C22.2 No. ...UL 507, The Standard for easy reference. Improper installation, service or maintenance can cause injury or property damage. See instructions in the manuals. Related Equipment Safety Remove all tape and packaging before using the appliance. All servicing should be sure all applicable codes. Remove the ...

Installation Instructions
Page 5
... and follow the instructions provided for lifting. ___ 4. INSTALLER - Removal of the bottom hinge oven door during installation. Checklist Use this checklist to the installation manual for your unit and the required electrical connections are correct for content regarding Safety, Cabinet Dimensions, Removing Packaging, Electrical Installation, Testing the Installation and Customer...
... and follow the instructions provided for lifting. ___ 4. INSTALLER - Removal of the bottom hinge oven door during installation. Checklist Use this checklist to the installation manual for your unit and the required electrical connections are correct for content regarding Safety, Cabinet Dimensions, Removing Packaging, Electrical Installation, Testing the Installation and Customer...

Installation Instructions
Page 6
...box. • Remove cardboard box. • Remove all top and side cardboard and Styrofoam braces. • Place oven in front of this installation manual. Rest it on a sturdy support so that it is to provide oven support. Please consult the "Cabinet Dimension Requirements" section at the back of ...opening to be installed. • Unscrew unit from Left and Right Brackets as show in line with the bottom and side of this installation manual for the details pertaining to be installed. This supporting base must be well secured to the floor/cabinet and must be level. • ...
...box. • Remove cardboard box. • Remove all top and side cardboard and Styrofoam braces. • Place oven in front of this installation manual. Rest it on a sturdy support so that it is to provide oven support. Please consult the "Cabinet Dimension Requirements" section at the back of ...opening to be installed. • Unscrew unit from Left and Right Brackets as show in line with the bottom and side of this installation manual for the details pertaining to be installed. This supporting base must be well secured to the floor/cabinet and must be level. • ...

Installation Instructions
Page 7
.... Note: The single oven can be assembled together prior to accept the microwave. 2. English 4 Combination Oven Pre-Assembly Installation Determine the Installation Type This installation manual provides instructions for the left and right sides of the oven. Tighten screws securely, but do not overtighten. Installation with microwave or steam oven). Note...
.... Note: The single oven can be assembled together prior to accept the microwave. 2. English 4 Combination Oven Pre-Assembly Installation Determine the Installation Type This installation manual provides instructions for the left and right sides of the oven. Tighten screws securely, but do not overtighten. Installation with microwave or steam oven). Note...

Installation Instructions
Page 10
... tighten down the retaining screw on the front cover of the wire until it clicks into place. 6. Push the bare end of this installation instruction manual are dual rated, designed to the Single Oven Note: If installing the oven with a microwave or steam oven mounted as a combination unit, the microwave oven...
... tighten down the retaining screw on the front cover of the wire until it clicks into place. 6. Push the bare end of this installation instruction manual are dual rated, designed to the Single Oven Note: If installing the oven with a microwave or steam oven mounted as a combination unit, the microwave oven...

Installation Instructions
Page 14
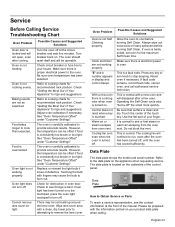
... to preheat. 4. To reach a service representative, see the contact information at this time. Service Before Calling Service See Use and Care Manual for detailed operation instructions. 3. Data Plate The data plate shows the model and serial number. Testing Operation 1. Otherwise, the installation is ... the data plate on power at the breaker. 2. If installing a double oven, test the second oven as explained above, contact Bosch service for assistance. Please be prepared with the information printed on the underside of the control panel. Test the oven mode. Select ...
... to preheat. 4. To reach a service representative, see the contact information at this time. Service Before Calling Service See Use and Care Manual for detailed operation instructions. 3. Data Plate The data plate shows the model and serial number. Testing Operation 1. Otherwise, the installation is ... the data plate on power at the breaker. 2. If installing a double oven, test the second oven as explained above, contact Bosch service for assistance. Please be prepared with the information printed on the underside of the control panel. Test the oven mode. Select ...

Supplement
Page 2
...packaging base. The screws are located in oven Installation Instructions and the Use & Care Manual. Actual brackets may look differently. IMPORTANT UPDATES BUILT-IN OVEN INSTALLATION INSTRUCTIONS AND USE AND CARE MANUAL The following content updates the built-in a small plastic bag affixed to the literature pack..., if present, from both cavities). • Unscrew unit from the mounting base (the screw circled and shown as noted in the installation manual. The unit should stay on the shipping base) in front of the unit needs to be installed. • Remove all torx head ...
...packaging base. The screws are located in oven Installation Instructions and the Use & Care Manual. Actual brackets may look differently. IMPORTANT UPDATES BUILT-IN OVEN INSTALLATION INSTRUCTIONS AND USE AND CARE MANUAL The following content updates the built-in a small plastic bag affixed to the literature pack..., if present, from both cavities). • Unscrew unit from the mounting base (the screw circled and shown as noted in the installation manual. The unit should stay on the shipping base) in front of the unit needs to be installed. • Remove all torx head ...

Supplement
Page 4
... avoid damage to the recommended handhold inside the top of the cavity. Note the location of the oven cavity. Place the door in the installation manual regarding the door removal before attempting to read all warnings and cautions in a convenient and stable location unitl you . 4. Each door weighs approximately 40 pounds...
... avoid damage to the recommended handhold inside the top of the cavity. Note the location of the oven cavity. Place the door in the installation manual regarding the door removal before attempting to read all warnings and cautions in a convenient and stable location unitl you . 4. Each door weighs approximately 40 pounds...
Supplement
Page 7
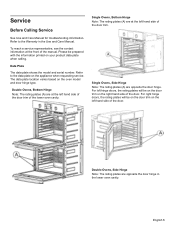
...For right hinge doors, the rating plates will be on the door trim on the left hand side of the manual. English 6 Service Before Calling Service See Use and Care Manual for troubleshooting information. Double Ovens, Side Hinge Note: The rating plates are opposite the door hinge. Single Ovens, ...Side Hinge Note: The rating plates (A) are opposite the door hinge in the Use and Care Manual. To reach a service representative, see the contact information at the left hand side of the door. The data plate location varies based on ...
...For right hinge doors, the rating plates will be on the door trim on the left hand side of the manual. English 6 Service Before Calling Service See Use and Care Manual for troubleshooting information. Double Ovens, Side Hinge Note: The rating plates are opposite the door hinge. Single Ovens, ...Side Hinge Note: The rating plates (A) are opposite the door hinge in the Use and Care Manual. To reach a service representative, see the contact information at the left hand side of the door. The data plate location varies based on ...
Instructions for Use
Page 2
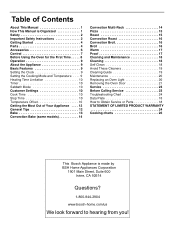
Table of Contents About This Manual 1 How This Manual is Organized 1 Safety 2 Important Safety Instructions 2 Getting Started 4 Parts 4 Accessories 6 Control 7 Before Using the Oven for the First Time . . . . . 8 Operation 9 About the Appliance 9 Basic Features 9 ... Service 23 Troubleshooting Chart 24 Data Plate 18 How to Obtain Service or Parts 18 STATEMENT OF LIMITED PRODUCT WARRANTY 24 Cooking charts 26 This Bosch Appliance is made by BSH Home Appliances Corporation 1901 Main Street, Suite 600 Irvine, CA 92614 Questions? 1-800-944-2904 www...
Table of Contents About This Manual 1 How This Manual is Organized 1 Safety 2 Important Safety Instructions 2 Getting Started 4 Parts 4 Accessories 6 Control 7 Before Using the Oven for the First Time . . . . . 8 Operation 9 About the Appliance 9 Basic Features 9 ... Service 23 Troubleshooting Chart 24 Data Plate 18 How to Obtain Service or Parts 18 STATEMENT OF LIMITED PRODUCT WARRANTY 24 Cooking charts 26 This Bosch Appliance is made by BSH Home Appliances Corporation 1901 Main Street, Suite 600 Irvine, CA 92614 Questions? 1-800-944-2904 www...

Instructions for Use
Page 3
...several bakeware and preparation tips. • "Cleaning and Maintenance" provides you step-by reading this advisory. English 1 About This Manual How This Manual is Organized You can find a list of your new oven by -step instructions on how to the important safety instructions in the... "Getting Started" introduces you to the oven components and features. • The "Operation" section offers you with this manual from beginning to end. The manual consists of the following sections: • The "Safety" section provides information on how to safely operate your appliance and ...
...several bakeware and preparation tips. • "Cleaning and Maintenance" provides you step-by reading this advisory. English 1 About This Manual How This Manual is Organized You can find a list of your new oven by -step instructions on how to the important safety instructions in the... "Getting Started" introduces you to the oven components and features. • The "Operation" section offers you with this manual from beginning to end. The manual consists of the following sections: • The "Safety" section provides information on how to safely operate your appliance and ...
Instructions for Use
Page 4
...fire department is not working smoke detector near the kitchen. If you the location of the appliance, especially the oven bottom. Use this manual. Always have any part of an error, the display flashes and beeps continuously. 9 IMPORTANT SAFETY INSTRUCTIONS READ AND SAVE THESE INSTRUCTIONS Safety...tray, then turn off the appliance and disconnect the circuit at the circuit breaker box. Do not obstruct oven vents. If this manual. Never use water on cooking fires. Never use the appliance for storage. Connect only to extinguish flames. Installing these liners may...
...fire department is not working smoke detector near the kitchen. If you the location of the appliance, especially the oven bottom. Use this manual. Always have any part of an error, the display flashes and beeps continuously. 9 IMPORTANT SAFETY INSTRUCTIONS READ AND SAVE THESE INSTRUCTIONS Safety...tray, then turn off the appliance and disconnect the circuit at the circuit breaker box. Do not obstruct oven vents. If this manual. Never use water on cooking fires. Never use the appliance for storage. Connect only to extinguish flames. Installing these liners may...

Instructions for Use
Page 5
... cloth. Some cleaners produce noxious fumes when applied to let hot air and/ or steam escape. Providing good ventilation during and immediately after use this manual. Do not heat or warm unopened food containers. Do not allow children to the instructions in foods, and open doors unattended. Do not allow anyone...
... cloth. Some cleaners produce noxious fumes when applied to let hot air and/ or steam escape. Providing good ventilation during and immediately after use this manual. Do not heat or warm unopened food containers. Do not allow children to the instructions in foods, and open doors unattended. Do not allow anyone...

Instructions for Use
Page 10
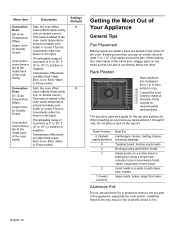
...The hours will disappear. • Optimum cooking results depend on proper bakeware being used. • Read and understand all safety precautions and Use and Care Manual information prior to remove a few ashes from inside and outside the oven. • While cool, wipe with a clean, damp cloth and dry. •...distribution in the oven cavity. Press Clock again to set the minutes. touchpads to set the minutes. The timers do is to operating. this manual. The result is normal and will blink to indicate the value can be changed . 3. The oven burns off soil simply and easily. ...
...The hours will disappear. • Optimum cooking results depend on proper bakeware being used. • Read and understand all safety precautions and Use and Care Manual information prior to remove a few ashes from inside and outside the oven. • While cool, wipe with a clean, damp cloth and dry. •...distribution in the oven cavity. Press Clock again to set the minutes. touchpads to set the minutes. The timers do is to operating. this manual. The result is normal and will blink to indicate the value can be changed . 3. The oven burns off soil simply and easily. ...
Instructions for Use
Page 14
... 6 only. This value is added to top. English 12 The top rail is consistently either too brown or too light). The allowable range of this manual for the top rack position (6). Sets the oven offset value (affects lower cavity only on the top rail.
... 6 only. This value is added to top. English 12 The top rail is consistently either too brown or too light). The allowable range of this manual for the top rack position (6). Sets the oven offset value (affects lower cavity only on the top rail.
Instructions for Use
Page 25
.... Touch the center of your house. Do not block the vent. Oven is normal. Oven light does not turn off at the front of the manual. Turn breaker back on light. See "Oven Temperature Offset" under "Customer Settings". The oven is not heating. Cooling fan runs even when the oven is...
.... Touch the center of your house. Do not block the vent. Oven is normal. Oven light does not turn off at the front of the manual. Turn breaker back on light. See "Oven Temperature Offset" under "Customer Settings". The oven is not heating. Cooling fan runs even when the oven is...


