

Installation Instructions
Page 5
...above or below the unit, a 2" diameter hole or space is required between the side of the oven and the wall/door. If the conduit box is installed at the end of the opening. Dimensions for 27" Wall-Mounted Units 24" (610mm) 251/2" (648mm) 263/4" (680mm) 2413/16" (630mm) 281/4"... (718mm) 291/16" (738mm) 27" (686mm) min. 43/4" (121mm) max. 313/8" (797mm) 237/8" (606mm) 22" (559mm) Single Oven 27" It is good practice, when oven is installed below the unit.
...above or below the unit, a 2" diameter hole or space is required between the side of the oven and the wall/door. If the conduit box is installed at the end of the opening. Dimensions for 27" Wall-Mounted Units 24" (610mm) 251/2" (648mm) 263/4" (680mm) 2413/16" (630mm) 281/4"... (718mm) 291/16" (738mm) 27" (686mm) min. 43/4" (121mm) max. 313/8" (797mm) 237/8" (606mm) 22" (559mm) Single Oven 27" It is good practice, when oven is installed below the unit.

Installation Instructions
Page 6
... 237/8" (606mm) 22" (559mm) Double Oven 27" It is good practice, when oven is installed at the end of a cabinet run , adjacent to a perpendicular wall or cabinet door, to allow at least 1/4" space between the side of the oven and the wall/door. For oven support, install 2x4's extending front to back... flush with Microwave 27" It is good practice, when oven is installed at the end of a cabinet run , adjacent to a perpendicular wall or cabinet door, to allow at least...
... 237/8" (606mm) 22" (559mm) Double Oven 27" It is good practice, when oven is installed at the end of a cabinet run , adjacent to a perpendicular wall or cabinet door, to allow at least 1/4" space between the side of the oven and the wall/door. For oven support, install 2x4's extending front to back... flush with Microwave 27" It is good practice, when oven is installed at the end of a cabinet run , adjacent to a perpendicular wall or cabinet door, to allow at least...

Installation Instructions
Page 7
...) 263/4" (680mm) 2413/16" (630mm) 603/4" (1543mm) 613/8" (1559mm) 595/8" (1514mm) 93/4" (248mm) Combo Oven with Microwave and Warming Drawer 27" It is good practice, when oven is installed at the end of a cabinet run, adjacent to a perpendicular wall or cabinet door, to back flush with the bottom and the side of the opening...
...) 263/4" (680mm) 2413/16" (630mm) 603/4" (1543mm) 613/8" (1559mm) 595/8" (1514mm) 93/4" (248mm) Combo Oven with Microwave and Warming Drawer 27" It is good practice, when oven is installed at the end of a cabinet run, adjacent to a perpendicular wall or cabinet door, to back flush with the bottom and the side of the opening...

Installation Instructions
Page 8
... floor/cabinet and level. English 6 The cabinet base must be flat and capable of supporting a weight of the oven and the wall/door. The supporting base must be well secured to back flush with the bottom and the side of the opening ...27" (686mm) min. 43/4" (121mm) max. 313/8" (797mm) 237/8" (606mm) 22" (559mm) 293/4" (755mm) 2713/16" (706mm) 24" (610mm) 281/2" (724mm) 513/4" (1314mm) 511/8" (1299mm) 493/4" (1264mm) 93/4" (248mm) 237/8" (606mm) 22" (559mm) Single Oven 30" It is good practice, when oven is installed at the end of a cabinet run , adjacent to a perpendicular wall...
... floor/cabinet and level. English 6 The cabinet base must be flat and capable of supporting a weight of the oven and the wall/door. The supporting base must be well secured to back flush with the bottom and the side of the opening ...27" (686mm) min. 43/4" (121mm) max. 313/8" (797mm) 237/8" (606mm) 22" (559mm) 293/4" (755mm) 2713/16" (706mm) 24" (610mm) 281/2" (724mm) 513/4" (1314mm) 511/8" (1299mm) 493/4" (1264mm) 93/4" (248mm) 237/8" (606mm) 22" (559mm) Single Oven 30" It is good practice, when oven is installed at the end of a cabinet run , adjacent to a perpendicular wall...

Installation Instructions
Page 9
... door, to allow at least 1/4" space between the side of the oven and the wall/door. The supporting base must be well secured to allow at least 1/4" space between the side of the oven and the wall/door. For oven support, install 2x4's extending front to back flush with Microwave and Warming... Drawer 30" It is good practice, when oven is installed at the end of the opening . Note: The conduit box...
... door, to allow at least 1/4" space between the side of the oven and the wall/door. The supporting base must be well secured to allow at least 1/4" space between the side of the oven and the wall/door. For oven support, install 2x4's extending front to back flush with Microwave and Warming... Drawer 30" It is good practice, when oven is installed at the end of the opening . Note: The conduit box...

Installation Instructions
Page 10
... floor/cabinet and level. Note: The conduit box must be flat and capable of supporting a weight of at least 1/4" space between the side of the oven and the wall/door. 24" (610mm) 281/2" (724mm) 293/4" (755mm) 2713/16" (706mm) 40" (1016mm) 407/16" (1027mm) 381/8" (968mm) 93/4" (248mm)... Oven with the bottom and the side of the opening. The cabinet base must be well secured to allow at least 290 lbs (132 kg). 237/8" (606mm) 22" (559mm) 30" Under-the-counter-Units 24" (610mm) 161/2" (419mm) 281/4" (718mm) 293/4" (755mm) 291/16" (738mm) 2713/16" (706mm) 281/2" (724mm) 27...
... floor/cabinet and level. Note: The conduit box must be flat and capable of supporting a weight of at least 1/4" space between the side of the oven and the wall/door. 24" (610mm) 281/2" (724mm) 293/4" (755mm) 2713/16" (706mm) 40" (1016mm) 407/16" (1027mm) 381/8" (968mm) 93/4" (248mm)... Oven with the bottom and the side of the opening. The cabinet base must be well secured to allow at least 290 lbs (132 kg). 237/8" (606mm) 22" (559mm) 30" Under-the-counter-Units 24" (610mm) 161/2" (419mm) 281/4" (718mm) 293/4" (755mm) 291/16" (738mm) 2713/16" (706mm) 281/2" (724mm) 27...

Installation Instructions
Page 15
...hinges in until flush with cabinet wall, being careful not to expose hinges and slots. 3. Testing Operation 1. Check power at the breaker. 2. Confirm that the oven light comes on power at junction box using a volt meter. The oven should be sure it is correctly... cutout. For 240 V installation, the reading between oven and cabinet back wall. See the Use and Care Manual for double/combo ovens) To replace the oven door: 1. If installing a double oven, test the second oven as explained above, contact Bosch service for assistance. Otherwise, the installation is flush with...
...hinges in until flush with cabinet wall, being careful not to expose hinges and slots. 3. Testing Operation 1. Check power at the breaker. 2. Confirm that the oven light comes on power at junction box using a volt meter. The oven should be sure it is correctly... cutout. For 240 V installation, the reading between oven and cabinet back wall. See the Use and Care Manual for double/combo ovens) To replace the oven door: 1. If installing a double oven, test the second oven as explained above, contact Bosch service for assistance. Otherwise, the installation is flush with...
Use & Care Manual
Page 20
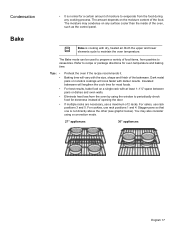
...upper and lower elements cycle to casseroles. Insulated bakeware will cook faster with at least 1-1½" space between pans or dishes and oven walls. For cakes, use rack positions 1 and 4. The moisture may also consider using the window to periodically check food for doneness ...8226; It is normal for a certain amount of moisture to evaporate from the oven by using a convection mode. 27" appliances: 30" appliances: English 17 Tips: • • • • • Preheat the oven if the recipe recommends it. For best results, bake food on the moisture content...
...upper and lower elements cycle to casseroles. Insulated bakeware will cook faster with at least 1-1½" space between pans or dishes and oven walls. For cakes, use rack positions 1 and 4. The moisture may also consider using the window to periodically check food for doneness ...8226; It is normal for a certain amount of moisture to evaporate from the oven by using a convection mode. 27" appliances: 30" appliances: English 17 Tips: • • • • • Preheat the oven if the recipe recommends it. For best results, bake food on the moisture content...


