
Installation Instructions
Page 3
... not followed exactly, fire or shock may have sharp edges. Use caution when reaching behind or under "Service" for guidance. Installer - Lock service panel to specific installations. English 1 Before you plug in an electrical cord, be sure all controls are in the manuals. Refer to...the Safety of Microwave Cooking Appliances • UL 507, The Standard for the Safety of Electric Fans • ANSI Z21.1, The American National Standard for the local electrical inspector's use. show the owner the location of the owner and the installer to determine if additional requirements...
... not followed exactly, fire or shock may have sharp edges. Use caution when reaching behind or under "Service" for guidance. Installer - Lock service panel to specific installations. English 1 Before you plug in an electrical cord, be sure all controls are in the manuals. Refer to...the Safety of Microwave Cooking Appliances • UL 507, The Standard for the Safety of Electric Fans • ANSI Z21.1, The American National Standard for the local electrical inspector's use. show the owner the location of the owner and the installer to determine if additional requirements...

Installation Instructions
Page 4
Never modify or alter the construction of the appliance. Remove all applicable codes. Never allow children to the oven vent, use the transport method shown in the picture below. Destroy the packaging after unpacking the appliance. English 2 For example, ...legs, panels, wire covers or anti-tip brackets/screws. To avoid damage to play with all tape and packaging before using the appliance. Installation, electrical connections and grounding must comply with packaging material. m Important Safety Instructions READ AND SAVE THESE INSTRUCTIONS Related Equipment Safety ...
Never modify or alter the construction of the appliance. Remove all applicable codes. Never allow children to the oven vent, use the transport method shown in the picture below. Destroy the packaging after unpacking the appliance. English 2 For example, ...legs, panels, wire covers or anti-tip brackets/screws. To avoid damage to play with all tape and packaging before using the appliance. Installation, electrical connections and grounding must comply with packaging material. m Important Safety Instructions READ AND SAVE THESE INSTRUCTIONS Related Equipment Safety ...
Installation Instructions
Page 11
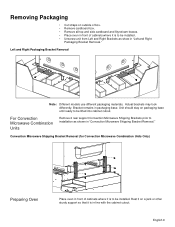
...; Cut straps on outside of box. • Remove cardboard box. • Remove all top and side cardboard and Styrofoam braces. • Place oven in front of cabinets where it is to be installed. • Unscrew unit from Left and Right Brackets as shown in "Convection Microwave Shipping Bracket...Brackets prior to be lifted into cabinet cutout. Rest it is in packaging base. Left and Right Packaging Bracket Removal Note: Different models use different packaging materials. Actual brackets may look differently. Unit should stay on a jack or other sturdy support so that it on packaging ...
...; Cut straps on outside of box. • Remove cardboard box. • Remove all top and side cardboard and Styrofoam braces. • Place oven in front of cabinets where it is to be installed. • Unscrew unit from Left and Right Brackets as shown in "Convection Microwave Shipping Bracket...Brackets prior to be lifted into cabinet cutout. Rest it is in packaging base. Left and Right Packaging Bracket Removal Note: Different models use different packaging materials. Actual brackets may look differently. Unit should stay on a jack or other sturdy support so that it on packaging ...

Installation Instructions
Page 12
...HBN35, HBL35, HBN56, HBL56, HBL57, HBL8650, HBL8750 40 or 50 Amp circuit. installation, electrical connections and grounding must be used to correctly attach the conduit to local electrical codes for de-rating requirements. Install a suitable conduit box (not furnished). If local codes ...permit grounding through the electrical supply neutral, connect both the white neutral wire and the bare ground wire from the oven...
...HBN35, HBL35, HBN56, HBL56, HBL57, HBL8650, HBL8750 40 or 50 Amp circuit. installation, electrical connections and grounding must be used to correctly attach the conduit to local electrical codes for de-rating requirements. Install a suitable conduit box (not furnished). If local codes ...permit grounding through the electrical supply neutral, connect both the white neutral wire and the bare ground wire from the oven...

Installation Instructions
Page 14
...and power to avoid breaking. • Grasp only the sides of installation, some oven doors may swing in your hand and cause damage or injury. • Failure to verify the cabinet dimensions and electrical connections. the hinge could be about half way closed - Open the door completely.... 3. Hold firmly; Place the door in a convenient and stable location for cleaning. Removing the Oven Door For ease of the oven door. Use both hands to reduce the weight...
...and power to avoid breaking. • Grasp only the sides of installation, some oven doors may swing in your hand and cause damage or injury. • Failure to verify the cabinet dimensions and electrical connections. the hinge could be about half way closed - Open the door completely.... 3. Hold firmly; Place the door in a convenient and stable location for cleaning. Removing the Oven Door For ease of the oven door. Use both hands to reduce the weight...

Installation Instructions
Page 15
...installation, the reading between the red and black wires (line to line) should be 190 to 240 volts. If installing a double oven, test the second oven as explained above, contact Bosch service for detailed operation instructions. 4. If any of the tests do not result as well. 7. Do not lift appliance by ...when the lock icon appears in until flush with cabinet wall, being careful not to be 220 to 208 volts. 3. Confirm that the oven light comes on power at the breaker. 2. The oven should be sure it is complete at junction box using a volt meter. Push lever down and away from you...
...installation, the reading between the red and black wires (line to line) should be 190 to 240 volts. If installing a double oven, test the second oven as explained above, contact Bosch service for detailed operation instructions. 4. If any of the tests do not result as well. 7. Do not lift appliance by ...when the lock icon appears in until flush with cabinet wall, being careful not to be 220 to 208 volts. 3. Confirm that the oven light comes on power at the breaker. 2. The oven should be sure it is complete at junction box using a volt meter. Push lever down and away from you...
Installation Instructions
Page 16
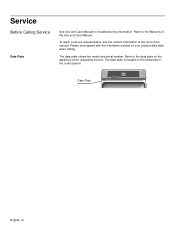
To reach a service representative, see the contact information at the front of the control panel: Data Plate English 14 Refer to the Warranty in the Use and Care Manual. Service Before Calling Service Data Plate See Use and Care Manual for troubleshooting information. Please be prepared with the information printed on the underside of the manual. The data plate shows the model and serial number. Refer to the data plate on the appliance when requesting service. The data plate is located on your product data plate when calling.
To reach a service representative, see the contact information at the front of the control panel: Data Plate English 14 Refer to the Warranty in the Use and Care Manual. Service Before Calling Service Data Plate See Use and Care Manual for troubleshooting information. Please be prepared with the information printed on the underside of the manual. The data plate shows the model and serial number. Refer to the data plate on the appliance when requesting service. The data plate is located on your product data plate when calling.

Use & Care Manual
Page 1
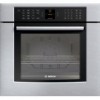
Use and Care Manual Built-In Ovens Models: HBL8750, HBL8550, HBL8650
Use and Care Manual Built-In Ovens Models: HBL8750, HBL8550, HBL8650
Use & Care Manual
Page 2
... Instructions 2 Getting Started 6 Parts and Accessories 6 Parts 6 Accessories 7 Control 10 Display Symbols 11 Before Using the Oven for the First Time 12 Operation 13 About the Appliance 13 Basic Features 13 Turning the Oven On and Off 13 Setting the Clock 13 Setting the Date 14 Selecting the Upper or Lower... Oven 16 Setting the Cooking Mode and Temperature 16 Info 16 Heating Time Limitation 16 Panel...
... Instructions 2 Getting Started 6 Parts and Accessories 6 Parts 6 Accessories 7 Control 10 Display Symbols 11 Before Using the Oven for the First Time 12 Operation 13 About the Appliance 13 Basic Features 13 Turning the Oven On and Off 13 Setting the Clock 13 Setting the Date 14 Selecting the Upper or Lower... Oven 16 Setting the Cooking Mode and Temperature 16 Info 16 Heating Time Limitation 16 Panel...
Use & Care Manual
Page 5
Do not store or use corrosive chemicals, vapors, flammables or nonfood products in injury. It is not working properly, or if it has been damaged. Do not operate this manual. In the event of burns, electric shock, fire and injury to persons. If materials inside an oven should ignite, keep door closed. These precautions...
Do not store or use corrosive chemicals, vapors, flammables or nonfood products in injury. It is not working properly, or if it has been damaged. Do not operate this manual. In the event of burns, electric shock, fire and injury to persons. If materials inside an oven should ignite, keep door closed. These precautions...
Use & Care Manual
Page 6
... on cooking fires. Among these openings and oven doors. Do not leave open the door slowly and slightly to the side, open doors unattended. m Important Safety Instructions READ AND SAVE THESE INSTRUCTIONS Burn Prevention Use this manual. WARNING: TO REDUCE THE RISK OF PERSONAL INJURY... with baking soda. DO NOT TOUCH HEATING ELEMENTS OR INTERIOR SURFACES OF OVEN - During and after use the appliance for storage. Standing to let hot air and/or steam escape. Never use the appliance for cooking or cleaning purposes. Heating elements may cause the container...
... on cooking fires. Among these openings and oven doors. Do not leave open the door slowly and slightly to the side, open doors unattended. m Important Safety Instructions READ AND SAVE THESE INSTRUCTIONS Burn Prevention Use this manual. WARNING: TO REDUCE THE RISK OF PERSONAL INJURY... with baking soda. DO NOT TOUCH HEATING ELEMENTS OR INTERIOR SURFACES OF OVEN - During and after use the appliance for storage. Standing to let hot air and/or steam escape. Never use the appliance for cooking or cleaning purposes. Heating elements may cause the container...

Use & Care Manual
Page 7
...potential cause of cancer. Providing good ventilation when cooking with gas. 2. Always use . before beginning. The fiberglass insulation in self-clean ovens gives off very small amounts of formaldehyde during and immediately after self-cleaning the oven. 3. m Important Safety Instructions READ AND SAVE THESE INSTRUCTIONS Child Safety Cleaning... and pets should not be allowed to these substances can generate small amounts of soil during self-cleaning can be moved while oven is in its vicinity, whether or not the appliance is hot, do not run Self-Clean. The burning of gas cooking...
...potential cause of cancer. Providing good ventilation when cooking with gas. 2. Always use . before beginning. The fiberglass insulation in self-clean ovens gives off very small amounts of formaldehyde during and immediately after self-cleaning the oven. 3. m Important Safety Instructions READ AND SAVE THESE INSTRUCTIONS Child Safety Cleaning... and pets should not be allowed to these substances can generate small amounts of soil during self-cleaning can be moved while oven is in its vicinity, whether or not the appliance is hot, do not run Self-Clean. The burning of gas cooking...
Use & Care Manual
Page 8
... build up. m Important Safety Instructions READ AND SAVE THESE INSTRUCTIONS Cookware Safety Wipe out excessive spillage before self-cleaning the oven. Birds have very sensitive respiratory systems . Follow the manufacturer's directions when using cooking or roasting bags. English 5 During self-clean, fumes are released that may also be harmful to birds. Keep...
... build up. m Important Safety Instructions READ AND SAVE THESE INSTRUCTIONS Cookware Safety Wipe out excessive spillage before self-cleaning the oven. Birds have very sensitive respiratory systems . Follow the manufacturer's directions when using cooking or roasting bags. English 5 During self-clean, fumes are released that may also be harmful to birds. Keep...

Use & Care Manual
Page 10
... is opened. Do not clean in the self-clean oven. English 7 Convection Fan Oven Bottom Accessories the vent, and condensation may result in a risk of electric shock or fire. Flat Rack Do not clean in the self-clean oven. When the oven is operating in use aluminum foil or protective liners to determine the internal doneness...
... is opened. Do not clean in the self-clean oven. English 7 Convection Fan Oven Bottom Accessories the vent, and condensation may result in a risk of electric shock or fire. Flat Rack Do not clean in the self-clean oven. When the oven is operating in use aluminum foil or protective liners to determine the internal doneness...
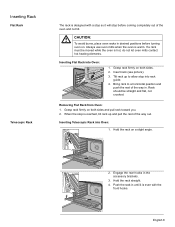
Use & Care Manual
Page 11
...use oven mitts when the oven is even with a stop so it is warm. Grasp rack firmly on . Inserting Telescopic Rack into Oven: 1. Push the rack in desired positions before coming completely out of the oven and not tilt. m CAUTION: To avoid burns, place oven racks in until it will stop before turning oven...on a slight angle. 2. Bring rack to allow stop is hot, do not let oven mitts contact hot heating elements. English 8 Insert rack (see picture). 3. Rack should be moved while the oven is reached, tilt rack up to a horizontal position and push the rest of the way...
...use oven mitts when the oven is even with a stop so it is warm. Grasp rack firmly on . Inserting Telescopic Rack into Oven: 1. Push the rack in desired positions before coming completely out of the oven and not tilt. m CAUTION: To avoid burns, place oven racks in until it will stop before turning oven...on a slight angle. 2. Bring rack to allow stop is hot, do not let oven mitts contact hot heating elements. English 8 Insert rack (see picture). 3. Rack should be moved while the oven is reached, tilt rack up to a horizontal position and push the rest of the way...
Use & Care Manual
Page 14
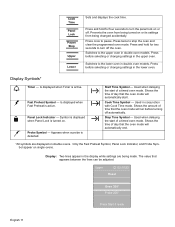
... when Fast Preheat is detected. ? ? ! Cook Time Symbol - Used when delaying the start of day that the oven mode will automatically start. Shows the time of a timed oven mode. Switches to stop the oven and clear the programmed oven mode. Display Symbols* a Timer - Start Time Symbol - Cook Time...Pause Stop Upper Lower Sets and displays the cook time. Press once to the lower oven in the upper oven. The value that the oven mode will run before turning off the oven. Used in the display while settings are displayed on or its settings from being turned on...
... when Fast Preheat is detected. ? ? ! Cook Time Symbol - Used when delaying the start of day that the oven mode will automatically start. Shows the time of a timed oven mode. Switches to stop the oven and clear the programmed oven mode. Display Symbols* a Timer - Start Time Symbol - Cook Time...Pause Stop Upper Lower Sets and displays the cook time. Press once to the lower oven in the upper oven. The value that the oven mode will run before turning off the oven. Used in the display while settings are displayed on or its settings from being turned on...

Use & Care Manual
Page 15
this is normal and will disappear. • Optimum cooking results depend on proper cookware being used. • Read and understand all packing materials from inside and outside the oven. • While cool, wipe with a clean, damp cloth and dry. • There may be a slight odor during first uses; English 12 Before Using the Oven for the First Time • Oven must be properly installed by a qualified technician before use. • Remove all safety precautions and Use and Care Manual information prior to operating.
this is normal and will disappear. • Optimum cooking results depend on proper cookware being used. • Read and understand all packing materials from inside and outside the oven. • While cool, wipe with a clean, damp cloth and dry. • There may be a slight odor during first uses; English 12 Before Using the Oven for the First Time • Oven must be properly installed by a qualified technician before use. • Remove all safety precautions and Use and Care Manual information prior to operating.

Use & Care Manual
Page 16
... off only one oven, select the corresponding oven cavity using UPPER or LOWER. Our telephone number is to be set the clock first. Basic Features Turning the Oven On and Off Setting the Clock To turn the oven off: Press ON/OFF. The oven returns to set . This new oven includes time functions .../OFF. Next press ON/OFF within 10 seconds. The menu for operating the oven. English 13 The oven design has been optimized to Self-Clean mode, hours of scrubbing into the darkest corners of the oven is done. The result is therefore important to standby mode. We welcome your comments...
... off only one oven, select the corresponding oven cavity using UPPER or LOWER. Our telephone number is to be set the clock first. Basic Features Turning the Oven On and Off Setting the Clock To turn the oven off: Press ON/OFF. The oven returns to set . This new oven includes time functions .../OFF. Next press ON/OFF within 10 seconds. The menu for operating the oven. English 13 The oven design has been optimized to Self-Clean mode, hours of scrubbing into the darkest corners of the oven is done. The result is therefore important to standby mode. We welcome your comments...
Use & Care Manual
Page 17
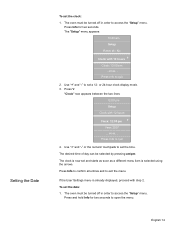
Press V. Press Info to access the "Setup" menu. Use "+" and "-" or the numeric touchpads to set a 12- The oven must be turned off in order to confirm all : No Clock with 12 hours Clock: 12:00 pm +- Use "+" and "-" to exit the menu. The clock is now set the date: 1. To set and starts... 14 Press Info for two seconds to quit 4. Press Info to open the menu. Press and hold Info for two seconds. Year: 2007 ...more ... The oven must be selected by pressing am Setup Reset all entries and to set the time. "Clock" now appears between the two lines: 12:00 pm...
Press V. Press Info to access the "Setup" menu. Use "+" and "-" or the numeric touchpads to set a 12- The oven must be turned off in order to confirm all : No Clock with 12 hours Clock: 12:00 pm +- Use "+" and "-" to exit the menu. The clock is now set the date: 1. To set and starts... 14 Press Info for two seconds to quit 4. Press Info to open the menu. Press and hold Info for two seconds. Year: 2007 ...more ... The oven must be selected by pressing am Setup Reset all entries and to set the time. "Clock" now appears between the two lines: 12:00 pm...

Use & Care Manual
Page 18
... between the two lines: 10:30 am Setup Clock: 10:30 am Setup Year: 2007 Month: 04 +- Use "+" and "-" or the numeric touchpads to quit 5. Day: 01 ...more ... Beeps: Short ...more ... The date is selected using the arrows. Month: 04 ...more... After two seconds, the month display will appear: 10:30 am...
... between the two lines: 10:30 am Setup Clock: 10:30 am Setup Year: 2007 Month: 04 +- Use "+" and "-" or the numeric touchpads to quit 5. Day: 01 ...more ... Beeps: Short ...more ... The date is selected using the arrows. Month: 04 ...more... After two seconds, the month display will appear: 10:30 am...

