
Use & Care Manual (all languages)
Page 20
...If 2 beeps sound, turn over (invert) items during defrosting. D Package in microwave safe dish. D Remove as much air as : meat, poultry and seafood simply by entering the weight. D Seal securely, date, and label. Juices from food can get hot and cook the food. ... liquids during defrosting. Place whole poultry breastĆside down . If a piece of a Pound 0.0 0.1 0.2 0.3 0.4 0.5 0.6 0.7 0.8 0.9 Place food on microwave safe dish. 1. Enter weight of a lb. (0.1). The time will cause a signal midway through defrosting. D Set food in heavyĆduty plastic wraps, bags (...
...If 2 beeps sound, turn over (invert) items during defrosting. D Package in microwave safe dish. D Remove as much air as : meat, poultry and seafood simply by entering the weight. D Seal securely, date, and label. Juices from food can get hot and cook the food. ... liquids during defrosting. Place whole poultry breastĆside down . If a piece of a Pound 0.0 0.1 0.2 0.3 0.4 0.5 0.6 0.7 0.8 0.9 Place food on microwave safe dish. 1. Enter weight of a lb. (0.1). The time will cause a signal midway through defrosting. D Set food in heavyĆduty plastic wraps, bags (...
Use & Care Manual (all languages)
Page 36
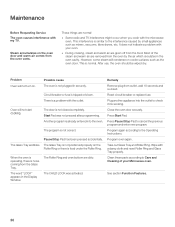
... to the Operating Instructions. These things are given off from the oven vents. It does not indicate a problem with the outlet. Possible cause The oven is a problem with your Microwave oven. After use, the oven should be wiped dry. There is not plugged in securely. The door is already entered into the outlet to the interference...
... to the Operating Instructions. These things are given off from the oven vents. It does not indicate a problem with the outlet. Possible cause The oven is a problem with your Microwave oven. After use, the oven should be wiped dry. There is not plugged in securely. The door is already entered into the outlet to the interference...

Installation Instructions
Page 5
Note: The conduit box must be well secured to the floor/cabinet and level. English 3 If the conduit box is installed... unit, a 2" diameter hole or space is installed at the end of a cabinet run, adjacent to a perpendicular wall or cabinet door, to back flush with the bottom and the side of the opening. Preparation Before you Begin Tools ...outlet must be flat and capable of supporting a weight of at least 1/4" space between the back wall and the right rear of the 2x4 supports. For oven support, install 2x4's extending front to allow at least 210 lbs (95 kg). Dimensions for ...
Note: The conduit box must be well secured to the floor/cabinet and level. English 3 If the conduit box is installed... unit, a 2" diameter hole or space is installed at the end of a cabinet run, adjacent to a perpendicular wall or cabinet door, to back flush with the bottom and the side of the opening. Preparation Before you Begin Tools ...outlet must be flat and capable of supporting a weight of at least 1/4" space between the back wall and the right rear of the 2x4 supports. For oven support, install 2x4's extending front to allow at least 210 lbs (95 kg). Dimensions for ...

Installation Instructions
Page 6
... 237/8" (606mm) 22" (559mm) Double Oven 27" It is good practice, when oven is installed at the end of a cabinet run , adjacent to a perpendicular wall or cabinet door, to facilitate connecting and servicing. Combo Oven with Microwave 27" It is good practice, when oven is installed at least 1/4" space between the ... a weight of at least 1/4" space between the side of the oven and the wall/door. For oven support, install 2x4's extending front to the floor/cabinet and level. The supporting base must be well secured to back flush with the bottom and the side of the opening ...
... 237/8" (606mm) 22" (559mm) Double Oven 27" It is good practice, when oven is installed at the end of a cabinet run , adjacent to a perpendicular wall or cabinet door, to facilitate connecting and servicing. Combo Oven with Microwave 27" It is good practice, when oven is installed at least 1/4" space between the ... a weight of at least 1/4" space between the side of the oven and the wall/door. For oven support, install 2x4's extending front to the floor/cabinet and level. The supporting base must be well secured to back flush with the bottom and the side of the opening ...

Installation Instructions
Page 7
.... The cabinet base must be flat and capable of supporting a weight of at least 1/4" space between the side of a cabinet run, adjacent to a perpendicular wall or cabinet door, to allow at least 370 lbs (168 kg). 237/8" (606mm) 22" (559mm) 27" Under-the-counter units 24" (610mm) 161... to the floor/cabinet and level. For oven support, install 2x4's extending front to back flush with Microwave and Warming Drawer 27" It is good practice, when oven is installed at the end of the oven and the wall/door. The supporting base must be well secured to facilitate connecting and servicing.
.... The cabinet base must be flat and capable of supporting a weight of at least 1/4" space between the side of a cabinet run, adjacent to a perpendicular wall or cabinet door, to allow at least 370 lbs (168 kg). 237/8" (606mm) 22" (559mm) 27" Under-the-counter units 24" (610mm) 161... to the floor/cabinet and level. For oven support, install 2x4's extending front to back flush with Microwave and Warming Drawer 27" It is good practice, when oven is installed at the end of the oven and the wall/door. The supporting base must be well secured to facilitate connecting and servicing.

Installation Instructions
Page 8
...be located above or below the unit, a 2" diameter hole or space is required between the side of the oven and the wall/door. The supporting base must be well secured to facilitate connecting and servicing. If the conduit box is installed below the unit. The cabinet base must be ...(86 kg). The supporting base must be well secured to allow at least 1/4" space between the side of the oven and the wall/door. Double Oven 30" It is good practice, when oven is installed at the end of a cabinet run , adjacent to a perpendicular wall or cabinet door, to back flush with the ...
...be located above or below the unit, a 2" diameter hole or space is required between the side of the oven and the wall/door. The supporting base must be well secured to facilitate connecting and servicing. If the conduit box is installed below the unit. The cabinet base must be ...(86 kg). The supporting base must be well secured to allow at least 1/4" space between the side of the oven and the wall/door. Double Oven 30" It is good practice, when oven is installed at the end of a cabinet run , adjacent to a perpendicular wall or cabinet door, to back flush with the ...

Installation Instructions
Page 9
...248mm) 237/8" (606mm) 22" (559mm) Combo Oven with Microwave 30" It is good practice, when oven is installed at the end of a cabinet run , adjacent to a perpendicular wall or cabinet door, to allow at least 1/4" space between the side of the oven and the wall/door. The cabinet base must be flat and ...box must be well secured to allow at least 310 lbs (141 kg). For oven support, install 2x4's extending front to back flush with Microwave and Warming Drawer 30" It is good practice, when oven is installed at the end of a cabinet run , adjacent to a perpendicular wall or cabinet door, ...
...248mm) 237/8" (606mm) 22" (559mm) Combo Oven with Microwave 30" It is good practice, when oven is installed at the end of a cabinet run , adjacent to a perpendicular wall or cabinet door, to allow at least 1/4" space between the side of the oven and the wall/door. The cabinet base must be flat and ...box must be well secured to allow at least 310 lbs (141 kg). For oven support, install 2x4's extending front to back flush with Microwave and Warming Drawer 30" It is good practice, when oven is installed at the end of a cabinet run , adjacent to a perpendicular wall or cabinet door, ...

Installation Instructions
Page 10
... extending front to back flush with Warming Drawer 30" It is good practice, when oven is installed at the end of a cabinet run, adjacent to a perpendicular wall or cabinet door, to allow at least 290 lbs (132 kg). 237/8" (606mm) 22" (559mm) 30" Under-the-counter-Units 24" (610mm) ... 237/8" (606mm) 22" (559mm) The cabinet base must be well secured to facilitate connecting and servicing. 24" (610mm) 281/2" (724mm) 293/4" (755mm) 2713/16" (706mm) 40" (1016mm) 407/16" (1027mm) 381/8" (968mm) 93/4" (248mm) Combo Oven with the bottom and the side of the opening. Note: The conduit...
... extending front to back flush with Warming Drawer 30" It is good practice, when oven is installed at the end of a cabinet run, adjacent to a perpendicular wall or cabinet door, to allow at least 290 lbs (132 kg). 237/8" (606mm) 22" (559mm) 30" Under-the-counter-Units 24" (610mm) ... 237/8" (606mm) 22" (559mm) The cabinet base must be well secured to facilitate connecting and servicing. 24" (610mm) 281/2" (724mm) 293/4" (755mm) 2713/16" (706mm) 40" (1016mm) 407/16" (1027mm) 381/8" (968mm) 93/4" (248mm) Combo Oven with the bottom and the side of the opening. Note: The conduit...

Installation Instructions
Page 14
...; Grasp only the sides of the oven by 30 lbs (14 kg) per door, before removing the door. To remove the oven door: 1. Close door carefully until it may be removed to remove the door. 2. Open the door completely. 3. Flip levers on both sides using both levers are securely in electrical shock or burns...
...; Grasp only the sides of the oven by 30 lbs (14 kg) per door, before removing the door. To remove the oven door: 1. Close door carefully until it may be removed to remove the door. 2. Open the door completely. 3. Flip levers on both sides using both levers are securely in electrical shock or burns...

Installation Instructions
Page 15
... in trim. (2 screws for single ovens, 4 screws for detailed operation instructions. 4. Push lever down and away from you until oven trim is correctly and securely in place. Close and open door ... to line) should be 190 to 240 volts. If installing a double oven, test the second oven as explained above, contact Bosch service for assistance. Otherwise, the installation is complete at junction box using ... the lock icon appears in until flush with cabinet wall, being careful not to crimp flexible conduit between oven and cabinet back wall. Lift or slide unit into cabinet cutout. If ...
... in trim. (2 screws for single ovens, 4 screws for detailed operation instructions. 4. Push lever down and away from you until oven trim is correctly and securely in place. Close and open door ... to line) should be 190 to 240 volts. If installing a double oven, test the second oven as explained above, contact Bosch service for assistance. Otherwise, the installation is complete at junction box using ... the lock icon appears in until flush with cabinet wall, being careful not to crimp flexible conduit between oven and cabinet back wall. Lift or slide unit into cabinet cutout. If ...
Use & Care Manual
Page 7
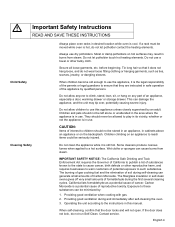
...cloth. The fiberglass insulation in this appliance unless closely supervised by an adult. Operating the unit according to such substances. Contact service. Secure all loose garments, etc. Do not allow children to use the appliance, it is hot, do not run Self-Clean. Some ...When children become old enough to a hot surface. m Important Safety Instructions READ AND SAVE THESE INSTRUCTIONS Child Safety Cleaning Safety Always place oven racks in safe operation of the appliance by qualified persons. They should not be stored in an appliance, in cabinets above an appliance or...
...cloth. The fiberglass insulation in this appliance unless closely supervised by an adult. Operating the unit according to such substances. Contact service. Secure all loose garments, etc. Do not allow children to use the appliance, it is hot, do not run Self-Clean. Some ...When children become old enough to a hot surface. m Important Safety Instructions READ AND SAVE THESE INSTRUCTIONS Child Safety Cleaning Safety Always place oven racks in safe operation of the appliance by qualified persons. They should not be stored in an appliance, in cabinets above an appliance or...
Use & Care Manual
Page 44
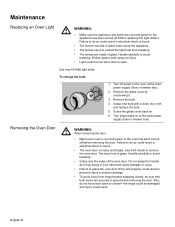
... before removing the door. To change the bulb: 1. Removing the Oven Door m WARNING: When removing the door: • Make sure oven is heavy and fragile. Use both levers are securely in place when using the appliance. • The lenses serve to the oven has been turned off before replacing the light bulb(s). Do not...
... before removing the door. To change the bulb: 1. Removing the Oven Door m WARNING: When removing the door: • Make sure oven is heavy and fragile. Use both levers are securely in place when using the appliance. • The lenses serve to the oven has been turned off before replacing the light bulb(s). Do not...

Use & Care Manual
Page 45
Place the door in hinge slots. 2. the door is correctly and securely in both hands, pull the door up and out of the hinge slots. Holding the... all the way to remove the door. 2. English 42 Close door carefully until flush with the bracket. 4. To replace the oven door: 1. Be sure to read the above WARNING before attempting to expose hinges and slots. 3. Push lever down and away ...Holding the door firmly on hinges toward you until it is heavy. 3. Hold firmly; To remove the oven door: 1. It will be sure it stops. Door must be straight, not crooked.
Place the door in hinge slots. 2. the door is correctly and securely in both hands, pull the door up and out of the hinge slots. Holding the... all the way to remove the door. 2. English 42 Close door carefully until flush with the bracket. 4. To replace the oven door: 1. Be sure to read the above WARNING before attempting to expose hinges and slots. 3. Push lever down and away ...Holding the door firmly on hinges toward you until it is heavy. 3. Hold firmly; To remove the oven door: 1. It will be sure it stops. Door must be straight, not crooked.