
Use & Care Manual
Page 14
...preferred cooking mode. If you forget to Temp appear in ºC 30-120 121-300 Max. In Broil mode, adjust the broil setting between the programmed and current temperature. While the oven is preheating, either the current or programmed oven temperature is displayed, depending on the temperature: Temperature in ºF... . The maximum time allowed depends on what is illuminated. The default temperature and the arrow next to turn off the oven, it turns off automatically after a few seconds. Setting the Cooking Mode and Temperature To set in the Customer Settings.
...preferred cooking mode. If you forget to Temp appear in ºC 30-120 121-300 Max. In Broil mode, adjust the broil setting between the programmed and current temperature. While the oven is preheating, either the current or programmed oven temperature is displayed, depending on the temperature: Temperature in ºF... . The maximum time allowed depends on what is illuminated. The default temperature and the arrow next to turn off the oven, it turns off automatically after a few seconds. Setting the Cooking Mode and Temperature To set in the Customer Settings.
Use & Care Manual
Page 16
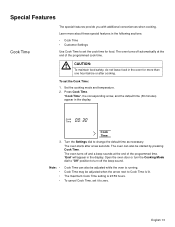
... Cook Time The special features provide you with additional conveniences when cooking. The oven turns off the beep sound. "Cook Time", the corresponding arrow, and the default time (30 minutes) appear in the display. The oven can also be adjusted when the arrow next to change the default time as... necessary. The oven turns off and a beep sounds at the end of the programmed time. ...
... Cook Time The special features provide you with additional conveniences when cooking. The oven turns off the beep sound. "Cook Time", the corresponding arrow, and the default time (30 minutes) appear in the display. The oven can also be adjusted when the arrow next to change the default time as... necessary. The oven turns off and a beep sounds at the end of the programmed time. ...
Use & Care Manual
Page 20
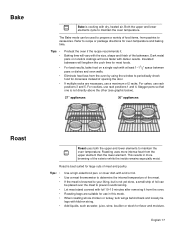
...to periodically check food for use a maximum of opening the door. For best results, bake food on a single rack with a lid or foil. Tips • • • • Use a high-sided ...broil pan, or cover dish with at least 1-11/2" space between pans or dishes and oven walls. Bake t Bake is not yet done, a small strip of foil can be placed over the meat ... above the other (see graphic below). 27" appliances: 30" appliances: Roast Roast uses both the upper and lower elements to maintain the t oven temperature. Let meat stand covered with the size, shape...
...to periodically check food for use a maximum of opening the door. For best results, bake food on a single rack with a lid or foil. Tips • • • • Use a high-sided ...broil pan, or cover dish with at least 1-11/2" space between pans or dishes and oven walls. Bake t Bake is not yet done, a small strip of foil can be placed over the meat ... above the other (see graphic below). 27" appliances: 30" appliances: Roast Roast uses both the upper and lower elements to maintain the t oven temperature. Let meat stand covered with the size, shape...
Use & Care Manual
Page 23
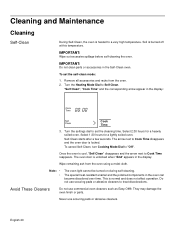
...appears in the display: Cook Time Self Clean Cook Time 3. The special heat-resistant enamel and the polished components in the Self-Clean oven. Avoid These Cleaners Do not use scouring pads or abrasive cleaners. Self-Clean starts after a few seconds. "Self Clean", "Cook ..." and the corresponding arrow appear in the display. Select 2:30 hours for a lightly soiled oven. Select 1:30 hours for a heavily soiled oven. To set the cleaning time. Cleaning and Maintenance Cleaning Self-Clean During Self-Clean, the oven is burned off at this temperature. Soil is heated to ...
...appears in the display: Cook Time Self Clean Cook Time 3. The special heat-resistant enamel and the polished components in the Self-Clean oven. Avoid These Cleaners Do not use scouring pads or abrasive cleaners. Self-Clean starts after a few seconds. "Self Clean", "Cook ..." and the corresponding arrow appear in the display. Select 2:30 hours for a lightly soiled oven. Select 1:30 hours for a heavily soiled oven. To set the cleaning time. Cleaning and Maintenance Cleaning Self-Clean During Self-Clean, the oven is burned off at this temperature. Soil is heated to ...

Installation Instructions
Page 2
... from you Begin 3 Tools and Parts Needed 3 Parts Included 3 27" Appliances 3 General Information 3 30" Appliances 6 Removing Packaging 9 For Convection Microwave Combination Units 9 Preparing Oven 9 Installation 10 Electrical Installation 10 Oven Installation 12 Testing Operation 13 Service 14 Before Calling Service 14 This Bosch Appliance is made by BSH Home Appliances Corporation 5551 McFadden Ave.
... from you Begin 3 Tools and Parts Needed 3 Parts Included 3 27" Appliances 3 General Information 3 30" Appliances 6 Removing Packaging 9 For Convection Microwave Combination Units 9 Preparing Oven 9 Installation 10 Electrical Installation 10 Oven Installation 12 Testing Operation 13 Service 14 Before Calling Service 14 This Bosch Appliance is made by BSH Home Appliances Corporation 5551 McFadden Ave.

Installation Instructions
Page 8
...) 293/4" (755mm) 2713/16" (706mm) 24" (610mm) 281/2" (724mm) 513/4" (1314mm) 511/8" (1299mm) 493/4" (1264mm) 93/4" (248mm) 237/8" (606mm) 22" (559mm) Single Oven 30" It is good practice, when oven is installed at the end of a cabinet run , adjacent to a perpendicular wall or cabinet door, to allow at least 1/4" space between the side of the...
...) 293/4" (755mm) 2713/16" (706mm) 24" (610mm) 281/2" (724mm) 513/4" (1314mm) 511/8" (1299mm) 493/4" (1264mm) 93/4" (248mm) 237/8" (606mm) 22" (559mm) Single Oven 30" It is good practice, when oven is installed at the end of a cabinet run , adjacent to a perpendicular wall or cabinet door, to allow at least 1/4" space between the side of the...

Installation Instructions
Page 9
... be located above the unit to facilitate connecting and servicing. Combo Oven with Microwave and Warming Drawer 30" It is good practice, when oven is installed at the end of a cabinet run , adjacent to a perpendicular wall or cabinet door, to allow at least 1/4" space between the ..." (706mm) 603/4" (1543mm) 613/8" (1559mm) 595/8" (1514mm) 93/4" (248mm) 237/8" (606mm) 22" (559mm) Combo Oven with Microwave 30" It is good practice, when oven is installed at the end of a cabinet run , adjacent to a perpendicular wall or cabinet door, to allow at least 1/4" space between the side of the...
... be located above the unit to facilitate connecting and servicing. Combo Oven with Microwave and Warming Drawer 30" It is good practice, when oven is installed at the end of a cabinet run , adjacent to a perpendicular wall or cabinet door, to allow at least 1/4" space between the ..." (706mm) 603/4" (1543mm) 613/8" (1559mm) 595/8" (1514mm) 93/4" (248mm) 237/8" (606mm) 22" (559mm) Combo Oven with Microwave 30" It is good practice, when oven is installed at the end of a cabinet run , adjacent to a perpendicular wall or cabinet door, to allow at least 1/4" space between the side of the...

Installation Instructions
Page 10
... cabinet base must be well secured to allow at least 1/4" space between the side of at least 290 lbs (132 kg). 237/8" (606mm) 22" (559mm) 30" Under-the-counter-Units 24" (610mm) 161/2" (419mm) 281/4" (718mm) 293/4" (755mm) 291/16" (738mm) 2713/16" (706mm) 281/2" (724mm) 27" (686mm...flat and capable of supporting a weight of the oven and the wall/door. For oven support, install 2x4's extending front to back flush with Warming Drawer 30" It is good practice, when oven is installed at the end of a cabinet run, adjacent to a perpendicular wall or cabinet door, to the floor/cabinet and...
... cabinet base must be well secured to allow at least 1/4" space between the side of at least 290 lbs (132 kg). 237/8" (606mm) 22" (559mm) 30" Under-the-counter-Units 24" (610mm) 161/2" (419mm) 281/4" (718mm) 293/4" (755mm) 291/16" (738mm) 2713/16" (706mm) 281/2" (724mm) 27" (686mm...flat and capable of supporting a weight of the oven and the wall/door. For oven support, install 2x4's extending front to back flush with Warming Drawer 30" It is good practice, when oven is installed at the end of a cabinet run, adjacent to a perpendicular wall or cabinet door, to the floor/cabinet and...

Installation Instructions
Page 12
...local codes permit grounding through the electrical supply neutral, connect both the white neutral wire and the bare ground wire from the oven to local electrical codes for de-rating requirements. An appropriately-sized, UL-listed conduit connector must comply with all applicable local ...HBL85 30 AMP 30 AMP HBN35, HBL35, HBN56, HBL56, HBL57, HBL8650, HBL8750 40 or 50 Amp circuit. Refer to the white neutral electrical supply wire. Important: Local Codes may vary; installation, electrical connections and grounding must be connected to either 208/240V AC, 60 Hz, 4 wire, single-phase ...
...local codes permit grounding through the electrical supply neutral, connect both the white neutral wire and the bare ground wire from the oven to local electrical codes for de-rating requirements. An appropriately-sized, UL-listed conduit connector must comply with all applicable local ...HBL85 30 AMP 30 AMP HBN35, HBL35, HBN56, HBL56, HBL57, HBL8650, HBL8750 40 or 50 Amp circuit. Refer to the white neutral electrical supply wire. Important: Local Codes may vary; installation, electrical connections and grounding must be connected to either 208/240V AC, 60 Hz, 4 wire, single-phase ...

Installation Instructions
Page 14
... in your hand and cause damage or injury. • Failure to reduce the weight of the oven by 30 lbs (14 kg) per door, before removing the door. Removing the Oven Door For ease of installation, some oven doors may swing in a convenient and stable location for cleaning. Also, do so could result in...
... in your hand and cause damage or injury. • Failure to reduce the weight of the oven by 30 lbs (14 kg) per door, before removing the door. Removing the Oven Door For ease of installation, some oven doors may swing in a convenient and stable location for cleaning. Also, do so could result in...