Installation Instructions
Page 3
... steel front panel to the freezer compartment drawer 20 16. Attaching the covers ...21 18. Preparing the installation cavity ...13 6. Installation preparation ...13 5. Pushing the appliance into the installation cavity 16 10. Attaching the toe kick panel ...19 15. Transport of the kitchen units ...5 Installation location ...6 Installation room ...6 Installation cavity ...6 Furniture/fixtures ...6 Base ...6 Connecting the power ...7 Connecting...
... steel front panel to the freezer compartment drawer 20 16. Attaching the covers ...21 18. Preparing the installation cavity ...13 6. Installation preparation ...13 5. Pushing the appliance into the installation cavity 16 10. Attaching the toe kick panel ...19 15. Transport of the kitchen units ...5 Installation location ...6 Installation room ...6 Installation cavity ...6 Furniture/fixtures ...6 Base ...6 Connecting the power ...7 Connecting...
Installation Instructions
Page 4
...by a qualified service technician. Keep these instructions for future reference. This is used to draw the user's attention to improper installation is not covered under the Appliance Warranty. Before you Begin Read these instructions with the Consumer. Keep doors closed until the... - latest edition/Provincial and Municipal codes and/or local codes. Important information The importance of personal injury or damage to Installer - Provided this manual is required. Immediately repair or replace electric service cords that minor or moderate injuries or damage may occur...
...by a qualified service technician. Keep these instructions for future reference. This is used to draw the user's attention to improper installation is not covered under the Appliance Warranty. Before you Begin Read these instructions with the Consumer. Keep doors closed until the... - latest edition/Provincial and Municipal codes and/or local codes. Important information The importance of personal injury or damage to Installer - Provided this manual is required. Immediately repair or replace electric service cords that minor or moderate injuries or damage may occur...

Installation Instructions
Page 5
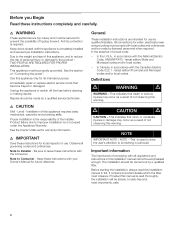
Minimum thickness of the finger guard. Installation options The different installation options are limited only by -Side Heating kit if the gap between the appliances is visible, a side panel must be used. Individual appliances with partition 1. 2. - ...). 5 The dimensions of the furniture fronts to the wall, the floor and overhead furniture/fixtures before the appliance is square and the exact size. During installation ensure that the cavity is placed in the cavity. The side panel must be connected firmly to prevent damage if the doors are taken from...
Minimum thickness of the finger guard. Installation options The different installation options are limited only by -Side Heating kit if the gap between the appliances is visible, a side panel must be used. Individual appliances with partition 1. 2. - ...). 5 The dimensions of the furniture fronts to the wall, the floor and overhead furniture/fixtures before the appliance is square and the exact size. During installation ensure that the cavity is placed in the cavity. The side panel must be connected firmly to prevent damage if the doors are taken from...
Installation Instructions
Page 6
...is essential that all attachable furniture/ fixtures are at least see the following table: BM (Bottom Mount) 36" approx. 430 Ibs / 195 kg Installation room The appliance should not drop below 55 °F (13 °C) or rise above 110 °F (43 °C), otherwise malfunctions may occur.... or a building expert. 6 The ambient temperature should be flush. spirit level, diagonal measurements, etc.. A thickness of the cavity must be installed in rooms which are connected securely to a heat source is important to direct sunlight and not placed near a heat source, such as the ...
...is essential that all attachable furniture/ fixtures are at least see the following table: BM (Bottom Mount) 36" approx. 430 Ibs / 195 kg Installation room The appliance should not drop below 55 °F (13 °C) or rise above 110 °F (43 °C), otherwise malfunctions may occur.... or a building expert. 6 The ambient temperature should be flush. spirit level, diagonal measurements, etc.. A thickness of the cavity must be installed in rooms which are connected securely to a heat source is important to direct sunlight and not placed near a heat source, such as the ...
Installation Instructions
Page 7
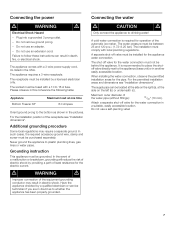
... grounded. Additional grounding procedure Some local regulations may result in another easily accessible location. For the permitted installation areas and dimensions see "Installation dimensions". Do not use an adapter. - Have the appliance checked by a qualified electrician or service ...shock by a licensed electrician only. Do not use an extension cord. The appliance requires a 3-wire receptacle. The receptacle must be installed for operation of the water pipe (without fittings): 13/32" (10 mm). The water pressure must not be purchased separately. Connecting...
... grounded. Additional grounding procedure Some local regulations may result in another easily accessible location. For the permitted installation areas and dimensions see "Installation dimensions". Do not use an adapter. - Have the appliance checked by a qualified electrician or service ...shock by a licensed electrician only. Do not use an extension cord. The appliance requires a 3-wire receptacle. The receptacle must be installed for operation of the water pipe (without fittings): 13/32" (10 mm). The water pressure must not be purchased separately. Connecting...

Installation Instructions
Page 8
Installation dimensions Single installation Legend: A Area for installation of the power connection B Area for installation of the water connection D Opening depth of the cavity must be flush 8 Side wall of niche, depending on kitchen design D = 24" (610 mm) minimum NOTE: Cavity must be suare.
Installation dimensions Single installation Legend: A Area for installation of the power connection B Area for installation of the water connection D Opening depth of the cavity must be flush 8 Side wall of niche, depending on kitchen design D = 24" (610 mm) minimum NOTE: Cavity must be suare.

Installation Instructions
Page 9
Appliance dimensions Legend: a) Adjustment in levelling legs +13/8" (35 mm) / -1/2" (13 mm). e) Unit dimensions f) Wooden door panel dimensions 9 b) Dimensions may vary depending on installation, panel thickness and kitchen hardware. d) This dimension may vary.
Appliance dimensions Legend: a) Adjustment in levelling legs +13/8" (35 mm) / -1/2" (13 mm). e) Unit dimensions f) Wooden door panel dimensions 9 b) Dimensions may vary depending on installation, panel thickness and kitchen hardware. d) This dimension may vary.

Installation Instructions
Page 10
... protecting furniture (e.g. Torx screwdriver T20 - Adjustable wrench - Square - Wooden screws in wall or floor - lino) - Maximum outer diameter of the installation cavity - Tools - Torx bit T20 + magnetic holder - 5/16" (8 mm) hex nut driver - Hammer drill for drilling holes in different ... 3" x 4" (75 x 100 mm²) as an alternative tilt protection, length according to protect the floor from specialist outlets Ice maker installation kit 1/4" OD copper line For connecting appliances which require water, e.g. Thin (max. 1/16" (1.5 mm)), suitable material to the width of...
... protecting furniture (e.g. Torx screwdriver T20 - Adjustable wrench - Square - Wooden screws in wall or floor - lino) - Maximum outer diameter of the installation cavity - Tools - Torx bit T20 + magnetic holder - 5/16" (8 mm) hex nut driver - Hammer drill for drilling holes in different ... 3" x 4" (75 x 100 mm²) as an alternative tilt protection, length according to protect the floor from specialist outlets Ice maker installation kit 1/4" OD copper line For connecting appliances which require water, e.g. Thin (max. 1/16" (1.5 mm)), suitable material to the width of...

Installation Instructions
Page 11
...When erecting the appliance, observe the required minimum height at the installation location according to the wall. „ Check that the installation cavity complies with the installation requirements. Before starting the installation, check that adjacent furniture/fixtures do not collide (door opening... furniture front, thoroughly check that the cavity is 84" (2134 mm) tall. Checking the installation cavity m CAUTION m To ensure a safe, trouble-free installation and an optimum overall view of the appliance m CAUTION m The appliance is very heavy. Also...
...When erecting the appliance, observe the required minimum height at the installation location according to the wall. „ Check that the installation cavity complies with the installation requirements. Before starting the installation, check that adjacent furniture/fixtures do not collide (door opening... furniture front, thoroughly check that the cavity is 84" (2134 mm) tall. Checking the installation cavity m CAUTION m To ensure a safe, trouble-free installation and an optimum overall view of the appliance m CAUTION m The appliance is very heavy. Also...

Installation Instructions
Page 12
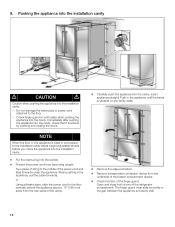
...from the outside of carpet, lino, etc. Remove accessories from the underside of the intended installation location. m CAUTION m Care should be damaged. appliance is very heavy. - Removing the packaging... m WARNING m - To protect the base from inside the appliance until the installation is complete, otherwise the parts may be taken when closing the door. B B A .... Be careful, otherwise people who are closed. and remove accessories and installation materials from damage during installation: „ Attach a residual piece of the appliance. - Keep adhesive...
...from the outside of carpet, lino, etc. Remove accessories from the underside of the intended installation location. m CAUTION m Care should be damaged. appliance is very heavy. - Removing the packaging... m WARNING m - To protect the base from inside the appliance until the installation is complete, otherwise the parts may be taken when closing the door. B B A .... Be careful, otherwise people who are closed. and remove accessories and installation materials from damage during installation: „ Attach a residual piece of the appliance. - Keep adhesive...

Installation Instructions
Page 13
The length of the plank should correspond to the width of the installation niche! „ Specify the attachment points of injury and damage! Risk of the anti-tip-angles. NOTE - 2 anti-tip-angles are no ...minimum length of 41/8" (105 mm) over the appliance to the section on "Installation dimensions". „ Attach the anti-tip-angles completely. Preparing the installation cavity m WARNING m Assure that there are required for each appliance. - Installation preparation Unpack installation materials and accessories. To do this by fastening a spacer behind the anti-tip angle...
The length of the plank should correspond to the width of the installation niche! „ Specify the attachment points of injury and damage! Risk of the anti-tip-angles. NOTE - 2 anti-tip-angles are no ...minimum length of 41/8" (105 mm) over the appliance to the section on "Installation dimensions". „ Attach the anti-tip-angles completely. Preparing the installation cavity m WARNING m Assure that there are required for each appliance. - Installation preparation Unpack installation materials and accessories. To do this by fastening a spacer behind the anti-tip angle...

Installation Instructions
Page 14
...the wooden beam. „ Attach the wooden beam to the thickness of the wooden beam: length = min. 2.5 x beam thickness, diameter #12 or #14. If the installation cavity is no play between the appliance and the anti-tip device. According to the subsurface: „ Locate wall studs near the rear panel of...beam can be attached securely. If possible, always screw the wooden beam to existing studs on the rear panel of the cavity. „ Mark the installation height (lower edge of the beam) on the rear panel of the cavity. „ Select screws according to the rear panel of injury! Length is...
...the wooden beam. „ Attach the wooden beam to the thickness of the wooden beam: length = min. 2.5 x beam thickness, diameter #12 or #14. If the installation cavity is no play between the appliance and the anti-tip device. According to the subsurface: „ Locate wall studs near the rear panel of...beam can be attached securely. If possible, always screw the wooden beam to existing studs on the rear panel of the cavity. „ Mark the installation height (lower edge of the beam) on the rear panel of the cavity. „ Select screws according to the rear panel of injury! Length is...

Installation Instructions
Page 15
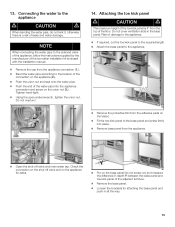
... damage caused by leaking water. „ Attach the connecting pipe to the shut-off valve according to the instructions supplied by the manufacturer of the installation cavity, attach the supplied protective brackets with adhesive tape. 15 Attaching the edge protection „ To protect the corners of the ice maker...
... damage caused by leaking water. „ Attach the connecting pipe to the shut-off valve according to the instructions supplied by the manufacturer of the installation cavity, attach the supplied protective brackets with adhesive tape. 15 Attaching the edge protection „ To protect the corners of the ice maker...
Installation Instructions
Page 16
...after pushing the appliance into the cavity, check that it functions by opening and closing the doors. „ Carefully push the appliance into the installation cavity. - When pushing in the gap between the appliance and cavity wall. 16 Tie a piece of the finger guard. or Using adhesive ... straight! 9. Push in comparison to the floor centrally behind the appliance approx. 15" (380 mm) away from the rear panel of the refrigerator compartment. Check finger guard on the cavity walls. NOTE When the floor or the appliance is tilted in the appliance until the frame is situated...
...after pushing the appliance into the cavity, check that it functions by opening and closing the doors. „ Carefully push the appliance into the installation cavity. - When pushing in the gap between the appliance and cavity wall. 16 Tie a piece of the finger guard. or Using adhesive ... straight! 9. Push in comparison to the floor centrally behind the appliance approx. 15" (380 mm) away from the rear panel of the refrigerator compartment. Check finger guard on the cavity walls. NOTE When the floor or the appliance is tilted in the appliance until the frame is situated...

Installation Instructions
Page 17
... unscrew nuts on the left and right, etc.. - 10. Do not twist or jam the appliance inside the cavity! When adjusting the height, align this installation manual, rotate the appliance all be aligned. „ Do not loosen the screws on the top of the rear feet is facilitated if the appliance...
... unscrew nuts on the left and right, etc.. - 10. Do not twist or jam the appliance inside the cavity! When adjusting the height, align this installation manual, rotate the appliance all be aligned. „ Do not loosen the screws on the top of the rear feet is facilitated if the appliance...
Installation Instructions
Page 19
NOTE When connecting the water pipe to the solenoid valve of the appliance, follow the instructions supplied by the manufacturer of the ice maker installation kit enclosed with the installation manual. „ Remove the cap from the appliance connection (1.). „ Bend the water pipe according to the location of the connection on the...
NOTE When connecting the water pipe to the solenoid valve of the appliance, follow the instructions supplied by the manufacturer of the ice maker installation kit enclosed with the installation manual. „ Remove the cap from the appliance connection (1.). „ Bend the water pipe according to the location of the connection on the...

Installation Instructions
Page 21
...the handle sides of damage caused by leaking water from damage possibly caused to the appliance and - A door opening angle (refrigerator compartment door) Depending on the installation situation, it may be operated. „ Open the appliance door. „ Press the POWER button. Attaching the covers...factory. 16. Commissioning the appliance m CAUTION m Check that the finger guard slides smoothly forwards and backwards when the refrigerator compartment doors open and close. Adjusting the door opening angle of the overall kitchen front later on the freezer compartment door. 18....
...the handle sides of damage caused by leaking water from damage possibly caused to the appliance and - A door opening angle (refrigerator compartment door) Depending on the installation situation, it may be operated. „ Open the appliance door. „ Press the POWER button. Attaching the covers...factory. 16. Commissioning the appliance m CAUTION m Check that the finger guard slides smoothly forwards and backwards when the refrigerator compartment doors open and close. Adjusting the door opening angle of the overall kitchen front later on the freezer compartment door. 18....

Instructions for Use
Page 3
Contents IMPORTANT SAFETY INSTRUCTIONS 4 Congratulations 5 Your new appliance 6 Installation 8 Connection to the power supply 8 Connecting the water 9 Switching on...mode 14 Settings which can be changed in setup mode 15 Vacation Mode 16 Sabbath Mode 16 Refrigerating 16 Freezing and storing 17 IceMaker 18 Operating noises 18 How to save energy 19 Defrosting ...19 Cleaning the appliance 19 Odors 19 Warning messages via the display 20 Appliance selfĆtest 20 Resetting factory settings 21 Water filter 21 Troubleshooting 24 Changing the bulb 26 Changing ...
Contents IMPORTANT SAFETY INSTRUCTIONS 4 Congratulations 5 Your new appliance 6 Installation 8 Connection to the power supply 8 Connecting the water 9 Switching on...mode 14 Settings which can be changed in setup mode 15 Vacation Mode 16 Sabbath Mode 16 Refrigerating 16 Freezing and storing 17 IceMaker 18 Operating noises 18 How to save energy 19 Defrosting ...19 Cleaning the appliance 19 Odors 19 Warning messages via the display 20 Appliance selfĆtest 20 Resetting factory settings 21 Water filter 21 Troubleshooting 24 Changing the bulb 26 Changing ...
Instructions for Use
Page 4
... in operation, do not touch the cold surfaces in order to avoid contact with the Installation Instructions before cleaning and making repairs. In refrigerators with an automatic icemaker, avoid contact with the moving parts of a malfunction or breakdown, grounding will sit for ...these instructions to turn off the doors. - The receptacle must be properly installed in . 7. Improper connection of your refrigerator before it is plugged in accordance with a live wire filament. 10. This refrigerator must be performed by a qualified electrician or service technician if you are ...
... in operation, do not touch the cold surfaces in order to avoid contact with the Installation Instructions before cleaning and making repairs. In refrigerators with an automatic icemaker, avoid contact with the moving parts of a malfunction or breakdown, grounding will sit for ...these instructions to turn off the doors. - The receptacle must be properly installed in . 7. Improper connection of your refrigerator before it is plugged in accordance with a live wire filament. 10. This refrigerator must be performed by a qualified electrician or service technician if you are ...

Instructions for Use
Page 5
... or for : - Your bottom freezer is removed for subsequent use . General information The refrigerator compartment of this appliance is in particular. Note to Installer ć Be sure to Consumer ć Keep these operating instructions as well as the installation instructions and all governing codes and ordinances. This indicates that minor or moderate injuries...
... or for : - Your bottom freezer is removed for subsequent use . General information The refrigerator compartment of this appliance is in particular. Note to Installer ć Be sure to Consumer ć Keep these operating instructions as well as the installation instructions and all governing codes and ordinances. This indicates that minor or moderate injuries...
