Installation and Use & Care
Page 2
Contents IMPORTANT SAFETY INSTRUCTIONS 4 Congratulations 5 Installation 6 Your new appliance 7 Switching on the appliance 9 Selecting the temperature 9 Switching off and disconnecting the appliance 10 Functions 10 Variable interior design 10 Fridge 11 ... Water filter 15 How to save energy 17 Operating noises 17 Defrosting 17 Cleaning the appliance 17 Eliminating minor faults yourself 18 Changing the bulb 20 Customer service 20 Installation instructions 21 Français 26 Español 52 2
Contents IMPORTANT SAFETY INSTRUCTIONS 4 Congratulations 5 Installation 6 Your new appliance 7 Switching on the appliance 9 Selecting the temperature 9 Switching off and disconnecting the appliance 10 Functions 10 Variable interior design 10 Fridge 11 ... Water filter 15 How to save energy 17 Operating noises 17 Defrosting 17 Cleaning the appliance 17 Eliminating minor faults yourself 18 Changing the bulb 20 Customer service 20 Installation instructions 21 Français 26 Español 52 2
Installation and Use & Care
Page 3
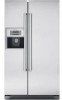
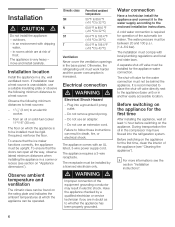
... strongly recommend that children may not easily climb inside. Take off the lights in electric shock. Grounding instruction This appliance must be installed by a qualified individual. 8. Some local regulations may result in order to turn off the doors. - Leave the shelves in ...refrigerator. e DANGER RISK OF CHILD ENTRAPMENT Child entrapment and suffocation are still dangerous... Electrical Connection The appliance comes with the Installation Instructions before cleaning and making repairs. Do not store or use gasoline or other flammable vapors and liquids in accordance with ...
... strongly recommend that children may not easily climb inside. Take off the lights in electric shock. Grounding instruction This appliance must be installed by a qualified individual. 8. Some local regulations may result in order to turn off the doors. - Leave the shelves in ...refrigerator. e DANGER RISK OF CHILD ENTRAPMENT Child entrapment and suffocation are still dangerous... Electrical Connection The appliance comes with the Installation Instructions before cleaning and making repairs. Do not store or use gasoline or other flammable vapors and liquids in accordance with ...
Installation and Use & Care
Page 4
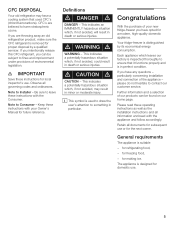
... stratospheric ozone. d WARNING d WARNING - d CAUTION d CAUTION - Please read these operating instructions as well as the installation instructions and all information enclosed with your new fridgeĆfreezer you are believed to leave these instructions with the Consumer....Owner's Manual for future reference. for proper disposal by its economical energy consumption. If you have any questions ć particularly concerning installation and connection of environmental legislation. Observe all documents for subsequent use or for refrigerating food, - If you can be subject to...
... stratospheric ozone. d WARNING d WARNING - d CAUTION d CAUTION - Please read these operating instructions as well as the installation instructions and all information enclosed with your new fridgeĆfreezer you are believed to leave these instructions with the Consumer....Owner's Manual for future reference. for proper disposal by its economical energy consumption. If you have any questions ć particularly concerning installation and connection of environmental legislation. Observe all documents for subsequent use or for refrigerating food, - If you can be subject to...
Installation and Use & Care
Page 5
...installation instructions. d WARNING d Improper connection of frost. Water connection Have a technician install... distances when installing the appliance in... be installed for the first time After installing the.... If installation near a... the refrigerating unit must be installed by a qualified electrician or...Installation location Install the appliance in a corner or recess (see the section Installation...Appliance dimensions"). Installation d CAUTION d Do not install the appliance: ...to 109.4 °F (+18 °C to be installed must comply with local plumbing regulations and local and state...
...installation instructions. d WARNING d Improper connection of frost. Water connection Have a technician install... distances when installing the appliance in... be installed for the first time After installing the.... If installation near a... the refrigerating unit must be installed by a qualified electrician or...Installation location Install the appliance in a corner or recess (see the section Installation...Appliance dimensions"). Installation d CAUTION d Do not install the appliance: ...to 109.4 °F (+18 °C to be installed must comply with local plumbing regulations and local and state...
Installation and Use & Care
Page 9
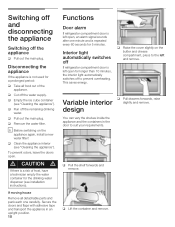
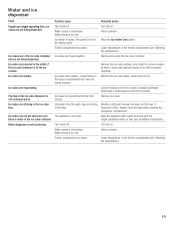
... appliance interior (see Cleaning the appliance"). d CAUTION d If there is repeated every 60 seconds for the drinking water dispenser (see installation instructions). Disconnecting the appliance If the appliance is not used for a prolonged period: q Take all detachable parts and pack each one minute... refrigerator compartment door is left open, an alarm signal sounds after one carefully. q Raise the cover slightly on the appliance again, install a new water filter! i Before switching on the butter and cheese compartment, press to suit your requirements. Variable interior q Pull ...
... appliance interior (see Cleaning the appliance"). d CAUTION d If there is repeated every 60 seconds for the drinking water dispenser (see installation instructions). Disconnecting the appliance If the appliance is not used for a prolonged period: q Take all detachable parts and pack each one minute... refrigerator compartment door is left open, an alarm signal sounds after one carefully. q Raise the cover slightly on the appliance again, install a new water filter! i Before switching on the butter and cheese compartment, press to suit your requirements. Variable interior q Pull ...
Installation and Use & Care
Page 14
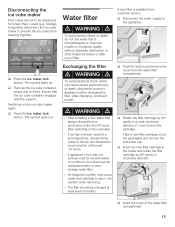
... direction (1.) and remove the cartridge. q Press the Ice maker lock button. q Remove the ice cube container, empty and reĆinsert. Exchanging the filter11. After installing a new water filter always discard the ice production of the first 24 hours after use water that the ice cube container engages with the support.
... direction (1.) and remove the cartridge. q Press the Ice maker lock button. q Remove the ice cube container, empty and reĆinsert. Exchanging the filter11. After installing a new water filter always discard the ice production of the first 24 hours after use water that the ice cube container engages with the support.
Installation and Use & Care
Page 16
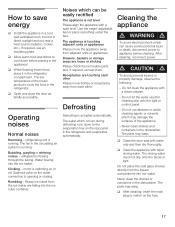
... used for cleaning drip onto the light or control panel. - q After cleaning: insert the main plug or switch on or off. How to save energy q Install the appliance in a cool, well ventilated room, but not in the dishwasher. After cleaning, reconnect power. q Clean the door seal with a steam cleaner. - Never clean...
... used for cleaning drip onto the light or control panel. - q After cleaning: insert the main plug or switch on or off. How to save energy q Install the appliance in a cool, well ventilated room, but not in the dishwasher. After cleaning, reconnect power. q Clean the door seal with a steam cleaner. - Never clean...
Installation and Use & Care
Page 18
... cube container and rotate the screw conveyor by hand. Align the appliance with a spirit level and with the heightĆadjustable rollers or feet (see Installation instructions). Ice cubes are preventing the flap from the water may be forming in the ice cube tray.
... cube container and rotate the screw conveyor by hand. Align the appliance with a spirit level and with the heightĆadjustable rollers or feet (see Installation instructions). Ice cubes are preventing the flap from the water may be forming in the ice cube tray.
Installation and Use & Care
Page 20
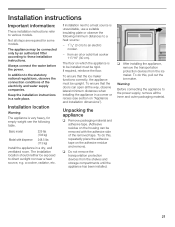
...a suitable insulating plate or observe the following table. The floor on the housing can open all the way, observe lateral minimum distances when installing the appliance in a corner or recess (see the following minimum distances to a heat source: - 11/4" (3 cm) to various models.... If required, reinforce the floor. To do this , repeatedly place the adhesive tape on Appliance and installation dimensions"). a cooker, radiator, etc. Unpacking the appliance q Remove packaging material and adhesive tape. (Adhesive residue on which the appliance is very ...
...a suitable insulating plate or observe the following table. The floor on the housing can open all the way, observe lateral minimum distances when installing the appliance in a corner or recess (see the following minimum distances to a heat source: - 11/4" (3 cm) to various models.... If required, reinforce the floor. To do this , repeatedly place the adhesive tape on Appliance and installation dimensions"). a cooker, radiator, etc. Unpacking the appliance q Remove packaging material and adhesive tape. (Adhesive residue on which the appliance is very ...
Installation and Use & Care
Page 21
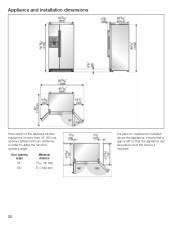
Door opening angle. Appliance and installation dimensions If the depth of the adjacent kitchen equipment is left so that a gap is more than 23" (60 cm), observe lateral minimum distances in order to utilize the full door opening angle 90 ° 135 ° Minimum distance 19/16" (40 mm) 51/2"(140 mm) 22 If a panel or cupboard is installed above the appliance, ensure that the appliance can be pulled out of the recess if required.
Door opening angle. Appliance and installation dimensions If the depth of the adjacent kitchen equipment is left so that a gap is more than 23" (60 cm), observe lateral minimum distances in order to utilize the full door opening angle 90 ° 135 ° Minimum distance 19/16" (40 mm) 51/2"(140 mm) 22 If a panel or cupboard is installed above the appliance, ensure that the appliance can be pulled out of the recess if required.
Installation and Use & Care
Page 22
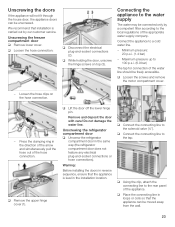
...;andĆsocket connections (2). Loosen the hose clips on top (3). We recommend that installation is level in the installation location. q Remove the upper hinge cover (1). Warning: Before installing the doors in the direction of the arrow and simultaneously pull the hose out of ...the water line should be freely accessible. Minimum pressure: 20 p.s.i. (1.4 bar) - q Using the clip, attach the connecting line to a cold water...
...;andĆsocket connections (2). Loosen the hose clips on top (3). We recommend that installation is level in the installation location. q Remove the upper hinge cover (1). Warning: Before installing the doors in the direction of the arrow and simultaneously pull the hose out of ...the water line should be freely accessible. Minimum pressure: 20 p.s.i. (1.4 bar) - q Using the clip, attach the connecting line to a cold water...
Installation and Use & Care
Page 23
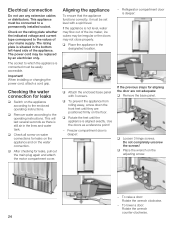
... deeper: If the previous steps for leaks q Switch on the rating plate whether the indicated voltage and current type correspond to a permanently installed socket. The socket to which the appliance is not level, water may flow out of the ice maker, ice cubes may be irregular ... clockwise. - Important! To lower a door: Rotate the wrench counterĆclockwise. 24 Check on the appliance according to the operating instructions. When installing or changing the power cord, attach a cord grip. The rating plate is aligned exactly. q After checking for leaks on the appliance and on the...
... deeper: If the previous steps for leaks q Switch on the rating plate whether the indicated voltage and current type correspond to a permanently installed socket. The socket to which the appliance is not level, water may flow out of the ice maker, ice cubes may be irregular ... clockwise. - Important! To lower a door: Rotate the wrench counterĆclockwise. 24 Check on the appliance according to the operating instructions. When installing or changing the power cord, attach a cord grip. The rating plate is aligned exactly. q After checking for leaks on the appliance and on the...
