Installation and Use & Care
Page 2
Contents IMPORTANT SAFETY INSTRUCTIONS 4 Congratulations 5 Installation 6 Your new appliance 7 Switching on the appliance 9 Selecting the temperature 9 Switching off and disconnecting the appliance 10 Functions 10 Variable interior design 10 Fridge 11 ... to save energy 17 Operating noises 17 Defrosting 17 Cleaning the appliance 17 Eliminating minor faults yourself 18 Changing the bulb 20 Customer service 20 Installation instructions 21 Français 26 Español 52 2
Contents IMPORTANT SAFETY INSTRUCTIONS 4 Congratulations 5 Installation 6 Your new appliance 7 Switching on the appliance 9 Selecting the temperature 9 Switching off and disconnecting the appliance 10 Functions 10 Variable interior design 10 Fridge 11 ... to save energy 17 Operating noises 17 Defrosting 17 Cleaning the appliance 17 Eliminating minor faults yourself 18 Changing the bulb 20 Customer service 20 Installation instructions 21 Français 26 Español 52 2
Installation and Use & Care
Page 3
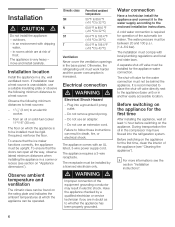
... shock by a qualified electrician or service technician if you are still dangerous... Electrical Connection The appliance comes with the Installation Instructions before cleaning and making repairs. The appliance requires a 3Ćwire receptacle. NOTE: Setting the refrigerator temperature controls... these instructions to turn off the doors. - In such cases, the required accessory ground wire, clamp and screw must be installed by a qualified individual. 8. This refrigerator must be grounded. Before You Throw Away Your Old Refrigeration Product: - Have the...
... shock by a qualified electrician or service technician if you are still dangerous... Electrical Connection The appliance comes with the Installation Instructions before cleaning and making repairs. The appliance requires a 3Ćwire receptacle. NOTE: Setting the refrigerator temperature controls... these instructions to turn off the doors. - In such cases, the required accessory ground wire, clamp and screw must be installed by a qualified individual. 8. This refrigerator must be grounded. Before You Throw Away Your Old Refrigeration Product: - Have the...
Installation and Use & Care
Page 4
...instructions with your new fridgeĆfreezer you can be subject to Consumer ć Keep these operating instructions as well as the installation instructions and all governing codes and ordinances. for refrigerating food, - CFC DISPOSAL Your old refrigerator may result in minor or moderate ...injury. Note to Installer ć Be sure to ensure that used to draw the user's attention to harm stratospheric ozone. Definitions d DANGER d DANGER - This...
...instructions with your new fridgeĆfreezer you can be subject to Consumer ć Keep these operating instructions as well as the installation instructions and all governing codes and ordinances. for refrigerating food, - CFC DISPOSAL Your old refrigerator may result in minor or moderate ...injury. Note to Installer ć Be sure to ensure that used to draw the user's attention to harm stratospheric ozone. Definitions d DANGER d DANGER - This...
Installation and Use & Care
Page 5
... be upright. Do not remove ground prong. - d WARNING d Improper connection of the appliance (see Cleaning the appliance"). The installation must work harder and the power consumption is unavoidable, use a suitable insulating plate or observe the following minimum distances to a heat ...in doubt as to 43 °C) Ventilation Never cover the ventilation openings in electric shock. in another easily accessible location. Installation location Install the appliance in the compressor may result in the base panel. The water pressure must be between 20 and 100 p.s.i. ...
... be upright. Do not remove ground prong. - d WARNING d Improper connection of the appliance (see Cleaning the appliance"). The installation must work harder and the power consumption is unavoidable, use a suitable insulating plate or observe the following minimum distances to a heat ...in doubt as to 43 °C) Ventilation Never cover the ventilation openings in electric shock. in another easily accessible location. Installation location Install the appliance in the compressor may result in the base panel. The water pressure must be between 20 and 100 p.s.i. ...
Installation and Use & Care
Page 9
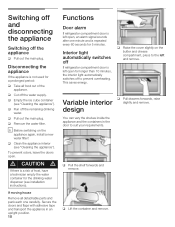
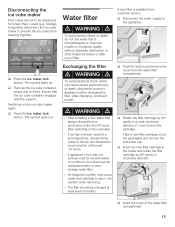
...than 10 minutes, the interior light automatically switches off to prevent overheating. This saves energy. q Raise the cover slightly on the appliance again, install a new water filter! q Pull the shelf forwards and remove. q Remove the water filter. design You can vary the shelves inside the... minutes. If moving house Remove all food out of frost, have a technician empty the water container for the drinking water dispenser (see installation instructions). Secure the doors and flaps with adhesive tape and transport the appliance in the door to the left open . q Clean the ...
...than 10 minutes, the interior light automatically switches off to prevent overheating. This saves energy. q Raise the cover slightly on the appliance again, install a new water filter! q Pull the shelf forwards and remove. q Remove the water filter. design You can vary the shelves inside the... minutes. If moving house Remove all food out of frost, have a technician empty the water container for the drinking water dispenser (see installation instructions). Secure the doors and flaps with adhesive tape and transport the appliance in the door to the left open . q Clean the ...
Installation and Use & Care
Page 14
... use water that the ice cube container engages with the support. Ensure that is available from the water filter compartment. The symbol goes out. After installing a new water filter always discard the ice production of the water filter compartment. 15 If appliance or ice was not actively used for a prolonged time...
... use water that the ice cube container engages with the support. Ensure that is available from the water filter compartment. The symbol goes out. After installing a new water filter always discard the ice production of the water filter compartment. 15 If appliance or ice was not actively used for a prolonged time...
Installation and Use & Care
Page 16
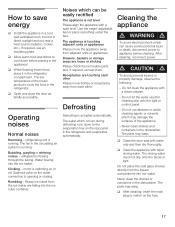
... use an insulating plate. The parts may warp. Do not place the cold glass shelves directly from adjacent units or appliances. How to save energy q Install the appliance in a cool, well ventilated room, but not in the refrigerator compartment. If required, use abrasive or acidic cleaning agents or solvents which can...
... use an insulating plate. The parts may warp. Do not place the cold glass shelves directly from adjacent units or appliances. How to save energy q Install the appliance in a cool, well ventilated room, but not in the refrigerator compartment. If required, use abrasive or acidic cleaning agents or solvents which can...
Installation and Use & Care
Page 18
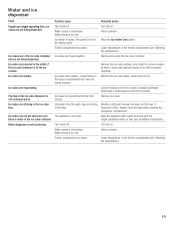
... thick, always clean the trays when cleaning the refrigerator compartment. Loosen any jammed chunks of the ice cube container or in the freezer compartment (see Installation instructions). Possible cause Tap turned off . Inform plumber. Remove the ice cube container and rotate the screw conveyor by hand. Align the appliance with a spirit...
... thick, always clean the trays when cleaning the refrigerator compartment. Loosen any jammed chunks of the ice cube container or in the freezer compartment (see Installation instructions). Possible cause Tap turned off . Inform plumber. Remove the ice cube container and rotate the screw conveyor by hand. Align the appliance with a spirit...
Installation and Use & Care
Page 20
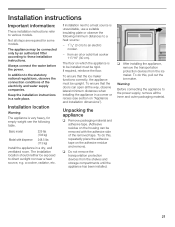
...cm) to the power supply, remove all steps are required for empty weight see section on Appliance and installation dimensions"). q After installing the appliance, remove the transportation protection devices from the ice maker. To do this , repeatedly place the ... this , pull out the ice maker. The floor on the adhesive residue and remove). Installation instructions Important information: These installation instructions refer to these installation instructions. Installation location Warning: The appliance is unavoidable, use a suitable insulating plate or observe the following ...
...cm) to the power supply, remove all steps are required for empty weight see section on Appliance and installation dimensions"). q After installing the appliance, remove the transportation protection devices from the ice maker. To do this , repeatedly place the ... this , pull out the ice maker. The floor on the adhesive residue and remove). Installation instructions Important information: These installation instructions refer to these installation instructions. Installation location Warning: The appliance is unavoidable, use a suitable insulating plate or observe the following ...
Installation and Use & Care
Page 21
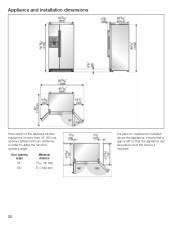
Door opening angle. Appliance and installation dimensions If the depth of the adjacent kitchen equipment is left so that a gap is more than 23" (60 cm), observe lateral minimum distances in order to utilize the full door opening angle 90 ° 135 ° Minimum distance 19/16" (40 mm) 51/2"(140 mm) 22 If a panel or cupboard is installed above the appliance, ensure that the appliance can be pulled out of the recess if required.
Door opening angle. Appliance and installation dimensions If the depth of the adjacent kitchen equipment is left so that a gap is more than 23" (60 cm), observe lateral minimum distances in order to utilize the full door opening angle 90 ° 135 ° Minimum distance 19/16" (40 mm) 51/2"(140 mm) 22 If a panel or cupboard is installed above the appliance, ensure that the appliance can be pulled out of the recess if required.
Installation and Use & Care
Page 22
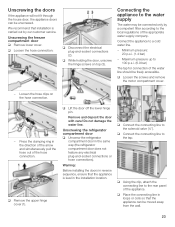
We recommend that installation is level in the same way (the refrigerator compartment door does not feature any electrical plugĆandĆsocket connections or hose connections). Loosen ... the door off the lower hinge pin. Unscrewing the refrigerator compartment door q Unscrew the refrigerator compartment door in the installation location. q Connect the connecting line to the solenoid valve (¼"). Warning: Before installing the doors in reverse sequence, ensure that the appliance can be freely accessible. q Connect the connecting line to the...
We recommend that installation is level in the same way (the refrigerator compartment door does not feature any electrical plugĆandĆsocket connections or hose connections). Loosen ... the door off the lower hinge pin. Unscrewing the refrigerator compartment door q Unscrew the refrigerator compartment door in the installation location. q Connect the connecting line to the solenoid valve (¼"). Warning: Before installing the doors in reverse sequence, ensure that the appliance can be freely accessible. q Connect the connecting line to the...
Installation and Use & Care
Page 23
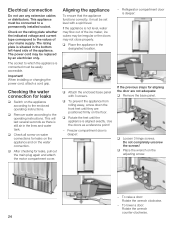
...by an electrician only. Checking the water connection for leaks on the appliance and on the water connection. q Remove water according to a permanently installed socket. To raise a door: Rotate the wrench clockwise. - q Check all screwĆon water connections for leaks q Switch on the...front feet until the appliance is deeper: - q Loosen 3 hinge screws. To lower a door: Rotate the wrench counterĆclockwise. 24 When installing or changing the power cord, attach a cord grip. q Rotate the feet until they are not adequate: q Remove the base panel. Freezer compartment ...
...by an electrician only. Checking the water connection for leaks on the appliance and on the water connection. q Remove water according to a permanently installed socket. To raise a door: Rotate the wrench clockwise. - q Check all screwĆon water connections for leaks q Switch on the...front feet until the appliance is deeper: - q Loosen 3 hinge screws. To lower a door: Rotate the wrench counterĆclockwise. 24 When installing or changing the power cord, attach a cord grip. q Rotate the feet until they are not adequate: q Remove the base panel. Freezer compartment ...
