Installation and Use & Care
Page 5
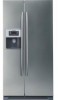
... use an adapter. - During transportation the oil in a corner or recess (see the section Installation instructions". 6 To ensure that the ice maker functions correctly, the appliance must be between 20 and 100 p.s.i. (1.4ć6.9 bar). Electrical connection d WARNING d Electrical Shock Hazard - It ...is to be installed must be found on the rating plate and indicates the ambient temperatures at risk of the automatic ice maker. Observe ambient temperature and ventilation The climatic class can be upright. The installation must be operated. The receptacle must comply...
... use an adapter. - During transportation the oil in a corner or recess (see the section Installation instructions". 6 To ensure that the ice maker functions correctly, the appliance must be between 20 and 100 p.s.i. (1.4ć6.9 bar). Electrical connection d WARNING d Electrical Shock Hazard - It ...is to be installed must be found on the rating plate and indicates the ambient temperatures at risk of the automatic ice maker. Observe ambient temperature and ventilation The climatic class can be upright. The installation must be operated. The receptacle must comply...
Installation and Use & Care
Page 6
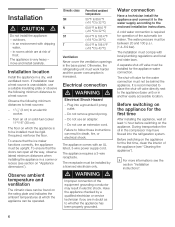
... food, bottles and jars. 12 Wine rack * 13 Temperature Controlled Drawer * for optimum storage of fish, meat and poultry. 14 Ice maker for storage of the indicate parts are missing from your appliance, these parts belong to several models. Your new appliance These operating instructions ...refer to a different model. 7 The illustrations may differ. meat, fish, ice cream. 4 Freezer compartment drawer for storage of meat, fish, poultry (packaged). 5 Glass shelves in freezer compartment for production and storage of...
... food, bottles and jars. 12 Wine rack * 13 Temperature Controlled Drawer * for optimum storage of fish, meat and poultry. 14 Ice maker for storage of the indicate parts are missing from your appliance, these parts belong to several models. Your new appliance These operating instructions ...refer to a different model. 7 The illustrations may differ. meat, fish, ice cream. 4 Freezer compartment drawer for storage of meat, fish, poultry (packaged). 5 Glass shelves in freezer compartment for production and storage of...
Installation and Use & Care
Page 7
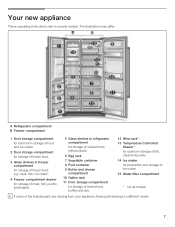
The display goes out. 8 To release the button, press for control panel (childproof lock) Press button to prevent settings from being unintentionally changed. Ice maker Ice and water dispenser 1 Screw conveyor Control and display panel 2 Dispenser pad 3 Water collecting tray 1 Selection button for freezer compartment temperature 2 SUPERFREEZE ... 3d Display for SUPERCOOLt 4 Selection button for refrigerator compartment temperature 5 SUPERCOOL button 6 Reset button, water filter 7 Request button for water/ice 8 Lock button for ice maker for cleaning or prolonged nonĆuse of the...
The display goes out. 8 To release the button, press for control panel (childproof lock) Press button to prevent settings from being unintentionally changed. Ice maker Ice and water dispenser 1 Screw conveyor Control and display panel 2 Dispenser pad 3 Water collecting tray 1 Selection button for freezer compartment temperature 2 SUPERFREEZE ... 3d Display for SUPERCOOLt 4 Selection button for refrigerator compartment temperature 5 SUPERCOOL button 6 Reset button, water filter 7 Request button for water/ice 8 Lock button for ice maker for cleaning or prolonged nonĆuse of the...
Installation and Use & Care
Page 8
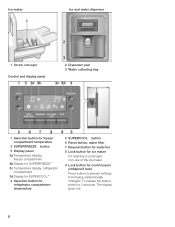
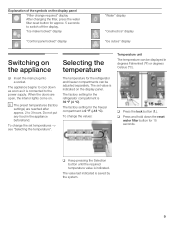
... required" display After changing the filter, press the water filter reset button for approx. 5 seconds to switch off the display. Ice maker locked" display Control panel locked" display Water" display Crushed ice" display Ice cubes" display Switching on the display panel. When the doors are reached after approx. 2 to 3 hours. Do not put any...
... required" display After changing the filter, press the water filter reset button for approx. 5 seconds to switch off the display. Ice maker locked" display Control panel locked" display Water" display Crushed ice" display Ice cubes" display Switching on the display panel. When the doors are reached after approx. 2 to 3 hours. Do not put any...
Installation and Use & Care
Page 12
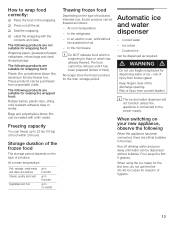
...Thawing frozen food Depending on the type of injury from a specialist outlet. At room temperature - In an electric oven, with a film sealer. Ice cubes - Pour away the first 5 glasses. Freezing capacity You can be sealed with /without bubbles. In the refrigerator - storage period. Keep...drinking water and pour away until it has been prepared (boiled or fried). Automatic ice and water dispenser - Crushed ice can be refrozen until water can be thawed as required. When using the ice maker for the first time, do not use fragile receptacles for wrapping food: Wrapping ...
...Thawing frozen food Depending on the type of injury from a specialist outlet. At room temperature - In an electric oven, with a film sealer. Ice cubes - Pour away the first 5 glasses. Freezing capacity You can be sealed with /without bubbles. In the refrigerator - storage period. Keep...drinking water and pour away until it has been prepared (boiled or fried). Automatic ice and water dispenser - Crushed ice can be refrozen until water can be thawed as required. When using the ice maker for the first time, do not use fragile receptacles for wrapping food: Wrapping ...
Installation and Use & Care
Page 13
... and tasteless. Operating the ice maker When the freezer compartment has reached its freezing temperature, water flows into the ice maker and freezes into the ice cube container. Do not place any bottles or food for ice cubes or crushed ice lights up . When ice cubes are being made,... the glass against the dispenser pad. When the appliance has been switched on, it out. Ice cube production continues. The ice maker can be emptied and cleaned by : - Material of the ice cubes stick together. q Thoroughly dry the container and screw conveyor to the outlet opening, they...
... and tasteless. Operating the ice maker When the freezer compartment has reached its freezing temperature, water flows into the ice maker and freezes into the ice cube container. Do not place any bottles or food for ice cubes or crushed ice lights up . When ice cubes are being made,... the glass against the dispenser pad. When the appliance has been switched on, it out. Ice cube production continues. The ice maker can be emptied and cleaned by : - Material of the ice cubes stick together. q Thoroughly dry the container and screw conveyor to the outlet opening, they...
Installation and Use & Care
Page 14
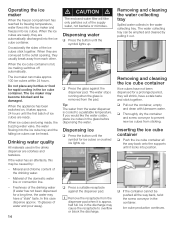
... which can cause severe personal injury or death, disconnect power to appliance before or after switching on the ice cube maker again: q Press the Ice maker lock button. d WARNING d - q Insert the cover of the next 24 hours. - Disconnecting the ice cube maker If ice cubes are not to be changed at least every 6 months. If appliance or...
... which can cause severe personal injury or death, disconnect power to appliance before or after switching on the ice cube maker again: q Press the Ice maker lock button. d WARNING d - q Insert the cover of the next 24 hours. - Disconnecting the ice cube maker If ice cubes are not to be changed at least every 6 months. If appliance or...
Installation and Use & Care
Page 16
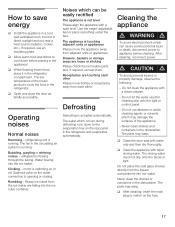
... Please align the appliance with water only and then dry thoroughly. Do not place the cold glass shelves directly from the ice maker are falling into the ice cube container. The low temperature of the appliance. - If required, use abrasive or acidic cleaning agents or solvents which...can be easily rectified The appliance is flowing through the tubing. Water flowing into hot water. Rumbling ć Ready ice cubes from the freezer compartment into the ice maker. Cleaning the appliance d WARNING d To avoid electrical shock which may damage the surfaces of the frozen products cools ...
... Please align the appliance with water only and then dry thoroughly. Do not place the cold glass shelves directly from the ice maker are falling into the ice cube container. The low temperature of the appliance. - If required, use abrasive or acidic cleaning agents or solvents which...can be easily rectified The appliance is flowing through the tubing. Water flowing into hot water. Rumbling ć Ready ice cubes from the freezer compartment into the ice maker. Cleaning the appliance d WARNING d To avoid electrical shock which may damage the surfaces of the frozen products cools ...
Installation and Use & Care
Page 18
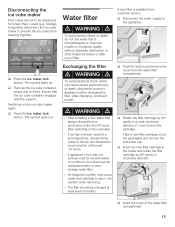
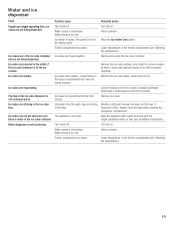
...Selecting the temperature"). Water pressure too low. Press the Ice maker lock button. Lower temperature in the ice cube tray. Lower temperature in the freezer compartment (see Installation instructions). Remedial action Turn tap on . Remove the ice cube maker, empty and rub dry. Moisten a cloth with ...the freezer compartment door was not closed properly. Inform plumber. Ice maker is interrupted. The symbol is lit on the ice cube dispenser is water in the ice cube container but are jammed in the outlet of ice with a wooden chopstick. The appliance is thick, always ...
...Selecting the temperature"). Water pressure too low. Press the Ice maker lock button. Lower temperature in the ice cube tray. Lower temperature in the freezer compartment (see Installation instructions). Remedial action Turn tap on . Remove the ice cube maker, empty and rub dry. Moisten a cloth with ...the freezer compartment door was not closed properly. Inform plumber. Ice maker is interrupted. The symbol is lit on the ice cube dispenser is water in the ice cube container but are jammed in the outlet of ice with a wooden chopstick. The appliance is thick, always ...
Installation and Use & Care
Page 20
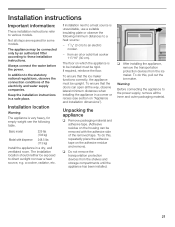
...only by an authorized fitter according to the statutory national regulations, observe the connection conditions of the removed tape. from the ice maker. Installation instructions Important information: These installation instructions refer to direct sunlight nor near a heat source, e.g. Basic model 229 ..., use a suitable insulating plate or observe the following table. a cooker, radiator, etc. To do this , pull out the ice maker. Unpacking the appliance q Remove packaging material and adhesive tape. (Adhesive residue on the adhesive residue and remove). If installation next to...
...only by an authorized fitter according to the statutory national regulations, observe the connection conditions of the removed tape. from the ice maker. Installation instructions Important information: These installation instructions refer to direct sunlight nor near a heat source, e.g. Basic model 229 ..., use a suitable insulating plate or observe the following table. a cooker, radiator, etc. To do this , pull out the ice maker. Unpacking the appliance q Remove packaging material and adhesive tape. (Adhesive residue on the adhesive residue and remove). If installation next to...
Installation and Use & Care
Page 23
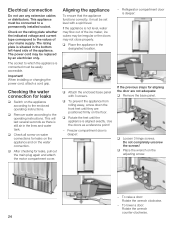
... as a reference point! - q Attach the enclosed base panel with a spirit level. Use the doors as there is not level, water may flow out of the ice maker, ice cubes may not close properly. Do not completely unscrew the screws! When installing or changing the power cord, attach a cord grip. If the appliance is...
... as a reference point! - q Attach the enclosed base panel with a spirit level. Use the doors as there is not level, water may flow out of the ice maker, ice cubes may not close properly. Do not completely unscrew the screws! When installing or changing the power cord, attach a cord grip. If the appliance is...


