User Manual
Page 1
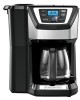
TM MILL & BREW™ 12-CUP PROGRAMMABLE COFFEE MAKER use & care manual CM5000
TM MILL & BREW™ 12-CUP PROGRAMMABLE COFFEE MAKER use & care manual CM5000
User Manual
Page 2
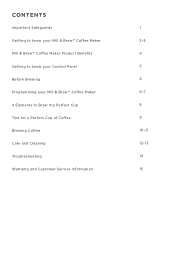
CONTENTS Important Safeguards Getting to know your Mill & Brew™ Coffee Maker Mill & Brew™ Coffee Maker Product Benefits Getting to know your Control Panel Before Brewing Programming your Mill & Brew™ Coffee Maker 4 Elements to Brew the Perfect Cup Tips for a Perfect Cup of Coffee Brewing Coffee Care and Cleaning Tr o u b l e s h o o t i n g Warranty and Customer Service Information 1 2-3 4 5 6 6 -7 8 9 10-11 12-13 14 15
CONTENTS Important Safeguards Getting to know your Mill & Brew™ Coffee Maker Mill & Brew™ Coffee Maker Product Benefits Getting to know your Control Panel Before Brewing Programming your Mill & Brew™ Coffee Maker 4 Elements to Brew the Perfect Cup Tips for a Perfect Cup of Coffee Brewing Coffee Care and Cleaning Tr o u b l e s h o o t i n g Warranty and Customer Service Information 1 2-3 4 5 6 6 -7 8 9 10-11 12-13 14 15
User Manual
Page 6
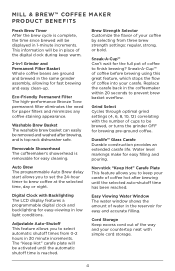
...the coffeemaker within 20 seconds to select automatic shutoff times from three brew strength settings: regular, strong, or bold. Sneak-A-Cup™ of coffee before brewing using this great feature, which stops the flow of cups to keep warm. 2-in-1 Grinder and Permanent Filter Basket Whole ... at the selected time, day or night. Sneak-A-Cup™ Can't wait for the full pot of coffee hot after brewing, and is top rack dishwasher safe. Grind Select Cycles through optimal grind settings (4, 6, 8, 10, 12) correlating with simple cord storage. 4 Duralife™ Glass Carafe Durable...
...the coffeemaker within 20 seconds to select automatic shutoff times from three brew strength settings: regular, strong, or bold. Sneak-A-Cup™ of coffee before brewing using this great feature, which stops the flow of cups to keep warm. 2-in-1 Grinder and Permanent Filter Basket Whole ... at the selected time, day or night. Sneak-A-Cup™ Can't wait for the full pot of coffee hot after brewing, and is top rack dishwasher safe. Grind Select Cycles through optimal grind settings (4, 6, 8, 10, 12) correlating with simple cord storage. 4 Duralife™ Glass Carafe Durable...
User Manual
Page 7
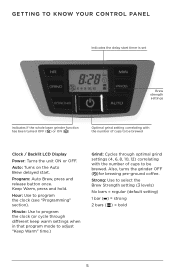
... Use to select the Brew Strength setting (3 levels) No bars = regular (default setting) 1 bar ( ) = strong 2 bars ( ) = bold 5 Auto: Turns on the Auto Brew delayed start timer is set Brew strength settings Indicates if ...been turned OFF ( ) or ON ( ) Optimal grind setting correlating with the number of cups to be brewed Clock / Backlit LCD Display Power: Turns the unit ON or OFF. Keep Warm, press...to program the clock (see "Programming" section). Also, turns the grinder OFF ( )for brewing pre-ground coffee. Minute: Use to program the clock (or cycle through different keep warm ...
... Use to select the Brew Strength setting (3 levels) No bars = regular (default setting) 1 bar ( ) = strong 2 bars ( ) = bold 5 Auto: Turns on the Auto Brew delayed start timer is set Brew strength settings Indicates if ...been turned OFF ( ) or ON ( ) Optimal grind setting correlating with the number of cups to be brewed Clock / Backlit LCD Display Power: Turns the unit ON or OFF. Keep Warm, press...to program the clock (see "Programming" section). Also, turns the grinder OFF ( )for brewing pre-ground coffee. Minute: Use to program the clock (or cycle through different keep warm ...
User Manual
Page 8
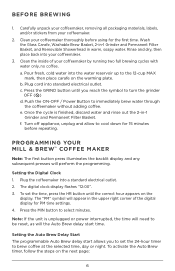
...finished, discard water and rinse out the 2-in warm, soapy water. BEFORE BREWING 1. Clean the inside of the digital display for 15 minutes before using for the first time. c. Push the ON-OFF / Power Button to the 12-cup MAX mark, then place carafe on the next page: 6 PROGRAMMING YOUR MILL... & BREW™ COFFEE MAKER Note: The first button press illuminates the backlit display and any subsequent presses will appear in...
...finished, discard water and rinse out the 2-in warm, soapy water. BEFORE BREWING 1. Clean the inside of the digital display for 15 minutes before using for the first time. c. Push the ON-OFF / Power Button to the 12-cup MAX mark, then place carafe on the next page: 6 PROGRAMMING YOUR MILL... & BREW™ COFFEE MAKER Note: The first button press illuminates the backlit display and any subsequent presses will appear in...
User Manual
Page 12
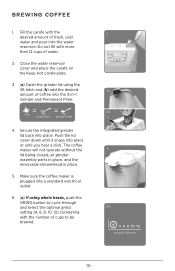
... place the carafe on the Keep Hot carafe plate. 3. (a) Open the grinder lid using whole beans, push the GRIND button to be brewed. 1 3a 3b 4 6a whole beans 10 The coffee maker will not operate without the lid being closed, all grinder assembly parts in place... removable showerhead in -1 Grinder and Permanent Filter. 4. Fill the carafe with more than 12 cups of cups to cycle through and select the optimal grind setting (4, 6, 8, 10, 12) correlating with the number of water. 2. BREWING COFFEE 1. Do not fill with the desired amount of coffee into the water reservoir. Secure...
... place the carafe on the Keep Hot carafe plate. 3. (a) Open the grinder lid using whole beans, push the GRIND button to be brewed. 1 3a 3b 4 6a whole beans 10 The coffee maker will not operate without the lid being closed, all grinder assembly parts in place... removable showerhead in -1 Grinder and Permanent Filter. 4. Fill the carafe with more than 12 cups of cups to cycle through and select the optimal grind setting (4, 6, 8, 10, 12) correlating with the number of water. 2. BREWING COFFEE 1. Do not fill with the desired amount of coffee into the water reservoir. Secure...
User Manual
Page 16
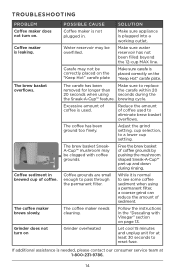
...Coffee maker is used to pass through the permanent filter. The brew basket overflows. Make sure water reservoir has not been filled beyond the 12-cup MAX line. Excessive amount of coffee used . Adjust the grind setting, cup selection, to reset fuse. The coffee maker needs cleaning. ...Reduce the amount of coffee is not plugged in. The brew basket SneakA-Cup™ mushroom may be clogged with...
...Coffee maker is used to pass through the permanent filter. The brew basket overflows. Make sure water reservoir has not been filled beyond the 12-cup MAX line. Excessive amount of coffee used . Adjust the grind setting, cup selection, to reset fuse. The coffee maker needs cleaning. ...Reduce the amount of coffee is not plugged in. The brew basket SneakA-Cup™ mushroom may be clogged with...


