User Manual
Page 1
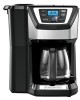
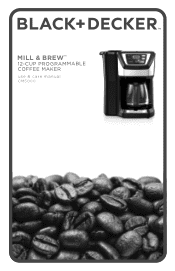
TM MILL & BREW™ 12-CUP PROGRAMMABLE COFFEE MAKER use & care manual CM5000
TM MILL & BREW™ 12-CUP PROGRAMMABLE COFFEE MAKER use & care manual CM5000
User Manual
Page 2
CONTENTS Important Safeguards Getting to know your Mill & Brew™ Coffee Maker Mill & Brew™ Coffee Maker Product Benefits Getting to know your Control Panel Before Brewing Programming your Mill & Brew™ Coffee Maker 4 Elements to Brew the Perfect Cup Tips for a Perfect Cup of Coffee Brewing Coffee Care and Cleaning Tr o u b l e s h o o t i n g Warranty and Customer Service Information 1 2-3 4 5 6 6 -7 8 9 10-11 12-13 14 15
CONTENTS Important Safeguards Getting to know your Mill & Brew™ Coffee Maker Mill & Brew™ Coffee Maker Product Benefits Getting to know your Control Panel Before Brewing Programming your Mill & Brew™ Coffee Maker 4 Elements to Brew the Perfect Cup Tips for a Perfect Cup of Coffee Brewing Coffee Care and Cleaning Tr o u b l e s h o o t i n g Warranty and Customer Service Information 1 2-3 4 5 6 6 -7 8 9 10-11 12-13 14 15
User Manual
Page 6
...reached. Water level markings make for paper filters and minimizes any coffee staining appearance. Sneak-A-Cup™ of coffee before brewing using this great feature, which stops the flow of coffee ...hours in 1-minute increments. Easy Viewing Water Window The water window shows the amount of cups to prevent brew basket overflow. Adjustable Auto-Shutoff This feature allows you to keep warm....carafe plate will be brewed, or turns the grinder OFF for easy and accurate filling. Sneak-A-Cup™ Can't wait for easy cleaning. Replace the carafe back in the reservoir for brewing ...
...reached. Water level markings make for paper filters and minimizes any coffee staining appearance. Sneak-A-Cup™ of coffee before brewing using this great feature, which stops the flow of coffee ...hours in 1-minute increments. Easy Viewing Water Window The water window shows the amount of cups to prevent brew basket overflow. Adjustable Auto-Shutoff This feature allows you to keep warm....carafe plate will be brewed, or turns the grinder OFF for easy and accurate filling. Sneak-A-Cup™ Can't wait for easy cleaning. Replace the carafe back in the reservoir for brewing ...
User Manual
Page 7
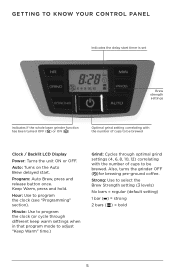
... through different keep warm settings when in that program mode to adjust "Keep Warm" time.) Grind: Cycles through optimal grind settings (4, 6, 8, 10, 12) correlating with the number of cups to be brewed Clock / Backlit LCD Display Power: Turns the unit ON or OFF. Program: Auto Brew, press and release button once. Strong... set Brew strength settings Indicates if the whole bean grinder function has been turned OFF ( ) or ON ( ) Optimal grind setting correlating with the number of cups to be brewed. GETTING TO KNOW YOUR CONTROL PANEL Indicates the delay start .
... through different keep warm settings when in that program mode to adjust "Keep Warm" time.) Grind: Cycles through optimal grind settings (4, 6, 8, 10, 12) correlating with the number of cups to be brewed Clock / Backlit LCD Display Power: Turns the unit ON or OFF. Program: Auto Brew, press and release button once. Strong... set Brew strength settings Indicates if the whole bean grinder function has been turned OFF ( ) or ON ( ) Optimal grind setting correlating with the number of cups to be brewed. GETTING TO KNOW YOUR CONTROL PANEL Indicates the delay start .
User Manual
Page 8
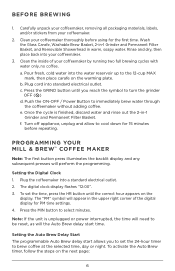
... PM time settings. 4. Pour fresh, cold water into your coffeemaker. 2. f. Turn off appliance, unplug and allow to the 12-cup MAX mark, then place carafe on the warming plate. The digital clock display flashes "12:00". 3. Setting the Auto Brew Delay Start The programmable Auto Brew delay start time. Carefully unpack your coffeemaker...
... PM time settings. 4. Pour fresh, cold water into your coffeemaker. 2. f. Turn off appliance, unplug and allow to the 12-cup MAX mark, then place carafe on the warming plate. The digital clock display flashes "12:00". 3. Setting the Auto Brew Delay Start The programmable Auto Brew delay start time. Carefully unpack your coffeemaker...
User Manual
Page 12
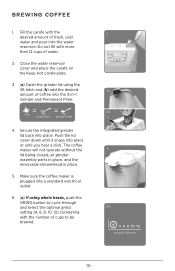
... maker is plugged into a standard electrical outlet. 6. (a) If using the lift latch and (b) add the desired amount of cups to cycle through and select the optimal grind setting (4, 6, 8, 10, 12) correlating with more than 12 cups of fresh, cold water and pour into the 2-in place. 5. Do not fill with the number of coffee...
... maker is plugged into a standard electrical outlet. 6. (a) If using the lift latch and (b) add the desired amount of cups to cycle through and select the optimal grind setting (4, 6, 8, 10, 12) correlating with more than 12 cups of fresh, cold water and pour into the 2-in place. 5. Do not fill with the number of coffee...
User Manual
Page 16
...Coffee maker is plugged into a working outlet. The coffee maker brews slowly. Make sure water reservoir has not been filled beyond the 12-cup MAX line. The coffee maker needs cleaning. If additional assistance is used to see some coffee sediment when using seconds during rinsing.... appliance is leaking. Water reservoir may be overfilled. brewing cycle. The coffee has been ground too finely. Follow the instructions in brewed cup of sediment. The carafe has been Make sure to reset fuse. TROUBLESHOOTING PROBLEM Coffee maker does not turn on the "Keep Hot"...
...Coffee maker is plugged into a working outlet. The coffee maker brews slowly. Make sure water reservoir has not been filled beyond the 12-cup MAX line. The coffee maker needs cleaning. If additional assistance is used to see some coffee sediment when using seconds during rinsing.... appliance is leaking. Water reservoir may be overfilled. brewing cycle. The coffee has been ground too finely. Follow the instructions in brewed cup of sediment. The carafe has been Make sure to reset fuse. TROUBLESHOOTING PROBLEM Coffee maker does not turn on the "Keep Hot"...


