
User Manual
Page 1
TM THERMAL PROGRAMMABLE 12-CUP COFFEE MAKER Use & Care Manual CM2035B
TM THERMAL PROGRAMMABLE 12-CUP COFFEE MAKER Use & Care Manual CM2035B
User Manual
Page 2
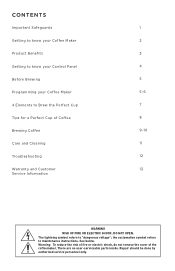
... parts inside. The lightning symbol refers to maintenance instructions. Warning: To reduce the risk of fire or electric shock, do not remove the cover of Coffee Brewing Coffee Care and Cleaning Tr o u b l e s h o o t i n g Warranty and Customer Service Information 1 2 3 4 5 5-6 7 8 9-10 11 12 13 WARNING ...should be done by authorized service personnel only. CONTENTS Important Safeguards Getting to know your Coffee Maker Product Benefits Getting to know your Control Panel Before Brewing Programming your Coffee Maker 4 Elements to Brew the Perfect Cup Tips for a Perfect Cup of the ...
... parts inside. The lightning symbol refers to maintenance instructions. Warning: To reduce the risk of fire or electric shock, do not remove the cover of Coffee Brewing Coffee Care and Cleaning Tr o u b l e s h o o t i n g Warranty and Customer Service Information 1 2 3 4 5 5-6 7 8 9-10 11 12 13 WARNING ...should be done by authorized service personnel only. CONTENTS Important Safeguards Getting to know your Coffee Maker Product Benefits Getting to know your Control Panel Before Brewing Programming your Coffee Maker 4 Elements to Brew the Perfect Cup Tips for a Perfect Cup of the ...
User Manual
Page 4
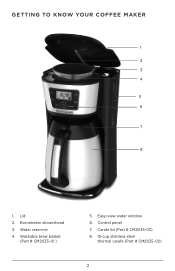
GETTING TO KNOW YOUR COFFEE MAKER 1 2 3 4 5 6 7 8 1. Water reservoir 4. Evenstream showerhead 3. Washable brew basket (Part # CM2035-01 ) 5. Carafe lid (Part # CM2035-03) 8. 12-cup stainless steel thermal carafe (Part # CM2035-02) 2 Lid 2. Easy-view water window 6. Control panel 7.
GETTING TO KNOW YOUR COFFEE MAKER 1 2 3 4 5 6 7 8 1. Water reservoir 4. Evenstream showerhead 3. Washable brew basket (Part # CM2035-01 ) 5. Carafe lid (Part # CM2035-03) 8. 12-cup stainless steel thermal carafe (Part # CM2035-02) 2 Lid 2. Easy-view water window 6. Control panel 7.
User Manual
Page 5
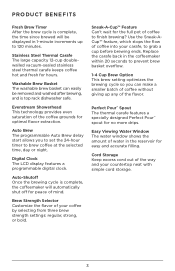
...Pour™ Spout The thermal carafe features a specially designed Perfect Pour™ spout for optimal flavor extraction. Cord Storage Keep excess cord out of coffee to 120 minutes. Sneak-A-Cup™ Feature Can't wait for easy and accurate filling. Use the Sneak-ACup™ feature, which stops the ...Brew delay start allows you can easily be displayed in the reservoir for the full pot of the way and your carafe, to brew coffee at the selected time, day or night. Digital Clock The LCD display features a programmable digital clock. Evenstream Showerhead This technology provides ...
...Pour™ Spout The thermal carafe features a specially designed Perfect Pour™ spout for optimal flavor extraction. Cord Storage Keep excess cord out of coffee to 120 minutes. Sneak-A-Cup™ Feature Can't wait for easy and accurate filling. Use the Sneak-ACup™ feature, which stops the ...Brew delay start allows you can easily be displayed in the reservoir for the full pot of the way and your carafe, to brew coffee at the selected time, day or night. Digital Clock The LCD display features a programmable digital clock. Evenstream Showerhead This technology provides ...
User Manual
Page 6
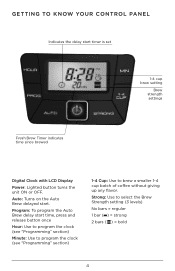
..." section) 1-4 Cup: Use to select the Brew Strength setting (3 levels) No bars = regular 1 bar ( ) = strong 2 bars ( ) = bold 4 Strong: Use to brew a smaller 1-4 cup batch of coffee without giving up any flavor. Auto: Turns on the Auto Brew delayed start timer is set 1-4 cup brew setting Brew strength settings Fresh Brew Timer...
..." section) 1-4 Cup: Use to select the Brew Strength setting (3 levels) No bars = regular 1 bar ( ) = strong 2 bars ( ) = bold 4 Strong: Use to brew a smaller 1-4 cup batch of coffee without giving up any flavor. Auto: Turns on the Auto Brew delayed start timer is set 1-4 cup brew setting Brew strength settings Fresh Brew Timer...

User Manual
Page 7
... the ON-OFF / Power Button to select minutes. Turn off appliance, unplug and allow to begin to www.prodprotect.com/applica 2. PROGRAMMING YOUR COFFEE MAKER Setting the Digital Clock 1. To activate the Auto Brew timer, follow these steps: 1. Rinse and dry, then place back into standard electrical... outlet. The digital clock display flashes "12:00". 3. Press the MIN button to immediately brew water through the coffeemaker without adding coffee. After the digital clock is not on the display. Make sure the PM light is set the 24-hour timer to be reset...
... the ON-OFF / Power Button to select minutes. Turn off appliance, unplug and allow to begin to www.prodprotect.com/applica 2. PROGRAMMING YOUR COFFEE MAKER Setting the Digital Clock 1. To activate the Auto Brew timer, follow these steps: 1. Rinse and dry, then place back into standard electrical... outlet. The digital clock display flashes "12:00". 3. Press the MIN button to immediately brew water through the coffeemaker without adding coffee. After the digital clock is not on the display. Make sure the PM light is set the 24-hour timer to be reset...
User Manual
Page 8
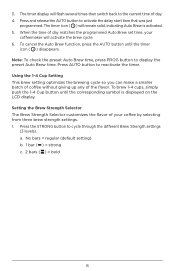
... Auto Brew time. Setting the Brew Strength Selector The Brew Strength Selector customizes the flavor of day matches the programmed Auto Brew set time, your coffee by selecting from three brew strength settings. 1. a. To brew 1-4 cups, simply push the 1-4 Cup button until the timer icon ( ) disappears.... Brew Strength settings (3 levels). Using the 1-4 Cup Setting This brew setting optimizes the brewing cycle so you can make a smaller batch of coffee without giving up any of day. 4. The timer display will activate the brew cycle. 6. To cancel the Auto Brew function, press the ...
... Auto Brew time. Setting the Brew Strength Selector The Brew Strength Selector customizes the flavor of day matches the programmed Auto Brew set time, your coffee by selecting from three brew strength settings. 1. a. To brew 1-4 cups, simply push the 1-4 Cup button until the timer icon ( ) disappears.... Brew Strength settings (3 levels). Using the 1-4 Cup Setting This brew setting optimizes the brewing cycle so you can make a smaller batch of coffee without giving up any of day. 4. The timer display will activate the brew cycle. 6. To cancel the Auto Brew function, press the ...
User Manual
Page 9
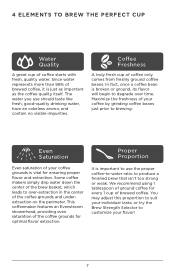
... on the perimeter. Even Saturation Proper Proportion Even saturation of ground coffee for optimal flavor extraction. We recommend using 1 tablespoon of your coffee grounds is just as important as the coffee quality itself. You may adjust this proportion to suit your individual taste... try the Brew Strength Selector to customize your coffee by grinding coffee beans just prior to over time. This coffeemaker features an Evenstream showerhead, providing even saturation of the coffee grounds for every 1 cup of brewed coffee, it is vital for ensuring proper flavor and...
... on the perimeter. Even Saturation Proper Proportion Even saturation of ground coffee for optimal flavor extraction. We recommend using 1 tablespoon of your coffee grounds is just as important as the coffee quality itself. You may adjust this proportion to suit your individual taste... try the Brew Strength Selector to customize your coffee by grinding coffee beans just prior to over time. This coffeemaker features an Evenstream showerhead, providing even saturation of the coffee grounds for every 1 cup of brewed coffee, it is vital for ensuring proper flavor and...
User Manual
Page 10
... immediately! The carafe is double-wall insulated and vacuum sealed to elements of coffee. • Never re-use your thermal carafe after brewing. Allowing coffee to sit too long and reheating coffee will cause the coffee to deteriorate. • Use spring water or filtered water, not distilled water... and contain no visible impurities. • Do not refrigerate or freeze your daily supply of coffee, as contact with hot tap water and empty before brewing. • Always store your coffee maker. Once coffee has been opened, keep it tightly sealed in a cool, dry place. TIPS FOR A...
... immediately! The carafe is double-wall insulated and vacuum sealed to elements of coffee. • Never re-use your thermal carafe after brewing. Allowing coffee to sit too long and reheating coffee will cause the coffee to deteriorate. • Use spring water or filtered water, not distilled water... and contain no visible impurities. • Do not refrigerate or freeze your daily supply of coffee, as contact with hot tap water and empty before brewing. • Always store your coffee maker. Once coffee has been opened, keep it tightly sealed in a cool, dry place. TIPS FOR A...

User Manual
Page 11
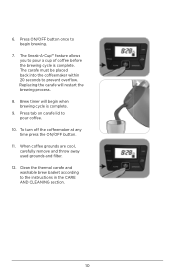
... arrow on the lid with the unlocked symbol on the carafe plate and plug cord into the brew basket. Use lines on carafe. 4. Add ground coffee (we suggest 1 tablespoon per cup). Place a basket shaped paper filter into a standard outlet. 5. Put brew basket in the "Programming" section. 9 ...To set the clock to brew coffee right away. 1. Do not fill past 12 MAX line. 2. Close carafe lid by first lining up with cold tap water. Place empty carafe on the...
... arrow on the lid with the unlocked symbol on the carafe plate and plug cord into the brew basket. Use lines on carafe. 4. Add ground coffee (we suggest 1 tablespoon per cup). Place a basket shaped paper filter into a standard outlet. 5. Put brew basket in the "Programming" section. 9 ...To set the clock to brew coffee right away. 1. Do not fill past 12 MAX line. 2. Close carafe lid by first lining up with cold tap water. Place empty carafe on the...
User Manual
Page 12
... cool, carefully remove and throw away used grounds and filter. 12. The Sneak-A-Cup™ feature allows you to pour coffee. 10. Press tab on carafe lid to pour a cup of coffee before the brewing cycle is complete. 9. 6. The carafe must be placed back into the coffeemaker within 20 seconds to the...
... cool, carefully remove and throw away used grounds and filter. 12. The Sneak-A-Cup™ feature allows you to pour coffee. 10. Press tab on carafe lid to pour a cup of coffee before the brewing cycle is complete. 9. 6. The carafe must be placed back into the coffeemaker within 20 seconds to the...
User Manual
Page 13
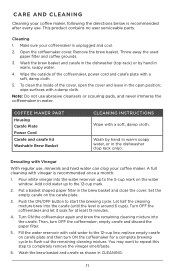
... to start the brewing cycle. CARE AND CLEANING Cleaning your coffeemaker is unplugged and cool. 2. Throw away the used paper filter and coffee grounds. 3. COFFEE MAKER PART Housing Carafe Plate Power Cord Carafe and carafe lid Washable Brew Basket CLEANING INSTRUCTIONS Wipe with a soft, damp cloth. 5....brew the remaining cleaning mixture into the carafe (until the level is recommended after every use , minerals and hard water can clog your coffee maker. Wash by hand in the dishwasher (top rack only). Turn OFF the coffeemaker and let it soak for a complete brewing cycle...
... to start the brewing cycle. CARE AND CLEANING Cleaning your coffeemaker is unplugged and cool. 2. Throw away the used paper filter and coffee grounds. 3. COFFEE MAKER PART Housing Carafe Plate Power Cord Carafe and carafe lid Washable Brew Basket CLEANING INSTRUCTIONS Wipe with a soft, damp cloth. 5....brew the remaining cleaning mixture into the carafe (until the level is recommended after every use , minerals and hard water can clog your coffee maker. Wash by hand in the dishwasher (top rack only). Turn OFF the coffeemaker and let it soak for a complete brewing cycle...
User Manual
Page 14
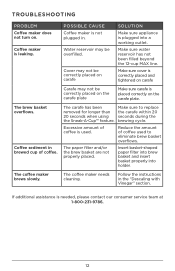
...20 seconds when using seconds during the the Sneak-A-Cup™ feature. The brew basket overflows. Excessive amount of coffee is leaking. The coffee maker brews slowly. The coffee maker needs cleaning. Make sure cover is correctly placed and tightened on carafe Carafe may not be correctly placed ...or the brew basket are not properly placed. The carafe has been Make sure to eliminate brew basket overflows. Reduce the amount of coffee. Cover may be correctly placed on carafe SOLUTION Make sure appliance is placed correctly on . If additional assistance is not plugged in ...
...20 seconds when using seconds during the the Sneak-A-Cup™ feature. The brew basket overflows. Excessive amount of coffee is leaking. The coffee maker brews slowly. The coffee maker needs cleaning. Make sure cover is correctly placed and tightened on carafe Carafe may not be correctly placed ...or the brew basket are not properly placed. The carafe has been Make sure to eliminate brew basket overflows. Reduce the amount of coffee. Cover may be correctly placed on carafe SOLUTION Make sure appliance is placed correctly on . If additional assistance is not plugged in ...

