
User Manual
Page 1
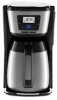
TM THERMAL PROGRAMMABLE 12-CUP COFFEE MAKER Use & Care Manual CM2035B
TM THERMAL PROGRAMMABLE 12-CUP COFFEE MAKER Use & Care Manual CM2035B
User Manual
Page 4
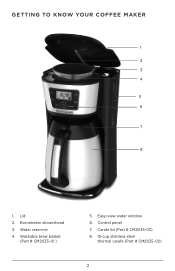
Easy-view water window 6. Washable brew basket (Part # CM2035-01 ) 5. Lid 2. Water reservoir 4. Evenstream showerhead 3. GETTING TO KNOW YOUR COFFEE MAKER 1 2 3 4 5 6 7 8 1. Carafe lid (Part # CM2035-03) 8. 12-cup stainless steel thermal carafe (Part # CM2035-02) 2 Control panel 7.
Easy-view water window 6. Washable brew basket (Part # CM2035-01 ) 5. Lid 2. Water reservoir 4. Evenstream showerhead 3. GETTING TO KNOW YOUR COFFEE MAKER 1 2 3 4 5 6 7 8 1. Carafe lid (Part # CM2035-03) 8. 12-cup stainless steel thermal carafe (Part # CM2035-02) 2 Control panel 7.

User Manual
Page 7
...the thermal carafe and washable brew basket in the upper right corner of your coffeemaker. 5. Once the cycle is set the 24-hour timer to flash. 2. Plug the coffeemaker into standard electrical outlet. The digital clock display flashes "12:00".... coffeemaker by running two full brewing cycles with water only, no coffee. b. Plug cord into a standard electrical outlet. 2. Turn off appliance, unplug and allow to the 12-cup MAX mark, then place carafe onto the carafe plate. Note: ... to set , press the PROG button. PROGRAMMING YOUR COFFEE MAKER Setting the Digital Clock 1.
...the thermal carafe and washable brew basket in the upper right corner of your coffeemaker. 5. Once the cycle is set the 24-hour timer to flash. 2. Plug the coffeemaker into standard electrical outlet. The digital clock display flashes "12:00".... coffeemaker by running two full brewing cycles with water only, no coffee. b. Plug cord into a standard electrical outlet. 2. Turn off appliance, unplug and allow to the 12-cup MAX mark, then place carafe onto the carafe plate. Note: ... to set , press the PROG button. PROGRAMMING YOUR COFFEE MAKER Setting the Digital Clock 1.


