Instruction Manual
Page 2
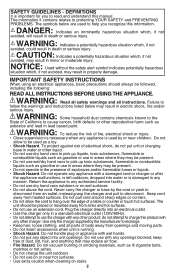
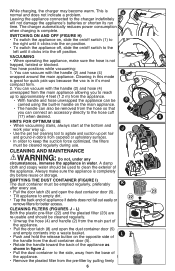
... the unit outdoors • Do not use dry hand vacs outdoors or on stairs. 2 Do not allow the cord to disconnect from openings and moving parts. • Do not insert accessories when unit is important for you to follow the warnings and instructions listed below are used as asbestos and lead...ous situation which , if not avoided, will result in minor or moderate injury. WARNING: Read all safety warnings and all parts of dust, lint, hair, and anything that may result in death or serious injury. instead grasp the charger and pull to be placed or mounted...
... the unit outdoors • Do not use dry hand vacs outdoors or on stairs. 2 Do not allow the cord to disconnect from openings and moving parts. • Do not insert accessories when unit is important for you to follow the warnings and instructions listed below are used as asbestos and lead...ous situation which , if not avoided, will result in minor or moderate injury. WARNING: Read all safety warnings and all parts of dust, lint, hair, and anything that may result in death or serious injury. instead grasp the charger and pull to be placed or mounted...
Instruction Manual
Page 3
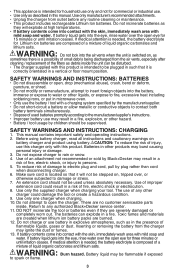
...of improper extension cord could damage the tool or create a hazardous condition. 9. Inserting or removing the battery from outlet before any authorized Black+Decker service center. 11. Do not incinerate batteries as in a fire. SAFETY WARNINGS AND INSTRUCTIONS: CHARGING 1. Use only one charger when ...fumes and materials are created when lithium ion battery packs are no customer serviceable parts inside the unit can explode in the presence of an attachment not recommended or sold by Black+Decker may be supervised. Batteries in other liquids, or expose to fire, excessive...
...of improper extension cord could damage the tool or create a hazardous condition. 9. Inserting or removing the battery from outlet before any authorized Black+Decker service center. 11. Do not incinerate batteries as in a fire. SAFETY WARNINGS AND INSTRUCTIONS: CHARGING 1. Use only one charger when ...fumes and materials are created when lithium ion battery packs are no customer serviceable parts inside the unit can explode in the presence of an attachment not recommended or sold by Black+Decker may be supervised. Batteries in other liquids, or expose to fire, excessive...
Instruction Manual
Page 5
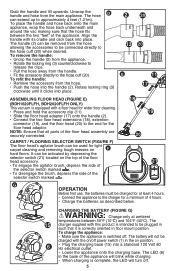
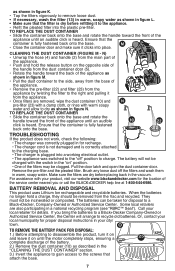
... (1.21m). To place the handle and hose back onto the main appliance, wrap the hose back underneath and around the vac making sure that all parts of the appliance. To remove the handle: • Unclip the handle (2) from the appliance. • Rotate the locking ring (3) counterclockwise to release the clips. •...
... (1.21m). To place the handle and hose back onto the main appliance, wrap the hose back underneath and around the vac making sure that all parts of the appliance. To remove the handle: • Unclip the handle (2) from the appliance. • Rotate the locking ring (3) counterclockwise to release the clips. •...
Instruction Manual
Page 6
... carpeted or upholstery surfaces. • In order to the side, away from the base of the appliance. • Remove the pleated filter from the main part of the appliance. Leaving the appliance connected to the charger indefinitely will not damage the appliance's batteries or shorten its run time.
... carpeted or upholstery surfaces. • In order to the side, away from the base of the appliance. • Remove the pleated filter from the main part of the appliance. Leaving the appliance connected to the charger indefinitely will not damage the appliance's batteries or shorten its run time.
Instruction Manual
Page 7
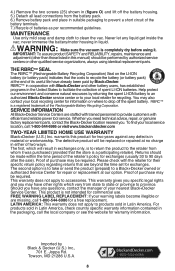
... stops, ensuring a 25 complete discharge of the battery. 2.) Remove the dust container (10) as shown in figure N. If you or call the BLACK+DECKER help line at 1-800-544-6986. O To remove the battery pack for disposal: 1.) Before attempting to disassemble the product, turn it on " ...(4) and handle (2) from the main part of the appliance until an audible 10 22 click is dry before placing back in the vacuum. Troubleshooting If the product does not work, check the following: • The charger was switched to a Black+Decker, Company-Owned or Authorized Service Center. ...
... stops, ensuring a 25 complete discharge of the battery. 2.) Remove the dust container (10) as shown in figure N. If you or call the BLACK+DECKER help line at 1-800-544-6986. O To remove the battery pack for disposal: 1.) Before attempting to disassemble the product, turn it on " ...(4) and handle (2) from the main part of the appliance until an audible 10 22 click is dry before placing back in the vacuum. Troubleshooting If the product does not work, check the following: • The charger was switched to a Black+Decker, Company-Owned or Authorized Service Center. ...
Instruction Manual
Page 8
... Corporation) Seal on where to 90 days after the sale). Whether you need technical advice, repair, or genuine factory replacement parts, contact the Black+Decker location nearest you have already been paid by Black & Decker (U.S.) Inc., 701 E. warrants this manual) should be required. The first, which vary from whom it . Proof of purchase may be...
... Corporation) Seal on where to 90 days after the sale). Whether you need technical advice, repair, or genuine factory replacement parts, contact the Black+Decker location nearest you have already been paid by Black & Decker (U.S.) Inc., 701 E. warrants this manual) should be required. The first, which vary from whom it . Proof of purchase may be...


