Instruction Manual
Page 2
...hazardous situation which , if not avoided, may result in death or serious injury. chlorine bleach, ammonia, drain cleaner, etc.) DO NOT vacuum Toner (for future reference. DO NOT run over the power cord with the appliance. WARNINGS: Before using an electrical appliances, basic precautions ... and follow all the filters fitted. When using this appliance, read and understand this product. DO NOT store or use the vacuum without the safety alert symbol indicates potentially hazardous situation which , if not avoided, will result in property damage. DANGER: Indicates...
...hazardous situation which , if not avoided, may result in death or serious injury. chlorine bleach, ammonia, drain cleaner, etc.) DO NOT vacuum Toner (for future reference. DO NOT run over the power cord with the appliance. WARNINGS: Before using an electrical appliances, basic precautions ... and follow all the filters fitted. When using this appliance, read and understand this product. DO NOT store or use the vacuum without the safety alert symbol indicates potentially hazardous situation which , if not avoided, will result in property damage. DANGER: Indicates...
Instruction Manual
Page 3
... as indicated on . DO use . If this manual. DO empty the Dust Canister and clean the filters regularly for domestic use extra care when vacuuming on dry, indoor surfaces. DO turn off controls before continuing. (refer to disconnect it has been dropped, damaged, left outdoors, or dropped into openings...for any damage caused by a third party, DO supply the instruction manual with plastic bags or any way. DO NOT handle the plug or vacuum cleaner with these instructions or any objects into liquid (water etc.) DO NOT close door on a level surface. DO NOT attempt to or from...
... as indicated on . DO use . If this manual. DO empty the Dust Canister and clean the filters regularly for domestic use extra care when vacuuming on dry, indoor surfaces. DO turn off controls before continuing. (refer to disconnect it has been dropped, damaged, left outdoors, or dropped into openings...for any damage caused by a third party, DO supply the instruction manual with plastic bags or any way. DO NOT handle the plug or vacuum cleaner with these instructions or any objects into liquid (water etc.) DO NOT close door on a level surface. DO NOT attempt to or from...
Instruction Manual
Page 4
... its cord. The following table shows the correct size to carry the current your tool may include the following symbols. Never pull or carry the vacuum cleaner by the flexible hose. 4 The smaller the gauge number, the heavier the cord. The symbols and their definitions are as follows: V volts A amperes Hz... 6 18 10 18 12 16 16 14 American Wire Gauge 16 16 14 16 14 12 16 14 12 12 Not Recommended Transporting your Vacuum To move your vacuum cleaner from room to room, unplug the unit and either push the appliance or carry using an extension cord, be sure to use...
... its cord. The following table shows the correct size to carry the current your tool may include the following symbols. Never pull or carry the vacuum cleaner by the flexible hose. 4 The smaller the gauge number, the heavier the cord. The symbols and their definitions are as follows: V volts A amperes Hz... 6 18 10 18 12 16 16 14 American Wire Gauge 16 16 14 16 14 12 16 14 12 12 Not Recommended Transporting your Vacuum To move your vacuum cleaner from room to room, unplug the unit and either push the appliance or carry using an extension cord, be sure to use...
Instruction Manual
Page 5
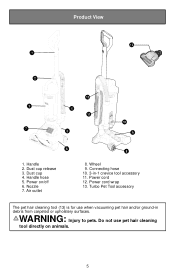
Power on animals. 5 Nozzle 7. WARNING: Injury to pets. Do not use when vacuuming pet hair and/or ground-in -1 crevice tool accessory 11. Air outlet 8 8. Dust cup release 3. Power cord 12. Product View 13 1 2 12 3 4 11 7 5 10 9 6 1. Handle 2. Handle hose 5. Wheel 9. Turbo Pet Tool accessory The pet hair cleaning tool (13) is for use pet hair cleaning tool directly on /off 6. Connecting hose 10. 3-in debris from carpeted or upholstery surfaces. Power cord wrap 13. Dust cup 4.
Power on animals. 5 Nozzle 7. WARNING: Injury to pets. Do not use when vacuuming pet hair and/or ground-in -1 crevice tool accessory 11. Air outlet 8 8. Dust cup release 3. Power cord 12. Product View 13 1 2 12 3 4 11 7 5 10 9 6 1. Handle 2. Handle hose 5. Wheel 9. Turbo Pet Tool accessory The pet hair cleaning tool (13) is for use pet hair cleaning tool directly on /off 6. Connecting hose 10. 3-in debris from carpeted or upholstery surfaces. Power cord wrap 13. Dust cup 4.
Instruction Manual
Page 6
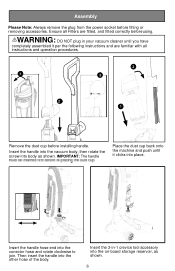
Insert the handle into the vacuum body, then rotate the screw into body as shown. 6 Insert the handle hose end into the other hose of the body. IMPORTANT: The handle Place ... into the on-board storage reservoir, as shown. Then insert the handle into the conector hose and rotate clockwise to join. Insert the 3-in your vacuum cleaner until it per the following instructions and are fitted, and fitted correctly before using. Assembly Please Note: Always remove the plug from the power...
Insert the handle into the vacuum body, then rotate the screw into body as shown. 6 Insert the handle hose end into the other hose of the body. IMPORTANT: The handle Place ... into the on-board storage reservoir, as shown. Then insert the handle into the conector hose and rotate clockwise to join. Insert the 3-in your vacuum cleaner until it per the following instructions and are fitted, and fitted correctly before using. Assembly Please Note: Always remove the plug from the power...
Instruction Manual
Page 8
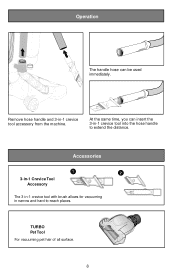
TURBO Pet Tool For vacuuming pet hair of all surface. 8 Accessories 1 2 3-in-1 Crevice Tool Accessory The 3-in-1 crevice tool with brush allows for vacuuming in -1 crevice tool accessory from the machine. Remove hose handle and 3-in narrow and hard-to extend the distance. Operation The handle hose can insert the 3-in-1 crevice tool into the hose handle to -reach places. At the same time, you can be used immediately.
TURBO Pet Tool For vacuuming pet hair of all surface. 8 Accessories 1 2 3-in-1 Crevice Tool Accessory The 3-in-1 crevice tool with brush allows for vacuuming in -1 crevice tool accessory from the machine. Remove hose handle and 3-in narrow and hard-to extend the distance. Operation The handle hose can insert the 3-in-1 crevice tool into the hose handle to -reach places. At the same time, you can be used immediately.
Instruction Manual
Page 9
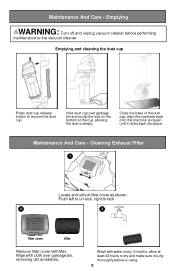
... machine and push until it is dry thoroughly before performing maintenance to remove the dust cup. Wipe with filter. Emptying WARNING: Turn off and unplug vacuum cleaner before re-using. 9 Hold dust cup over garbage bin, removing dirt and debris. Push left to un-lock, right to empty. Cleaning Exhaust... Filter 1 Locate and unlock filter cover as shown. Maintenance And Care - Emptying and cleaning the dust cup Press dust cup release button to the vacuum cleaner. Wash with water every 3 months, allow at least 24 hours to dry and make sure it clicks back into place.
... machine and push until it is dry thoroughly before performing maintenance to remove the dust cup. Wipe with filter. Emptying WARNING: Turn off and unplug vacuum cleaner before re-using. 9 Hold dust cup over garbage bin, removing dirt and debris. Push left to un-lock, right to empty. Cleaning Exhaust... Filter 1 Locate and unlock filter cover as shown. Maintenance And Care - Emptying and cleaning the dust cup Press dust cup release button to the vacuum cleaner. Wash with water every 3 months, allow at least 24 hours to dry and make sure it clicks back into place.
Instruction Manual
Page 10
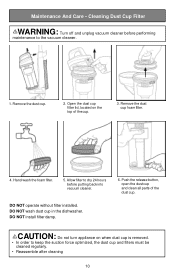
Remove the dust cup. 2. Allow filter to the vacuum cleaner. 1. Maintenance And Care - Open the dust cup filter lid, located on when dust cup is removed. • In order to keep the suction force ...: Do not turn appliance on the top of the dust cup. Hand wash the foam filter. 5. Cleaning Dust Cup Filter WARNING: Turn off and unplug vacuum cleaner before performing maintenance to dry 24 hours before putting back into...
Remove the dust cup. 2. Allow filter to the vacuum cleaner. 1. Maintenance And Care - Open the dust cup filter lid, located on when dust cup is removed. • In order to keep the suction force ...: Do not turn appliance on the top of the dust cup. Hand wash the foam filter. 5. Cleaning Dust Cup Filter WARNING: Turn off and unplug vacuum cleaner before performing maintenance to dry 24 hours before putting back into...
Instruction Manual
Page 11
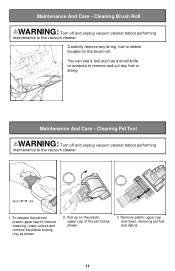
... remove the plastic locking ring as shown. 3. Maintenance And Care - UNLOCK LOCK 1. Cleaning Pet Tool WARNING: Turn off and unplug vacuum cleaner before performing maintenance to the vacuum cleaner. Remove plastic upper cap and clean, removing pet hair and debris. 11 Cleaning Brush Roll WARNING: Turn off and unplug... vacuum cleaner before performing maintenance to remove and cut any string, hair or debris located on the plastic upper cap of the pet tool...
... remove the plastic locking ring as shown. 3. Maintenance And Care - UNLOCK LOCK 1. Cleaning Pet Tool WARNING: Turn off and unplug vacuum cleaner before performing maintenance to the vacuum cleaner. Remove plastic upper cap and clean, removing pet hair and debris. 11 Cleaning Brush Roll WARNING: Turn off and unplug... vacuum cleaner before performing maintenance to remove and cut any string, hair or debris located on the plastic upper cap of the pet tool...

Instruction Manual
Page 12
Cleaning Vacuum And Tools Do not clean the vacuum cleaner, components or accessories using petrol or any other flammable liquid or solvents, etc. Maintenance And Care - Do Not place accessories, tools or components in a dishwasher. 12 Use only a moist cloth and mild detergent for cleaning the vacuum cleaner, components and accessories. After cleaning, wipe off the moisture on vacuum cleaner, components and accessories with a dry cloth. Clean only the outside of the vacuum cleaner.
Cleaning Vacuum And Tools Do not clean the vacuum cleaner, components or accessories using petrol or any other flammable liquid or solvents, etc. Maintenance And Care - Do Not place accessories, tools or components in a dishwasher. 12 Use only a moist cloth and mild detergent for cleaning the vacuum cleaner, components and accessories. After cleaning, wipe off the moisture on vacuum cleaner, components and accessories with a dry cloth. Clean only the outside of the vacuum cleaner.
Instruction Manual
Page 13
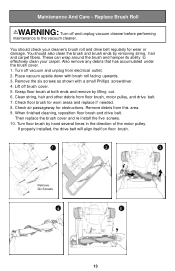
... if needed. 8. Turn floor brush by removing string, hair and carpet fibers. Replace Brush Roll WARNING: Turn off and unplug vacuum cleaner before performing maintenance to effectively clean your cleaner's brush roll and drive belt regularly for wear or damage. Check floor brush for... obstructions. Place vacuum upside down with a small Phillips screwdriver. 4. Then replace the brush cover and re-install the five screws. 10. Remove debris from...
... if needed. 8. Turn floor brush by removing string, hair and carpet fibers. Replace Brush Roll WARNING: Turn off and unplug vacuum cleaner before performing maintenance to effectively clean your cleaner's brush roll and drive belt regularly for wear or damage. Check floor brush for... obstructions. Place vacuum upside down with a small Phillips screwdriver. 4. Then replace the brush cover and re-install the five screws. 10. Remove debris from...
Instruction Manual
Page 14
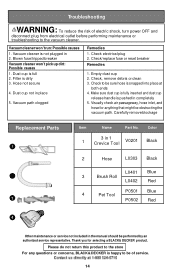
Check/replace fuse or reset breaker Remedies 1. Blown fuse/tripped breaker Vacuum cleaner won 't run:Possible causes 1. Check, remove debris or clean 3. Vacuum cleaner is happy to the store For any questions or concerns, BLACK&DECKER is not plugged in completely 5. Hose not secure 4. Carefully remove blockage Replacement Parts 1 2 3 Item Name Part No. Visually check...
Check/replace fuse or reset breaker Remedies 1. Blown fuse/tripped breaker Vacuum cleaner won 't run:Possible causes 1. Check, remove debris or clean 3. Vacuum cleaner is happy to the store For any questions or concerns, BLACK&DECKER is not plugged in completely 5. Hose not secure 4. Carefully remove blockage Replacement Parts 1 2 3 Item Name Part No. Visually check...


