
Instruction Manual
Page 2
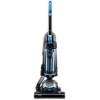
... read and follow all warnings and instructions in minor or moderate injury. DO NOT pick up flammable or combustible materials (i.e. DO NOT vacuum plaster, cement etc. DO NOT run over the power cord with the appliance. IMPORTANT SAFETY INSTRUCTION SAFETY GUIDELINES - CAUTION: Indicates a... below are familiar with reduced physical, sensory or mental capabilities, or lack of the appliance by a person responsible for use the vacuum cleaner if it contains relates to keep this instruction manual carefully before continuing. 2 DO NOT pick up toxic material (i.e. DO NOT...
... read and follow all warnings and instructions in minor or moderate injury. DO NOT pick up flammable or combustible materials (i.e. DO NOT vacuum plaster, cement etc. DO NOT run over the power cord with the appliance. IMPORTANT SAFETY INSTRUCTION SAFETY GUIDELINES - CAUTION: Indicates a... below are familiar with reduced physical, sensory or mental capabilities, or lack of the appliance by a person responsible for use the vacuum cleaner if it contains relates to keep this instruction manual carefully before continuing. 2 DO NOT pick up toxic material (i.e. DO NOT...
Instruction Manual
Page 3
...to modify this appliance is found during operation. DO NOT attempt to disconnect it . DO keep your appliance indoors in place. DO use the vacuum cleaner with plastic bags or any objects into liquid (water etc.) DO NOT close door on stairs. DO keep hair, loose clothing, fingers,.... DO disconnect the appliance from heated surfaces. No liability can be replaced by non-compliance with any other than those specified in use vacuum cleaner if it must be accepted for any uses other improper use or mishandling of the same voltage, frequency and rating as glass, nails...
...to modify this appliance is found during operation. DO NOT attempt to disconnect it . DO keep your appliance indoors in place. DO use the vacuum cleaner with plastic bags or any objects into liquid (water etc.) DO NOT close door on stairs. DO keep hair, loose clothing, fingers,.... DO disconnect the appliance from heated surfaces. No liability can be replaced by non-compliance with any other than those specified in use vacuum cleaner if it must be accepted for any uses other improper use or mishandling of the same voltage, frequency and rating as glass, nails...
Instruction Manual
Page 4
... 6 18 10 18 12 16 16 14 American Wire Gauge 16 16 14 16 14 12 16 14 12 12 Not Recommended Transporting your Vacuum To move your vacuum cleaner from room to use depending on your product will cause a drop in line voltage resulting in loss of Cord in doubt, use... gauge number, the heavier the cord. Volts 120V 240V Minimum Gauge for Cord Sets Total Length of power and overheating. Never pull or carry the vacuum cleaner by the flexible hose. 4 IMPORTANT SAFETY INSTRUCTION CONT. Never carry or pull the...
... 6 18 10 18 12 16 16 14 American Wire Gauge 16 16 14 16 14 12 16 14 12 12 Not Recommended Transporting your Vacuum To move your vacuum cleaner from room to use depending on your product will cause a drop in line voltage resulting in loss of Cord in doubt, use... gauge number, the heavier the cord. Volts 120V 240V Minimum Gauge for Cord Sets Total Length of power and overheating. Never pull or carry the vacuum cleaner by the flexible hose. 4 IMPORTANT SAFETY INSTRUCTION CONT. Never carry or pull the...
Instruction Manual
Page 6
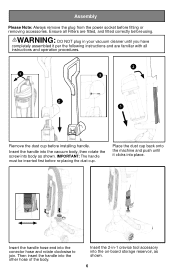
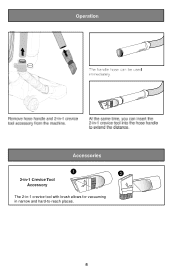
...procedures. 2 1 3 2 1 Remove the dust cup before using. Then insert the handle into body as shown. 6 Insert the 2-in your vacuum cleaner until it per the following instructions and are fitted, and fitted correctly before installing handle. IMPORTANT: The handle must be inserted first before fitting... or removing accessories. Insert the handle into the vacuum body, then rotate the screw into the other hose of the body. WARNING: DO NOT plug in -1 crevice tool accessory into the...
...procedures. 2 1 3 2 1 Remove the dust cup before using. Then insert the handle into body as shown. 6 Insert the 2-in your vacuum cleaner until it per the following instructions and are fitted, and fitted correctly before installing handle. IMPORTANT: The handle must be inserted first before fitting... or removing accessories. Insert the handle into the vacuum body, then rotate the screw into the other hose of the body. WARNING: DO NOT plug in -1 crevice tool accessory into the...
Instruction Manual
Page 8
The 2-in-1 crevice tool with brush allows for vacuuming in narrow and hard-to-reach places.
The 2-in-1 crevice tool with brush allows for vacuuming in narrow and hard-to-reach places.
Instruction Manual
Page 9
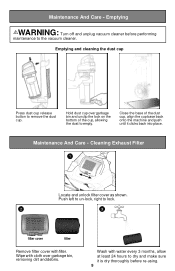
... back onto the machine and push until it is dry thoroughly before performing maintenance to remove the dust cup. Emptying WARNING: Turn off and unplug vacuum cleaner before re-using. 9 Wipe with filter. Emptying and cleaning the dust cup Press dust cup release button to the...
... back onto the machine and push until it is dry thoroughly before performing maintenance to remove the dust cup. Emptying WARNING: Turn off and unplug vacuum cleaner before re-using. 9 Wipe with filter. Emptying and cleaning the dust cup Press dust cup release button to the...
Instruction Manual
Page 10
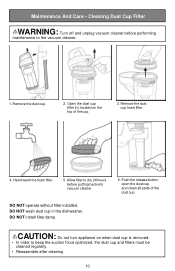
... foam filter. 4. CAUTION: Do not turn appliance on the top of the dust cup. Cleaning Dust Cup Filter WARNING: Turn off and unplug vacuum cleaner before putting back into vacuum cleaner. DO NOT operate without filter installed. Hand wash the foam filter. 5. DO NOT wash dust cup in the dishwasher. Allow filter... and clean all parts of the cup. 3. Open the dust cup filter lid, located on when dust cup is removed. • In order to the vacuum cleaner. 1. Maintenance And Care - DO NOT install filter damp. 6. Remove the dust cup. 2.
... foam filter. 4. CAUTION: Do not turn appliance on the top of the dust cup. Cleaning Dust Cup Filter WARNING: Turn off and unplug vacuum cleaner before putting back into vacuum cleaner. DO NOT operate without filter installed. Hand wash the foam filter. 5. DO NOT wash dust cup in the dishwasher. Allow filter... and clean all parts of the cup. 3. Open the dust cup filter lid, located on when dust cup is removed. • In order to the vacuum cleaner. 1. Maintenance And Care - DO NOT install filter damp. 6. Remove the dust cup. 2.
Instruction Manual
Page 11
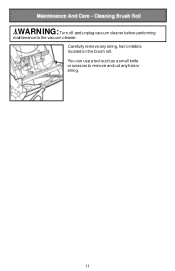
You can use a tool such as a small knife or scissors to the vacuum cleaner. .&.WARN ING: Turn off and unplug vacuum cleaner before performing maintenance to remove and cut any string, hair or debris located on the brush roll. Carefully remove any hair or string. 11
You can use a tool such as a small knife or scissors to the vacuum cleaner. .&.WARN ING: Turn off and unplug vacuum cleaner before performing maintenance to remove and cut any string, hair or debris located on the brush roll. Carefully remove any hair or string. 11
Instruction Manual
Page 12
Cleaning Vacuum And Tools Do not clean the vacuum cleaner, components or accessories using petrol or any other flammable liquid or solvents, etc. Do Not place accessories, tools or components in a dishwasher. 12 Maintenance And Care - After cleaning, wipe off the moisture on vacuum cleaner, components and accessories with a dry cloth. Use only a moist cloth and mild detergent for cleaning the vacuum cleaner, components and accessories. Clean only the outside of the vacuum cleaner.
Cleaning Vacuum And Tools Do not clean the vacuum cleaner, components or accessories using petrol or any other flammable liquid or solvents, etc. Do Not place accessories, tools or components in a dishwasher. 12 Maintenance And Care - After cleaning, wipe off the moisture on vacuum cleaner, components and accessories with a dry cloth. Use only a moist cloth and mild detergent for cleaning the vacuum cleaner, components and accessories. Clean only the outside of the vacuum cleaner.


