

Setup Manual
Page 2
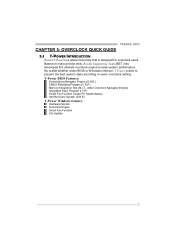
... 22 4.2 Raid Arrays 22 4.3 How RAID Works 22 Chapter 5: OverClock Quick Guide 25 5.1 T-Power Introduction 25 5.2 T-Power BIOS Feature 26 5.3 T-Power Windows Feature 34 Chapter 6: Useful Help 43 6.1 Driver Installation Note 43 6.2 Award BIOS Beep Code 44 6.3 Extra Information 44 6.4 Troubleshooting 46 Appendencies: SPEC In Other Language 48 German...48 France...50...
... 22 4.2 Raid Arrays 22 4.3 How RAID Works 22 Chapter 5: OverClock Quick Guide 25 5.1 T-Power Introduction 25 5.2 T-Power BIOS Feature 26 5.3 T-Power Windows Feature 34 Chapter 6: Useful Help 43 6.1 Driver Installation Note 43 6.2 Award BIOS Beep Code 44 6.3 Extra Information 44 6.4 Troubleshooting 46 Appendencies: SPEC In Other Language 48 German...48 France...50...

Setup Manual
Page 7
DVI-D VGA 1.5 MOTHERBOARD LAYOUT JKBMS1 JATXPWR2 JCFAN1 TA690G AM2 JATXPWR1 JTVOUT1 JHDMI DIMMA1 DIMMB1 DIMMA2 DIMMB2 Socket A M2 JUSB1 JUSBLAN1 JNFAN1 AMD 690G IDE1 FDD1 AUDIO1 LAN JAUDIOF1 PEX16_1 Codec PEX1_1 JSPDIF_OUT1 JSPDIF_IN1 JCDIN1 PCI1 BAT1 JCMOS1 AMD SB600 BIOS SATA2 SATA1 Super I/O JPRNT1 PCI2 JCOM1 JUSB2 JUSB3 LED_D1 LED_D2 SATA4 SATA3 JUSB4 JSFAN2 JPANEL1 PWRSW1 JSFAN1 RSTSW1 Note: ■ represents the 1st pin. 7
DVI-D VGA 1.5 MOTHERBOARD LAYOUT JKBMS1 JATXPWR2 JCFAN1 TA690G AM2 JATXPWR1 JTVOUT1 JHDMI DIMMA1 DIMMB1 DIMMA2 DIMMB2 Socket A M2 JUSB1 JUSBLAN1 JNFAN1 AMD 690G IDE1 FDD1 AUDIO1 LAN JAUDIOF1 PEX16_1 Codec PEX1_1 JSPDIF_OUT1 JSPDIF_IN1 JCDIN1 PCI1 BAT1 JCMOS1 AMD SB600 BIOS SATA2 SATA1 Super I/O JPRNT1 PCI2 JCOM1 JUSB2 JUSB3 LED_D1 LED_D2 SATA4 SATA3 JUSB4 JSFAN2 JPANEL1 PWRSW1 JSFAN1 RSTSW1 Note: ■ represents the 1st pin. 7

Setup Manual
Page 18
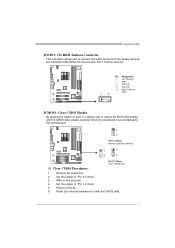
Remove AC power line. 2. Set the jumper to "Pin 2-3 close ". 5. Power on pin2-3, it allows user to restore the BIOS safe setting and the CMOS data, please carefully follow the procedures to "Pin 1-2 close ". 3. Set the jumper to avoid damaging the motherboard. 13 13 Pin 1-2 ...
Remove AC power line. 2. Set the jumper to "Pin 2-3 close ". 5. Power on pin2-3, it allows user to restore the BIOS safe setting and the CMOS data, please carefully follow the procedures to "Pin 1-2 close ". 3. Set the jumper to avoid damaging the motherboard. 13 13 Pin 1-2 ...
Setup Manual
Page 25
... Overclock Engine Smart Fan Function Life Update 25 Based on many precise tests, Biostar Engineering Team (BET) has developed this ultimate overclock engine to users' overclock setting. T-Power BIOS Features: Overclocking Navigator Engine (O.N.E.) CMOS Reloading Program (C.R.P.) Memory Integration Test (M.I.T., ...Navigator Engine) Integrated Flash Program (I.F.P.) Smart Fan Function (under BIOS or Windows interface, T-Power is designed for overclock users. TA690G AM2 CHAPTER 5: OVERCLOCK QUICK GUIDE 5.1 T-POWER INTRODUCTION Biostar T-Power is a whole new utility that is able to present...
... Overclock Engine Smart Fan Function Life Update 25 Based on many precise tests, Biostar Engineering Team (BET) has developed this ultimate overclock engine to users' overclock setting. T-Power BIOS Features: Overclocking Navigator Engine (O.N.E.) CMOS Reloading Program (C.R.P.) Memory Integration Test (M.I.T., ...Navigator Engine) Integrated Flash Program (I.F.P.) Smart Fan Function (under BIOS or Windows interface, T-Power is designed for overclock users. TA690G AM2 CHAPTER 5: OVERCLOCK QUICK GUIDE 5.1 T-POWER INTRODUCTION Biostar T-Power is a whole new utility that is able to present...

Setup Manual
Page 26
Manual Overclock System (M.O.S.) MOS is designed for both Elite and Casual overclockers. Overclocking Navigator Engine (O.N.E.): ONE provides two powerful overclocking engines: MOS and AOS for experienced overclock users. It allows users to customize personal overclock settings. 26 Motherboard Manual 5.2 T-POWER BIOS FEATURE A.
Manual Overclock System (M.O.S.) MOS is designed for both Elite and Casual overclockers. Overclocking Navigator Engine (O.N.E.): ONE provides two powerful overclocking engines: MOS and AOS for experienced overclock users. It allows users to customize personal overclock settings. 26 Motherboard Manual 5.2 T-POWER BIOS FEATURE A.
Setup Manual
Page 29
.... B. Moreover, users are able to save an ideal overclock setting during overclock operation. CMOS Reloading Program (C.R.P.): It allows users to save different CMOS settings into BIOS-ROM. There are 50 sets of record addresses in total, and users are able to personal preference. 29 Users are able to name the CMOS...
.... B. Moreover, users are able to save an ideal overclock setting during overclock operation. CMOS Reloading Program (C.R.P.): It allows users to save different CMOS settings into BIOS-ROM. There are 50 sets of record addresses in total, and users are able to personal preference. 29 Users are able to name the CMOS...

Setup Manual
Page 31
...item "Integrated Flash Program" to finish the process. However, it can 't be re-configured. Step 1: Go to Biostar website (http://www.biostar.com.tw) to upgrade BIOS. When the system hangs up . E. Step 5: When the BIOS update is completed, press YES to get the following frame and choose the... BIOS file downloaded in the default BIOS setting, and all overclock settings will automatically log in step 1....
...item "Integrated Flash Program" to finish the process. However, it can 't be re-configured. Step 1: Go to Biostar website (http://www.biostar.com.tw) to upgrade BIOS. When the system hangs up . E. Step 5: When the BIOS update is completed, press YES to get the following frame and choose the... BIOS file downloaded in the default BIOS setting, and all overclock settings will automatically log in step 1....

Setup Manual
Page 42
.... Clear CMOS: Click on this button will link to Biostar website and BIOS file will pop up to run BIOS flashing process, and it's easy and safe. Motherboard Manual D. Update BIOS: Click on this button to illustrate BIOS related information. Backup BIOS: Click on this button, and BIOS file will clear the CMOS Data. Live Update When...
.... Clear CMOS: Click on this button will link to Biostar website and BIOS file will pop up to run BIOS flashing process, and it's easy and safe. Motherboard Manual D. Update BIOS: Click on this button to illustrate BIOS related information. Backup BIOS: Click on this button, and BIOS file will clear the CMOS Data. Live Update When...

Setup Manual
Page 44
... 6.3 EXTRA INFORMATION A. Insert the bootable disk into floppy disk. 5. Copy "AWDFLASH.exe" and respectively BIOS into floppy drive and press Enter. 6. Download the Flash Utility "AWDFLASH.exe" from Biostar website. 4. BIOS Update After you fail to update BIOS or BIOS is shown after boot-up to DOS prompt. 7. System will work properly. 44 Motherboard Manual...
... 6.3 EXTRA INFORMATION A. Insert the bootable disk into floppy disk. 5. Copy "AWDFLASH.exe" and respectively BIOS into floppy drive and press Enter. 6. Download the Flash Utility "AWDFLASH.exe" from Biostar website. 4. BIOS Update After you fail to update BIOS or BIOS is shown after boot-up to DOS prompt. 7. System will work properly. 44 Motherboard Manual...

User Manual
Page 2
... Settings 13 Chapter 4: RAID Functions 19 4.1 Operation System 19 4.2 Raid Arrays 19 4.3 How RAID Works 19 Chapter 5: Useful Help 22 5.1 Driver Installation Note 22 5.2 Award BIOS Beep Code 23 5.3 Extra Information 23 5.4 Troubleshooting 25 Chapter 6: WarpSpeeder™ III 26 6.1 Introduction 26 6.2 System Requirement 26 6.3 Installation 27 6.4 WarpSpeeder™ III 28 Appendencies...
... Settings 13 Chapter 4: RAID Functions 19 4.1 Operation System 19 4.2 Raid Arrays 19 4.3 How RAID Works 19 Chapter 5: Useful Help 22 5.1 Driver Installation Note 22 5.2 Award BIOS Beep Code 23 5.3 Extra Information 23 5.4 Troubleshooting 25 Chapter 6: WarpSpeeder™ III 26 6.1 Introduction 26 6.2 System Requirement 26 6.3 Installation 27 6.4 WarpSpeeder™ III 28 Appendencies...

User Manual
Page 7
1.5 MOTHERBOARD LAYOUT JKBMS1 JCOM1 JATXP WR2 A690G-M2 Super I/O Socket A M2 DVI VGA DI MMA1 DI MMB1 DI MMA2 DI MMB2 FDD1 JUSB1 JCFAN1 IDE1 JATXPWR1 JUSBLAN1 AUDIO1 (for Ver 5.x) AUDIO2 (for Ver 6.x) LAN PEX1_1 AMD 690G PEX16_1 PCI1 AMD SB600 JSFAN1 JCMOS1 BIOS BAT1 SATA4 SATA1 Codec PCI2 JAUDIOF1 JCDIN1 JSPDIF_OUT1 JUSB2 JUSB3 JUSB4 SATA3 JPRNT1 SATA2 JPANEL1 Note: ■ represents the 1st pin. 5
1.5 MOTHERBOARD LAYOUT JKBMS1 JCOM1 JATXP WR2 A690G-M2 Super I/O Socket A M2 DVI VGA DI MMA1 DI MMB1 DI MMA2 DI MMB2 FDD1 JUSB1 JCFAN1 IDE1 JATXPWR1 JUSBLAN1 AUDIO1 (for Ver 5.x) AUDIO2 (for Ver 6.x) LAN PEX1_1 AMD 690G PEX16_1 PCI1 AMD SB600 JSFAN1 JCMOS1 BIOS BAT1 SATA4 SATA1 Codec PCI2 JAUDIOF1 JCDIN1 JSPDIF_OUT1 JUSB2 JUSB3 JUSB4 SATA3 JPRNT1 SATA2 JPANEL1 Note: ■ represents the 1st pin. 5
User Manual
Page 19
Power on pin2-3, it allows user to restore the BIOS safe setting and the CMOS data, please carefully follow the procedures to avoid damaging the motherboard. 1 3 Pin 1-2 Close: Normal Operation (default). 1 1 3 3 Pin 2-3 Close: Clear CMOS ... your desired password or clear the CMOS data. 17 Set the jumper to "Pin 1-2 close ". 3. Set the jumper to "Pin 2-3 close ". 5. Remove AC power line. 2. A690G-M2 JCDIN1: CD-ROM Audio-in Connector This connector allows user to connect the audio source from the variaty devices, like CD-ROM, DVD-ROM, PCI...
Power on pin2-3, it allows user to restore the BIOS safe setting and the CMOS data, please carefully follow the procedures to avoid damaging the motherboard. 1 3 Pin 1-2 Close: Normal Operation (default). 1 1 3 3 Pin 2-3 Close: Clear CMOS ... your desired password or clear the CMOS data. 17 Set the jumper to "Pin 1-2 close ". 3. Set the jumper to "Pin 2-3 close ". 5. Remove AC power line. 2. A690G-M2 JCDIN1: CD-ROM Audio-in Connector This connector allows user to connect the audio source from the variaty devices, like CD-ROM, DVD-ROM, PCI...

User Manual
Page 25
....) 8. System will work properly. 23 Download the Flash Utility "AWDFLASH.exe" from Biostar website. 4. Copy "AWDFLASH.exe" and respectively BIOS into floppy drive and press Enter. 6. Insert the bootable disk into floppy disk. 5. A690G-M2 5.2 AWARD BIOS BEEP CODE Beep Sound Meaning One long beep followed by virus, the Boot-Block function will help to...
....) 8. System will work properly. 23 Download the Flash Utility "AWDFLASH.exe" from Biostar website. 4. Copy "AWDFLASH.exe" and respectively BIOS into floppy drive and press Enter. 6. Insert the bootable disk into floppy disk. 5. A690G-M2 5.2 AWARD BIOS BEEP CODE Beep Sound Meaning One long beep followed by virus, the Boot-Block function will help to...

User Manual
Page 28
... systems if the setting is either the original system speed or a suitable one click. If you use Windows XP, you can get detail descriptions about BIOS model and chipsets. The Overvoltage Manager, on our main panel. With the Overclock Manager, users can easily adjust the frequency they prefer or they can...
... systems if the setting is either the original system speed or a suitable one click. If you use Windows XP, you can get detail descriptions about BIOS model and chipsets. The Overvoltage Manager, on our main panel. With the Overclock Manager, users can easily adjust the frequency they prefer or they can...

