User Guide
Page 1
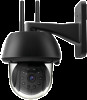
USER'S GUIDE Wi-Fi® Outdoor Pet Video Camera Models: SCOUT73, SCOUT73-2 The features described in this user's guide are subject to modifications without prior notice.
USER'S GUIDE Wi-Fi® Outdoor Pet Video Camera Models: SCOUT73, SCOUT73-2 The features described in this user's guide are subject to modifications without prior notice.
User Guide
Page 2
... 5 - 6 before you can monitor your PC or Notebook. Thank you are away, wonder no more. You can also view the camera's video from your original dated sales receipt for warranty coverage. Registration is not required for your product. In addition to your iPhone®... system. Welcome... If you have always wondered what happens when you for purchasing your new Motorola Wi-Fi® Outdoor Pet Video Camera! Inside the Box • 1 x Wi-Fi® Camera Unit • 1 x Power Adapter • 1 x Quick Start Guide • 1 x User Guide • 4 x Mounting Screws and Dry Wall...
... 5 - 6 before you can monitor your PC or Notebook. Thank you are away, wonder no more. You can also view the camera's video from your original dated sales receipt for warranty coverage. Registration is not required for your product. In addition to your iPhone®... system. Welcome... If you have always wondered what happens when you for purchasing your new Motorola Wi-Fi® Outdoor Pet Video Camera! Inside the Box • 1 x Wi-Fi® Camera Unit • 1 x Power Adapter • 1 x Quick Start Guide • 1 x User Guide • 4 x Mounting Screws and Dry Wall...

User Guide
Page 3
Wall mount base 3. LAN socket* (Adaptive Enthernet socket for night vision) 4. Keep the Wi-Fi® Camera Unit away from these types of other 2.4 GHz products, such as hub, router, etc.) * An Ethernet connection is required when the Wi-Fi&#... that you have a good Wi-Fi® connection available. Light Sensor (for installing your Wi-Fi® Camera Unit • Use of products, or turn them off if they appear to a spare port on your Camera 1 2 6 5 7 4 3 9 8 10 1. PAIR Button 7. Important guidelines for night mode detection) 6. Power / Status Indicator 8. Power ...
Wall mount base 3. LAN socket* (Adaptive Enthernet socket for night vision) 4. Keep the Wi-Fi® Camera Unit away from these types of other 2.4 GHz products, such as hub, router, etc.) * An Ethernet connection is required when the Wi-Fi&#... that you have a good Wi-Fi® connection available. Light Sensor (for installing your Wi-Fi® Camera Unit • Use of products, or turn them off if they appear to a spare port on your Camera 1 2 6 5 7 4 3 9 8 10 1. PAIR Button 7. Important guidelines for night mode detection) 6. Power / Status Indicator 8. Power ...
User Guide
Page 4
... 36 4.3.5 General settings 36 4.3.6 Hubble for Motorola Monitors Settings 38 4.3.7 Features of the Hubble for Motorola Monitors App 39 4.4 Camera Functions: Working with iPhone®/iPad 17 3.3.1 Power ON and Connect SCOUT73 camera 17 3.3.2 Download Hubble for Motorola Monitors App 17 3.3.3 Run Hubble for Motorola Monitors on Android™ device 12 3.2.4 Add...
... 36 4.3.5 General settings 36 4.3.6 Hubble for Motorola Monitors Settings 38 4.3.7 Features of the Hubble for Motorola Monitors App 39 4.4 Camera Functions: Working with iPhone®/iPad 17 3.3.1 Power ON and Connect SCOUT73 camera 17 3.3.2 Download Hubble for Motorola Monitors App 17 3.3.3 Run Hubble for Motorola Monitors on Android™ device 12 3.2.4 Add...

User Guide
Page 5
...until your pet is prone to chewing, we strongly recommend you would like to monitor (ie back yard or front door). ● Fix the camera to the product. Secure the cord away from the cot and out of the area you keep the unit and adapter cord more than 1 metre... infants or children, keep this unit is acclimated to a flat wall using the wall mounting plate and following the instructions provided. Safety Instructions 5 Never place camera or cords inside a cot or near a bed. Only use extension cords with any electrical device, supervision of its reach. As with AC Adapters. Safety...
...until your pet is prone to chewing, we strongly recommend you would like to monitor (ie back yard or front door). ● Fix the camera to the product. Secure the cord away from the cot and out of the area you keep the unit and adapter cord more than 1 metre... infants or children, keep this unit is acclimated to a flat wall using the wall mounting plate and following the instructions provided. Safety Instructions 5 Never place camera or cords inside a cot or near a bed. Only use extension cords with any electrical device, supervision of its reach. As with AC Adapters. Safety...

User Guide
Page 6
..., always read all small parts away from children. • This product is not a toy. WARNING This Wi-Fi® Camera Unit is compliant with it . • This Wi-Fi® Camera Unit is not a substitute for responsible adult supervision. • Keep this user's guide for future reference. • Heed Warnings...not defeat the safety purpose of children and pets. • Do not cover the Wi-Fi® Camera Unit with a towel or blanket. • Test the Wi-Fi® Camera Unit and all its functions so that you are familiar with all relevant electromagnetic field standards and is, ...
..., always read all small parts away from children. • This product is not a toy. WARNING This Wi-Fi® Camera Unit is compliant with it . • This Wi-Fi® Camera Unit is not a substitute for responsible adult supervision. • Keep this user's guide for future reference. • Heed Warnings...not defeat the safety purpose of children and pets. • Do not cover the Wi-Fi® Camera Unit with a towel or blanket. • Test the Wi-Fi® Camera Unit and all its functions so that you are familiar with all relevant electromagnetic field standards and is, ...

User Guide
Page 7
...contact qualified service personnel. Periodically examine the cord, and if its appearance indicates damage or deteriorated insulation, have it is recommended that the camera equipment be connected to a surge protector. Surge protectors should bear the UL listing mark or CSA certification mark. CAUTION: Maintain electrical safety... to be routed so that will keep the product running in the risk of power source indicated on or pinched by your camera dealer or local power company. Power supply cords should not be operated only from battery power, or other . ENGLISH the ...
...contact qualified service personnel. Periodically examine the cord, and if its appearance indicates damage or deteriorated insulation, have it is recommended that the camera equipment be connected to a surge protector. Surge protectors should bear the UL listing mark or CSA certification mark. CAUTION: Maintain electrical safety... to be routed so that will keep the product running in the risk of power source indicated on or pinched by your camera dealer or local power company. Power supply cords should not be operated only from battery power, or other . ENGLISH the ...

User Guide
Page 8
...used with your extension cable to verify its compliance prior to a wall using the supplied mounting brackets. • Camera Installation - Check the rating of your cameras, using the wall mount provided. Slots and openings on a bed, sofa, rug, or other products (including... ventilation is recommended. 8 Safety Instructions This product should be mounted securely to a wall to avoid the camera falling and potentially causing serious damage. • Camera Extension Cables - The mounting of the product and to the manufacturer's instructions and use attachments unless recommended ...
...used with your extension cable to verify its compliance prior to a wall using the supplied mounting brackets. • Camera Installation - Check the rating of your cameras, using the wall mount provided. Slots and openings on a bed, sofa, rug, or other products (including... ventilation is recommended. 8 Safety Instructions This product should be mounted securely to a wall to avoid the camera falling and potentially causing serious damage. • Camera Extension Cables - The mounting of the product and to the manufacturer's instructions and use attachments unless recommended ...

User Guide
Page 9
Test your Internet speed at: http://www.speedtest.net/ System Requirements 9 System Requirements Web Portal • Windows® 7 • Mac OS® 10.7 • Chrome™ 24 • Internet Explorer® 9 • Safari® 6 • Java™ 7 • Firefox® 18.0 • Adobe® Flash® Player 15.0 Android™ System • Version 4.2 or above iPhone®/iPad® iOS • Version 7.0 or above Wi-Fi requirements: • At least 0.6 Mbps upload bandwidth per camera. ENGLISH 2.
Test your Internet speed at: http://www.speedtest.net/ System Requirements 9 System Requirements Web Portal • Windows® 7 • Mac OS® 10.7 • Chrome™ 24 • Internet Explorer® 9 • Safari® 6 • Java™ 7 • Firefox® 18.0 • Adobe® Flash® Player 15.0 Android™ System • Version 4.2 or above iPhone®/iPad® iOS • Version 7.0 or above Wi-Fi requirements: • At least 0.6 Mbps upload bandwidth per camera. ENGLISH 2.

User Guide
Page 10
... during the in the ON position. Access your Camera locally View your Camera from any compatible device remotely When a user tries to access the Camera, our secure server authenticates the user's identity and permits access to the Camera. 3.1 Setup Connect the Camera to . Make sure the password of the router...suitable mains power socket and make sure the power switch is available for connection state: LED is red and blue and flashing slowly - The Camera must be within range of LED Indication: - Pair / Setup state: LED is blue and flashing slowly Note: You can only setup via...
... during the in the ON position. Access your Camera locally View your Camera from any compatible device remotely When a user tries to access the Camera, our secure server authenticates the user's identity and permits access to the Camera. 3.1 Setup Connect the Camera to . Make sure the password of the router...suitable mains power socket and make sure the power switch is available for connection state: LED is red and blue and flashing slowly - The Camera must be within range of LED Indication: - Pair / Setup state: LED is blue and flashing slowly Note: You can only setup via...
User Guide
Page 11
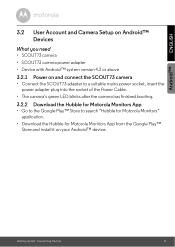
... - ENGLISH Android™ 3.2 User Account and Camera Setup on Android™ Devices What you need • SCOUT73 camera • SCOUT73 camera power adapter • Device with Android™ system version 4.2 or above 3.2.1 Power on and connect the SCOUT73 camera • Connect the SCOUT73 adapter to a suitable... mains power socket, insert the power adapter plug into the socket of the Power Cable. • The camera's green LED blinks after the camera has finished booting. 3.2.2 Download the Hubble for Motorola Monitors App • Go to the Google Play™ Store to...
... - ENGLISH Android™ 3.2 User Account and Camera Setup on Android™ Devices What you need • SCOUT73 camera • SCOUT73 camera power adapter • Device with Android™ system version 4.2 or above 3.2.1 Power on and connect the SCOUT73 camera • Connect the SCOUT73 adapter to a suitable... mains power socket, insert the power adapter plug into the socket of the Power Cable. • The camera's green LED blinks after the camera has finished booting. 3.2.2 Download the Hubble for Motorola Monitors App • Go to the Google Play™ Store to...
User Guide
Page 13
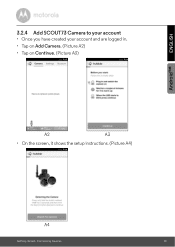
ENGLISH 3.2.4 Add SCOUT73 Camera to your account • Once you have created your account and are logged in. • Tap on Add Camera. (Picture A2) • Tap on Continue. (Picture A3) Android™ A2 A3 • On the screen, it shows the setup instructions. (Picture A4) A4 Getting started - Connecting Devices 13
ENGLISH 3.2.4 Add SCOUT73 Camera to your account • Once you have created your account and are logged in. • Tap on Add Camera. (Picture A2) • Tap on Continue. (Picture A3) Android™ A2 A3 • On the screen, it shows the setup instructions. (Picture A4) A4 Getting started - Connecting Devices 13

User Guide
Page 14
Connecting Devices Then tap on Connect. (Picture A7, A8) A7 14 A8 Getting started - • Press and hold the PAIR button for 3 seconds on the side of SCOUT73 camera and the indicator will auto-search and connect to your Camera as shown on the pictures below. (Pictures A5 & A6) A5 A6 • Select Wi-Fi® Network and tap Continue, enter password then tap on Search for Camera. • The app will flash rapidly.
Connecting Devices Then tap on Connect. (Picture A7, A8) A7 14 A8 Getting started - • Press and hold the PAIR button for 3 seconds on the side of SCOUT73 camera and the indicator will auto-search and connect to your Camera as shown on the pictures below. (Pictures A5 & A6) A5 A6 • Select Wi-Fi® Network and tap Continue, enter password then tap on Search for Camera. • The app will flash rapidly.

User Guide
Page 15
Connecting Devices 15 Once it has finished searching it will display the result of the connection attempt (Picture A9, A10). A9 A10 Getting started - ENGLISH Android™ • When the camera is connecting to the Wi-Fi® Network, please wait a few minutes whilst the camera searches for a connection. If the connection has failed, please tap on the Retry button and repeat the steps described in 3.2.4.
Connecting Devices 15 Once it has finished searching it will display the result of the connection attempt (Picture A9, A10). A9 A10 Getting started - ENGLISH Android™ • When the camera is connecting to the Wi-Fi® Network, please wait a few minutes whilst the camera searches for a connection. If the connection has failed, please tap on the Retry button and repeat the steps described in 3.2.4.

User Guide
Page 16
Connecting Devices • Tap on Watch Live Camera to view camera video and the LED indicator will turn on. (Picture A11) • Tap on Hubble logo and go back to the camera list. (Picture A12) A11 A12 16 Getting started -
Connecting Devices • Tap on Watch Live Camera to view camera video and the LED indicator will turn on. (Picture A11) • Tap on Hubble logo and go back to the camera list. (Picture A12) A11 A12 16 Getting started -
User Guide
Page 17
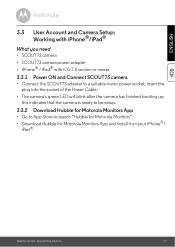
... adapter • iPhone® / iPad® with iOS 7.0 version or newer 3.3.1 Power ON and Connect SCOUT73 camera • Connect the SCOUT73 adapter to search "Hubble for Motorola Monitors". • Download Hubble for Motorola Monitors App • Go to App Store to a suitable ...mains power socket, insert the plug into the socket of the Power Cable. • The camera's green LED will blink after the camera has finished booting up; this indicates that the camera is ready to be setup. 3.3.2 Download Hubble for Motorola Monitors App and install it on your iPhone®...
... adapter • iPhone® / iPad® with iOS 7.0 version or newer 3.3.1 Power ON and Connect SCOUT73 camera • Connect the SCOUT73 adapter to search "Hubble for Motorola Monitors". • Download Hubble for Motorola Monitors App • Go to App Store to a suitable ...mains power socket, insert the plug into the socket of the Power Cable. • The camera's green LED will blink after the camera has finished booting up; this indicates that the camera is ready to be setup. 3.3.2 Download Hubble for Motorola Monitors App and install it on your iPhone®...

User Guide
Page 19
ENGLISH 3.3.4 Add SCOUT73 Camera to your account • Once you have created your account and are logged in: • Tap on Add Camera. (Picture i2) • Tap on "SCOUT73". (Picture i3) iOS i2 i3 • Follow the instruction on screen to turn on the Bluetooth™ function of your iPhone®/iPad®. i4 Getting started - Connecting Devices 19
ENGLISH 3.3.4 Add SCOUT73 Camera to your account • Once you have created your account and are logged in: • Tap on Add Camera. (Picture i2) • Tap on "SCOUT73". (Picture i3) iOS i2 i3 • Follow the instruction on screen to turn on the Bluetooth™ function of your iPhone®/iPad®. i4 Getting started - Connecting Devices 19

User Guide
Page 22
Then, enter password and tap Next. (Pictures i11, i12) i11 22 i12 Getting started - Connecting Devices • Follow the steps above to locate the camera with identification number "CameraHD-xxxxxxxxxx", then tap on Continue once your iPhone® or iPad® has connected to the camera. (Picture i10) i10 • Select Wi-Fi® Network then tap Continue.
Then, enter password and tap Next. (Pictures i11, i12) i11 22 i12 Getting started - Connecting Devices • Follow the steps above to locate the camera with identification number "CameraHD-xxxxxxxxxx", then tap on Continue once your iPhone® or iPad® has connected to the camera. (Picture i10) i10 • Select Wi-Fi® Network then tap Continue.

User Guide
Page 23
Once it has finished searching it will display the result of the connection attempt (Picture i13, i14). If the connection has failed, please tap on Hubble logo to go back to Camera list. (Picture i16) i15 i16 Getting started - iOS i13 i14 • Press Watch Live Camera to the Wi-Fi® Network, please wait a few minutes whilst the camera searches for a connection. ENGLISH • When the camera is connecting to view Camera video. (Picture i15) • Tap on the Retry button and repeat the steps described in 3.3.4. Connecting Devices 23
Once it has finished searching it will display the result of the connection attempt (Picture i13, i14). If the connection has failed, please tap on Hubble logo to go back to Camera list. (Picture i16) i15 i16 Getting started - iOS i13 i14 • Press Watch Live Camera to the Wi-Fi® Network, please wait a few minutes whilst the camera searches for a connection. ENGLISH • When the camera is connecting to view Camera video. (Picture i15) • Tap on the Retry button and repeat the steps described in 3.3.4. Connecting Devices 23

User Guide
Page 24
... on to the mounting plate at the center hole with the tamper-proof screw by the wrench key provided. 24 Camera Camera 4.1 Install your Camera and setting up . Secure the Camera Unit. • Fasten the unit to 4 catches on the mounting plate. • Make sure the unit sits firmly on the wall with the...
... on to the mounting plate at the center hole with the tamper-proof screw by the wrench key provided. 24 Camera Camera 4.1 Install your Camera and setting up . Secure the Camera Unit. • Fasten the unit to 4 catches on the mounting plate. • Make sure the unit sits firmly on the wall with the...