Operation Manual
Page 2
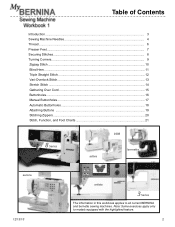
Note: Some exercises apply only to all current BERNINA and bernette sewing machines. Table of Contents Introduction ...3 Sewing Machine Needles 4 Thread ...6 Presser Feet ...7 Securing Stitches...8 Turning Corners...9 Zigzag Stitch...10 Blind Hem ...11 Triple Straight Stitch 12 Vari-Overlock Stitch... Buttonholes...17 Automatic Buttonholes 18 Attaching Buttons ...19 Stitching Zippers...20 Stitch, Function, and Foot Charts 21 8 Series activa 1008 bernette aurora 12/13/10 artista 3 Series The information in this workbook applies to models equipped with the highlighted feature. 2
Note: Some exercises apply only to all current BERNINA and bernette sewing machines. Table of Contents Introduction ...3 Sewing Machine Needles 4 Thread ...6 Presser Feet ...7 Securing Stitches...8 Turning Corners...9 Zigzag Stitch...10 Blind Hem ...11 Triple Straight Stitch 12 Vari-Overlock Stitch... Buttonholes...17 Automatic Buttonholes 18 Attaching Buttons ...19 Stitching Zippers...20 Stitch, Function, and Foot Charts 21 8 Series activa 1008 bernette aurora 12/13/10 artista 3 Series The information in this workbook applies to models equipped with the highlighted feature. 2
Operation Manual
Page 3
... working through the stitching exercises on a fairly regular basis will let you test your machine can then be used as a reference tool in a 3-ring binder. Sign up now for your BERNINA or bernette sewing machine. Stitch numbers, presser feet, and machine functions are listed for you determine if your knowledge and review the points the exercise...
... working through the stitching exercises on a fairly regular basis will let you test your machine can then be used as a reference tool in a 3-ring binder. Sign up now for your BERNINA or bernette sewing machine. Stitch numbers, presser feet, and machine functions are listed for you determine if your knowledge and review the points the exercise...
Operation Manual
Page 4
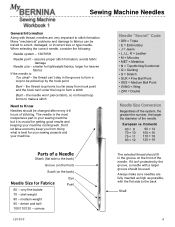
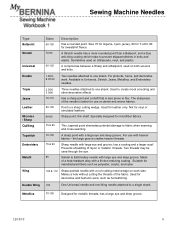
...to a bent, damaged, or incorrect size or type needle. smaller for heavier fabrics If the needle is crucial for your sewing projects and your machine running well. Sewing Machine Needles General Information Along with thread, needles are fully inserted as high as possible, with a larger groove should be used.... Many "mechanical" problems and damage to fabrics can 't stay in your sewing machine but it isn't protected by the hook point Bent - larger for lightweight fabrics; the thread can be picked up by the groove, a...
...to a bent, damaged, or incorrect size or type needle. smaller for heavier fabrics If the needle is crucial for your sewing projects and your machine running well. Sewing Machine Needles General Information Along with thread, needles are fully inserted as high as possible, with a larger groove should be used.... Many "mechanical" problems and damage to fabrics can 't stay in your sewing machine but it isn't protected by the hook point Bent - larger for lightweight fabrics; the thread can be picked up by the groove, a...
Operation Manual
Page 5
.... For pintucks, hems, and decorative work , such as polyester, acrylic, and nylon. 100 & 110 Sharp-pointed needle with large eye and deep groove. thin shaft. Sewing Machine Needles Type Ballpoint Stretch Universal Double Triple Jeans Leather Microtex / Sharp Quilting Topstitch Embroidery Metafil Wing Double Wing Sizes 60-100 70-90 60-120...
.... For pintucks, hems, and decorative work , such as polyester, acrylic, and nylon. 100 & 110 Sharp-pointed needle with large eye and deep groove. thin shaft. Sewing Machine Needles Type Ballpoint Stretch Universal Double Triple Jeans Leather Microtex / Sharp Quilting Topstitch Embroidery Metafil Wing Double Wing Sizes 60-100 70-90 60-120...
Operation Manual
Page 6
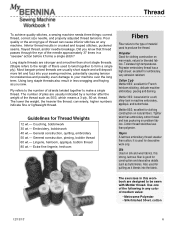
... bobbinwork 30 wt.- Tolerates high temperatures. Mettler 50/2; Use one of the following in machine embroidery, appliqué, and buttonholes. Thread To achieve quality stitches, a sewing machine needs three things: correct thread, correct size needle, and properly adjusted thread tensions. Mettler... thread. excellent for a soft, shiny look in any machine. loose twist for embroidery, very abrasion resistant. Ply refers to the number of material used to twist together to your sewing machine, potentially causing tension inconsistencies and possibly even damage to form...
... bobbinwork 30 wt.- Tolerates high temperatures. Mettler 50/2; Use one of the following in machine embroidery, appliqué, and buttonholes. Thread To achieve quality stitches, a sewing machine needs three things: correct thread, correct size needle, and properly adjusted thread tensions. Mettler... thread. excellent for a soft, shiny look in any machine. loose twist for embroidery, very abrasion resistant. Ply refers to the number of material used to twist together to your sewing machine, potentially causing tension inconsistencies and possibly even damage to form...
Operation Manual
Page 7
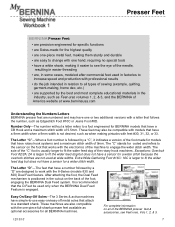
...speed and production with the electronics of 9mm. The sole of the needle, resulting in the cutout on the foot that attach to all BERNINA machines. Presser Feet BERNINA Presser Feet: ▪ are precision engineered for specific functions ▪ are Swiss-made for the highest quality ▪ are one-piece...tools ▪ have a white shank, making it indicates a version of the foot made for coded and refers to the sensor on the back of sewing (example, quilting, garment-making pintucks with feet #30, 31, 32, or 33. Exceptions: Overlock Foot #2/2A: 2A is usually larger to fit...
...speed and production with the electronics of 9mm. The sole of the needle, resulting in the cutout on the foot that attach to all BERNINA machines. Presser Feet BERNINA Presser Feet: ▪ are precision engineered for specific functions ▪ are Swiss-made for the highest quality ▪ are one-piece...tools ▪ have a white shank, making it indicates a version of the foot made for coded and refers to the sensor on the back of sewing (example, quilting, garment-making pintucks with feet #30, 31, 32, or 33. Exceptions: Overlock Foot #2/2A: 2A is usually larger to fit...
Operation Manual
Page 8
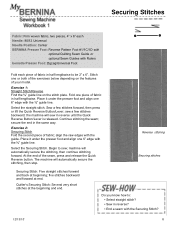
... stitch? ▪ Sew in reverse? ▪ End a seam with the ⅝" guide line. Place it under the presser foot and align one 6" edge with Rulers bernette Presser Foot: Zigzag/Universal Foot Fold each Needle: 80/12 Universal Needle Position: Center BERNINA Presser Foot: Reverse ...stitching, then continue stitching forward. Stitch one piece of your model. Sew a few stitches backward; machine will automatically secure the stitching, then stop. five stitches backward and forward at end. the machine will sew in the same way. Exercise 1: Straight Stitch/Reverse Find the &#...
... stitch? ▪ Sew in reverse? ▪ End a seam with the ⅝" guide line. Place it under the presser foot and align one 6" edge with Rulers bernette Presser Foot: Zigzag/Universal Foot Fold each Needle: 80/12 Universal Needle Position: Center BERNINA Presser Foot: Reverse ...stitching, then continue stitching forward. Stitch one piece of your model. Sew a few stitches backward; machine will automatically secure the stitching, then stop. five stitches backward and forward at end. the machine will sew in the same way. Exercise 1: Straight Stitch/Reverse Find the &#...
Operation Manual
Page 9
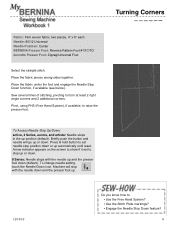
...touch the Needle Down icon. Place the fabric under the foot and engage the Needle Stop Down function, if available (see below). Sew several lines of stitching, pivoting to raise the presser foot. Briefly push the button and needle will stop position down or up and ... the Needle Stop Down feature? 9 Turning Corners Fabric: Firm woven fabric, two pieces, 4" x 6" each Needle: 80/12 Universal Needle Position: Center BERNINA Presser Foot: Reverse Pattern Foot #1/1C/1D bernette Presser Foot: Zigzag/Universal Foot Select the straight stitch. Place the fabric pieces wrong sides together...
...touch the Needle Down icon. Place the fabric under the foot and engage the Needle Stop Down function, if available (see below). Sew several lines of stitching, pivoting to raise the presser foot. Briefly push the button and needle will stop position down or up and ... the Needle Stop Down feature? 9 Turning Corners Fabric: Firm woven fabric, two pieces, 4" x 6" each Needle: 80/12 Universal Needle Position: Center BERNINA Presser Foot: Reverse Pattern Foot #1/1C/1D bernette Presser Foot: Zigzag/Universal Foot Select the straight stitch. Place the fabric pieces wrong sides together...
Operation Manual
Page 11
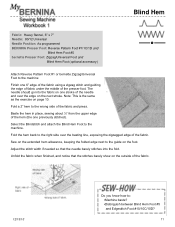
...the Blind Hem Foot to the guide on the extended hem allowance, keeping the folded edge next to the machine. Sew on the foot. Baste the hem in place, sewing about ¼" from the upper edge of the fabric and press. Unfold the fabric when finished, and ... Needle: 80/12 Universal Needle Position: As programmed BERNINA Presser Foot: Reverse Pattern Foot #1/1C/1D and Blind Hem Foot #5 bernette Presser Foot: Zigzag/Universal Foot and Blind Hem Foot (optional accessory) Attach Reverse Pattern Foot #1 or bernette Zigzag/Universal Foot to the machine Finish one 6" edge of the fabric using a ...
...the Blind Hem Foot to the guide on the extended hem allowance, keeping the folded edge next to the machine. Sew on the foot. Baste the hem in place, sewing about ¼" from the upper edge of the fabric and press. Unfold the fabric when finished, and ... Needle: 80/12 Universal Needle Position: As programmed BERNINA Presser Foot: Reverse Pattern Foot #1/1C/1D and Blind Hem Foot #5 bernette Presser Foot: Zigzag/Universal Foot and Blind Hem Foot (optional accessory) Attach Reverse Pattern Foot #1 or bernette Zigzag/Universal Foot to the machine Finish one 6" edge of the fabric using a ...
Operation Manual
Page 12
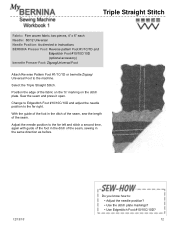
... in the ditch of the seam, sew the length of the seam. Select the Triple Straight Stitch. With the guide of the foot in instructions BERNINA Presser Foot: Reverse pattern Foot #1/1C/1D and Edgestitch Foot #10/10C/10D (optional accessory) bernette Presser Foot: Zigzag/Universal Foot Attach Reverse...plate. Adjust the needle position to the machine. Change to Edgestitch Foot #10/10C/10D and adjust the needle position to : ▪ Adjust the needle position? ▪ Use the stitch plate markings? ▪ Use Edgestitch Foot #10/10C/10D? 12 Sew the seam and press it open. Position...
... in the ditch of the seam, sew the length of the seam. Select the Triple Straight Stitch. With the guide of the foot in instructions BERNINA Presser Foot: Reverse pattern Foot #1/1C/1D and Edgestitch Foot #10/10C/10D (optional accessory) bernette Presser Foot: Zigzag/Universal Foot Attach Reverse...plate. Adjust the needle position to the machine. Change to Edgestitch Foot #10/10C/10D and adjust the needle position to : ▪ Adjust the needle position? ▪ Use the stitch plate markings? ▪ Use Edgestitch Foot #10/10C/10D? 12 Sew the seam and press it open. Position...
Operation Manual
Page 15
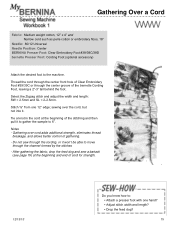
...of the stitching and then pull it won't be able to 6". sewing over cord adds additional strength, eliminates thread breakage, and allows better control of cord for strength. 12/13/10 Do you know how to the machine. Gathering over the cord, but not into it. Stitch ⅝"...cotton, 12" x 4" and Narrow cord such as perle cotton or embroidery floss, 18" Needle: 80/12 Universal Needle Position: Center BERNINA Presser Foot: Clear Embroidery Foot #39/39C/39D bernette Presser Foot: Cording Foot (optional accessory) Attach the desired foot to : ▪ Attach a presser foot with one 12" edge;...
...of the stitching and then pull it won't be able to 6". sewing over cord adds additional strength, eliminates thread breakage, and allows better control of cord for strength. 12/13/10 Do you know how to the machine. Gathering over the cord, but not into it. Stitch ⅝"...cotton, 12" x 4" and Narrow cord such as perle cotton or embroidery floss, 18" Needle: 80/12 Universal Needle Position: Center BERNINA Presser Foot: Clear Embroidery Foot #39/39C/39D bernette Presser Foot: Cording Foot (optional accessory) Attach the desired foot to : ▪ Attach a presser foot with one 12" edge;...
Operation Manual
Page 17
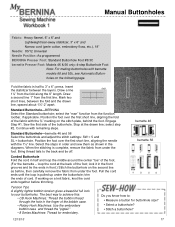
...bernette 46 Standard Buttonhole-bernette 46 and 56 Select the buttonhole and adjust the stitch settings: SW = 5 and SL = buttonhole. Bring thread tails to your buttonholes. The best way to achieve this: • CB Hook Machines: Thread the bobbin thread through the hole in the finger of the buttonhole. press. Sew...stitching is pulled up under the foot. trim the ends of the foot. (For the bernette - Draw a second line 1" from under the buttonhole; Standard Buttonhole-BERNINA Select the Standard buttonhole; Position the foot over the first short line, aligning the needle with...
...bernette 46 Standard Buttonhole-bernette 46 and 56 Select the buttonhole and adjust the stitch settings: SW = 5 and SL = buttonhole. Bring thread tails to your buttonholes. The best way to achieve this: • CB Hook Machines: Thread the bobbin thread through the hole in the finger of the buttonhole. press. Sew...stitching is pulled up under the foot. trim the ends of the foot. (For the bernette - Draw a second line 1" from under the buttonhole; Standard Buttonhole-BERNINA Select the Standard buttonhole; Position the foot over the first short line, aligning the needle with...
Operation Manual
Page 18
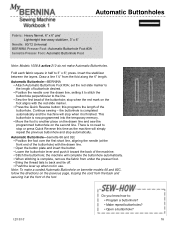
...Automatic Buttonholes Fabric: Heavy flannel, 6" x 6" and Lightweight tear-away stabilizer, 3" x 6" Needle: 80/12 Universal BERNINA Presser Foot: Automatic Buttonhole Foot #3A bernette Presser Foot: Automatic Buttonhole Foot Note: Models 1008 & activa 210 do not make a corded Automatic Buttonhole on...machine. • Stitch the buttonhole; Automatic Buttonhole-bernette 66 and 92c ▪ Position the foot over the drawn line, setting it at the front end of the buttonhole. Draw a line 1½" from the back and securing it to stitch the buttonhole perpendicular to the line. ▪ Sew...
...Automatic Buttonholes Fabric: Heavy flannel, 6" x 6" and Lightweight tear-away stabilizer, 3" x 6" Needle: 80/12 Universal BERNINA Presser Foot: Automatic Buttonhole Foot #3A bernette Presser Foot: Automatic Buttonhole Foot Note: Models 1008 & activa 210 do not make a corded Automatic Buttonhole on...machine. • Stitch the buttonhole; Automatic Buttonhole-bernette 66 and 92c ▪ Position the foot over the drawn line, setting it at the front end of the buttonhole. Draw a line 1½" from the back and securing it to stitch the buttonhole perpendicular to the line. ▪ Sew...
Operation Manual
Page 19
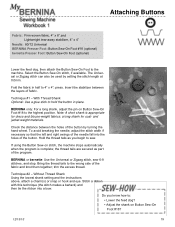
Insert the stabilizer between the holes of the program. BERNINA only: For a long shank, adjust the pin on stitch, the machine stops automatically when the program is appropriate for coat- Hold the thread tails as part of the button by setting the stitch ...: Firm woven fabric, 4" x 8" and Lightweight tear-away stabilizer, 4" x 4" Needle: 80/12 Universal BERNINA Presser Foot: Button Sew-On Foot #18 (optional) bernette Presser Foot: Button Sew-On Foot (optional) Lower the feed dog, then attach the Button Sew-On Foot to : ▪ Lower the feed dog? ▪ Adjust the shank on Button...
Insert the stabilizer between the holes of the program. BERNINA only: For a long shank, adjust the pin on stitch, the machine stops automatically when the program is appropriate for coat- Hold the thread tails as part of the button by setting the stitch ...: Firm woven fabric, 4" x 8" and Lightweight tear-away stabilizer, 4" x 4" Needle: 80/12 Universal BERNINA Presser Foot: Button Sew-On Foot #18 (optional) bernette Presser Foot: Button Sew-On Foot (optional) Lower the feed dog, then attach the Button Sew-On Foot to : ▪ Lower the feed dog? ▪ Adjust the shank on Button...
Operation Manual
Page 20
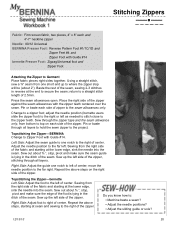
...8" each and 4"-7" neckline zipper Needle: 80/12 Universal BERNINA Presser Foot: Reverse Pattern Foot #1/1C/1D and Zipper Feet #4 and Zipper Foot with Guide #14 bernette Presser Foot: Zigzag/Universal foot and Zipper Foot Attaching the Zipper to the far right. Sew up the left as needed to stitch close to a ...seam. Do you know how to top on the right side of the fabric and starting at the end to left . Sew through all layers. Sewing from bottom to : ▪ Machine baste a seam? ▪ Adjust the needle positions? ▪ Adjust the sliding guide or sole? 12/13/10 20
...8" each and 4"-7" neckline zipper Needle: 80/12 Universal BERNINA Presser Foot: Reverse Pattern Foot #1/1C/1D and Zipper Feet #4 and Zipper Foot with Guide #14 bernette Presser Foot: Zigzag/Universal foot and Zipper Foot Attaching the Zipper to the far right. Sew up the left as needed to stitch close to a ...seam. Do you know how to top on the right side of the fabric and starting at the end to left . Sew through all layers. Sewing from bottom to : ▪ Machine baste a seam? ▪ Adjust the needle positions? ▪ Adjust the sliding guide or sole? 12/13/10 20
Operation Manual
Page 21
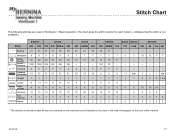
...21 21 21 21 30 30 Blindstitch 9 9 9 9 9 9 Button Sew-On 60 60 60 60 60 60 Quilter's Securing 1324 1324 324 324 ...bernette 380 350PE 330 210 1008 92c 66 56 46* 23 21 -- -- -- -- -- -- -- 7 7 7 5 14 12 11 -- 104 75 -- -- 5 5 5 -- 3 13 12 5 7 -- -- -- -- -- -- -- -- -- -- -- -- -- -- -- 0 0 0 11 dial 1 1 1 dial 1 1 1 1 1 2 2 2 1&2 9 9 9 -- -- -- -- -- -- 6 6 6 4 5 51 16 14 -- 19 17 14 -- 4 6 6 8 -- 3 3 3 -- 3 6 5 76 2 2 2 2 2 3 3 33 * The stitches on bernette model 46 are not numbered on the machine...
...21 21 21 21 30 30 Blindstitch 9 9 9 9 9 9 Button Sew-On 60 60 60 60 60 60 Quilter's Securing 1324 1324 324 324 ...bernette 380 350PE 330 210 1008 92c 66 56 46* 23 21 -- -- -- -- -- -- -- 7 7 7 5 14 12 11 -- 104 75 -- -- 5 5 5 -- 3 13 12 5 7 -- -- -- -- -- -- -- -- -- -- -- -- -- -- -- 0 0 0 11 dial 1 1 1 dial 1 1 1 1 1 2 2 2 1&2 9 9 9 -- -- -- -- -- -- 6 6 6 4 5 51 16 14 -- 19 17 14 -- 4 6 6 8 -- 3 3 3 -- 3 6 5 76 2 2 2 2 2 3 3 33 * The stitches on bernette model 46 are not numbered on the machine...


