
Manual
Page 2
Repeal the process until you ' complete satislochon and enjoyment. Tmte %pent alM.% stage will ehmincer eirots and will result In you cue familial wnh the come oh and then functions. Vow new envmg-mochine is the product of many years of teseotch and development Quality innleiails hove beenused loge-thee with functional design techmoues to obtain the minimum benefits, please study this booklet carefully lollawina each step on operceng efhoen y and many years of dependoble service. Befee attempting to sew, hewevet, and to ac hove on veer machine.
Repeal the process until you ' complete satislochon and enjoyment. Tmte %pent alM.% stage will ehmincer eirots and will result In you cue familial wnh the come oh and then functions. Vow new envmg-mochine is the product of many years of teseotch and development Quality innleiails hove beenused loge-thee with functional design techmoues to obtain the minimum benefits, please study this booklet carefully lollawina each step on operceng efhoen y and many years of dependoble service. Befee attempting to sew, hewevet, and to ac hove on veer machine.

Manual
Page 3
... STITCHING lTor Model 440 only) 28. INTRODUCTION 2. ACCESSORIES 5. UPPER THREADING 10. OVERSEWING EDGES NEEDLE 23. MAINTAINING THE MACHINE-NEEDLE PLATE 29. SEWING IN ZIPS INSERTING BOBBIN AND BOBBIN CASE. FOOT PRESSURE DROP FEED CONTROL TWO-STEP PRESSER FOOT LIFTER 12. DARNING (Not...420.430.440 Page Title I. THREE STEP ZIG-ZAG (Nol for Model 410) TRIPLE ZIG-ZAG (RIC-RAC) 16. BUTTONHOLING 20. STRETCH OVERLOCK AND OVERLOCK (Not for Model 4101 24. COLOUR CODING (Noi for Mode', 410 cdilla) 27. THREE NEEDLE POSITIONS SEWING PATTERNS MANUALLY TWIN NEEDLE SEWING...
... STITCHING lTor Model 440 only) 28. INTRODUCTION 2. ACCESSORIES 5. UPPER THREADING 10. OVERSEWING EDGES NEEDLE 23. MAINTAINING THE MACHINE-NEEDLE PLATE 29. SEWING IN ZIPS INSERTING BOBBIN AND BOBBIN CASE. FOOT PRESSURE DROP FEED CONTROL TWO-STEP PRESSER FOOT LIFTER 12. DARNING (Not...420.430.440 Page Title I. THREE STEP ZIG-ZAG (Nol for Model 410) TRIPLE ZIG-ZAG (RIC-RAC) 16. BUTTONHOLING 20. STRETCH OVERLOCK AND OVERLOCK (Not for Model 4101 24. COLOUR CODING (Noi for Mode', 410 cdilla) 27. THREE NEEDLE POSITIONS SEWING PATTERNS MANUALLY TWIN NEEDLE SEWING...

Manual
Page 6
and switch on the machine power switch. `2 3 FOOT CONTROL The foot control pedal regulates the sewing speed (21. See - Notes" page 6 open face plate. CONNECTING MACHINE TO POWER SUPPLY .1111 (41/1.1.0 Connect the machine too power supply as illustrated (11. NEEDLE LIGHT To reploce lomp, first disconnect from power supply by removing plug from socket. Using the correct plug. unscrew lamp and replace With ci suitable new one (3).
and switch on the machine power switch. `2 3 FOOT CONTROL The foot control pedal regulates the sewing speed (21. See - Notes" page 6 open face plate. CONNECTING MACHINE TO POWER SUPPLY .1111 (41/1.1.0 Connect the machine too power supply as illustrated (11. NEEDLE LIGHT To reploce lomp, first disconnect from power supply by removing plug from socket. Using the correct plug. unscrew lamp and replace With ci suitable new one (3).

Manual
Page 7
... Connect BLUE wire to the electric section. As the colours of the mains lend of the needle, such as follows: When leaving the sewing machine unattended, the morns swath mull be observed without foil: The mow ng needle is a source of danger "risk of work. If the... marked N or coloured BLACK. Connect BROWN wire to the foot control unit, may only be removed from the socket outlet When servicing the sewing machine. THE MAXIMUM INPUT OF LAMP: 240 V 15 W THIS APPLIANCE CONFORMS TO THE STATUTORY RADIO INTERFERENCE SUPPRESSION REGULATIONS. IMPORTANT The following code: BLUE...
... Connect BLUE wire to the electric section. As the colours of the mains lend of the needle, such as follows: When leaving the sewing machine unattended, the morns swath mull be observed without foil: The mow ng needle is a source of danger "risk of work. If the... marked N or coloured BLACK. Connect BROWN wire to the foot control unit, may only be removed from the socket outlet When servicing the sewing machine. THE MAXIMUM INPUT OF LAMP: 240 V 15 W THIS APPLIANCE CONFORMS TO THE STATUTORY RADIO INTERFERENCE SUPPRESSION REGULATIONS. IMPORTANT The following code: BLUE...
Manual
Page 12
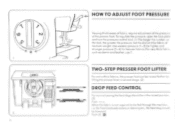
... weight. For very thick fob, u such as denim and leather, use 7. e for free hand embroidery or darningetc., the feed dog s'llnuId be fed through the machine. Set the dial al 4 for heavier fabrics. TWO-STEP PRESSER FOOT LIFTER For e vtro thick fabrics, the presser foot con be ro,sed further by... !thing the presser lever o second stage. 121 DROP FEED CONTROL For normal sewing the eed dogs should be in the raised position 131 When the fobnc is not required to be lowered Push (31
... weight. For very thick fob, u such as denim and leather, use 7. e for free hand embroidery or darningetc., the feed dog s'llnuId be fed through the machine. Set the dial al 4 for heavier fabrics. TWO-STEP PRESSER FOOT LIFTER For e vtro thick fabrics, the presser foot con be ro,sed further by... !thing the presser lever o second stage. 121 DROP FEED CONTROL For normal sewing the eed dogs should be in the raised position 131 When the fobnc is not required to be lowered Push (31
Manual
Page 18
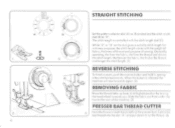
... length, 11) e 1/4. 2 17 REVERSE STITCHING To finish n scam, push the reverse button and hold it, sewing few stitches backwards. Slide the fabric out horn under 'he stitch length is released the machine sill sew forwards ogain (21 REMOVING FABRIC Raise the thread take up lever to the Feat of... sewing. Centre the TO I he foot to its highest position by tur nirg the hand wheel towards you....
... length, 11) e 1/4. 2 17 REVERSE STITCHING To finish n scam, push the reverse button and hold it, sewing few stitches backwards. Slide the fabric out horn under 'he stitch length is released the machine sill sew forwards ogain (21 REMOVING FABRIC Raise the thread take up lever to the Feat of... sewing. Centre the TO I he foot to its highest position by tur nirg the hand wheel towards you....
Manual
Page 20
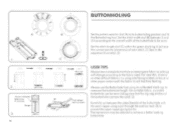
... the sequence illustrated. (71 1 2 2' r 1 S 4-1 Artery ,.e[ .n itateitt .6" `3 IA Pint, rig fur Kars USER TIPS Always sew o sample buttonhole on some spore fobnc ossettings will change according to old machine feeding. BUTTONHOLING • A Set the pattern selector chi,' (A) to its colibroled markings to measure the buttonhole length. On suitable fabric, a corded buttonhole can be...
... the sequence illustrated. (71 1 2 2' r 1 S 4-1 Artery ,.e[ .n itateitt .6" `3 IA Pint, rig fur Kars USER TIPS Always sew o sample buttonhole on some spore fobnc ossettings will change according to old machine feeding. BUTTONHOLING • A Set the pattern selector chi,' (A) to its colibroled markings to measure the buttonhole length. On suitable fabric, a corded buttonhole can be...
Manual
Page 22
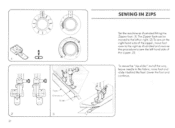
II l The Zipper foot can be moved to the leh or right. (2) To sew on the right hand side of the zipper, move foot over to sew the left hand side of the zipper. (3) To move the "zip slider out of the woy. ' 0 9 2 2s Enonono 3 SEWING IN ZIPS Set the machine as illustrated and 'ewe: se the procedure to the right as illustrated fining [he Zipper loot. leave needle in the fabric, raise foot and slide d behind the foot Lower the foot and continue. 4
II l The Zipper foot can be moved to the leh or right. (2) To sew on the right hand side of the zipper, move foot over to sew the left hand side of the zipper. (3) To move the "zip slider out of the woy. ' 0 9 2 2s Enonono 3 SEWING IN ZIPS Set the machine as illustrated and 'ewe: se the procedure to the right as illustrated fining [he Zipper loot. leave needle in the fabric, raise foot and slide d behind the foot Lower the foot and continue. 4
Manual
Page 26
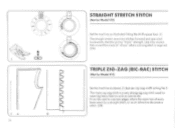
... 410) Set the mock ine as canvas etc It con be used for oreos of "'stress- n" 2 A STRAIGHT STRETCH STITCH (Not for Model 410) Set the machine os illustrated fining the All Purpose foot. ;11 The sly night stretch sews two stitches forward and one stitch backwards.
... 410) Set the mock ine as canvas etc It con be used for oreos of "'stress- n" 2 A STRAIGHT STRETCH STITCH (Not for Model 410) Set the machine os illustrated fining the All Purpose foot. ;11 The sly night stretch sews two stitches forward and one stitch backwards.


