
Manual
Page 2
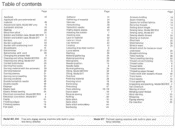
...hemstitch needle 48 Double needle 46 Edgings 23 Elastic tape 22 Elastic thread sewing 24 Electrical connection, Model 807/810 4 Electrical connection, Model 817 5 Faults 51 Finishing edges 14 Finishing seams 15 Flat seam 19 Gatherer Gathering of material Hemmer ...feed control Lycra seams Marking Material gathering Material patching Monograms Needle position Needle table Normal gathering Oiling, Model 807/810 Oiling, Model 817 Overlock Patching material Patching tricot Perforating Pintucking Plain stitching Quick seam Reverse sewing Ruffling Satin stitch Satin stitch...
...hemstitch needle 48 Double needle 46 Edgings 23 Elastic tape 22 Elastic thread sewing 24 Electrical connection, Model 807/810 4 Electrical connection, Model 817 5 Faults 51 Finishing edges 14 Finishing seams 15 Flat seam 19 Gatherer Gathering of material Hemmer ...feed control Lycra seams Marking Material gathering Material patching Monograms Needle position Needle table Normal gathering Oiling, Model 807/810 Oiling, Model 817 Overlock Patching material Patching tricot Perforating Pintucking Plain stitching Quick seam Reverse sewing Ruffling Satin stitch Satin stitch...
Manual
Page 4
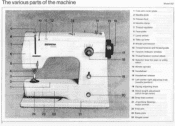
... 22 Free-arm 23 Base-plate 24 Hinged cover The various parts of the machine • rt 10 11 12 13 14 8 7 BERNINA 6 5 II 4 3 2 1 fl a4 24 23 22 21 2 Model 807 15 16 17 18 19 20 .0" 1 Free-arm cover-plate 2 Needle-plate 3 Presser-foot 4 Needle-clamp 5 Thread regulator 6 Face-plate...
... 22 Free-arm 23 Base-plate 24 Hinged cover The various parts of the machine • rt 10 11 12 13 14 8 7 BERNINA 6 5 II 4 3 2 1 fl a4 24 23 22 21 2 Model 807 15 16 17 18 19 20 .0" 1 Free-arm cover-plate 2 Needle-plate 3 Presser-foot 4 Needle-clamp 5 Thread regulator 6 Face-plate...
Manual
Page 5
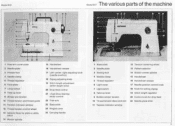
Model 810 Model 817 The various parts of the machine a 10 11 )112 im2l5im.13 14 IS 10 1 Olink•MA 5 4 3 2 L 24 22 1 Free-arm cover-plate 2 Needle-plate 3 ...
Model 810 Model 817 The various parts of the machine a 10 11 )112 im2l5im.13 14 IS 10 1 Olink•MA 5 4 3 2 L 24 22 1 Free-arm cover-plate 2 Needle-plate 3 ...
Manual
Page 6
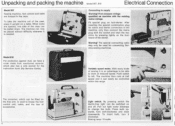
... be used to house the foot control unit, cable, and the box of accessories. _ 4 Light switch. tdi Fit special plug on and off. Model 810 For protection against dust, we have a cover made from reenforced material, which can be fitted on a table. Push switch to change the bulb.... foot- chine by pressing lightly on machine with the socket and start the ma- The container, which also has a side pocket for connecting Bernina sewing machines. To insert bulb, turn anti-clockwise and draw downwards. The machine can now be placed without difficulty wherever it is used for...
... be used to house the foot control unit, cable, and the box of accessories. _ 4 Light switch. tdi Fit special plug on and off. Model 810 For protection against dust, we have a cover made from reenforced material, which can be fitted on a table. Push switch to change the bulb.... foot- chine by pressing lightly on machine with the socket and start the ma- The container, which also has a side pocket for connecting Bernina sewing machines. To insert bulb, turn anti-clockwise and draw downwards. The machine can now be placed without difficulty wherever it is used for...
Manual
Page 7
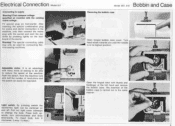
... switch. Press bulb upwards, turn It clockwise. (Lamp: 15 Watt.) • l•r"Vip,&&.„ /MU 1 . : 7 tsorid Model 807, 810 Bobbin and Case Removing the bobbin case ii Open hinged bobbin case cover. Adjustable motor. Push the switch. Wamingl The special connecting...draw downwards. First compare voltage specified on foot-starter. Electrical Connection Model 817 Connecting to reduce the speed of the machine. II -4101limpilsor 5 After inserting the special combination plug for connecting Bernina sewing machines. By pressing switch the dazzle-free light can easily be...
... switch. Press bulb upwards, turn It clockwise. (Lamp: 15 Watt.) • l•r"Vip,&&.„ /MU 1 . : 7 tsorid Model 807, 810 Bobbin and Case Removing the bobbin case ii Open hinged bobbin case cover. Adjustable motor. Push the switch. Wamingl The special connecting...draw downwards. First compare voltage specified on foot-starter. Electrical Connection Model 817 Connecting to reduce the speed of the machine. II -4101limpilsor 5 After inserting the special combination plug for connecting Bernina sewing machines. By pressing switch the dazzle-free light can easily be...
Manual
Page 8
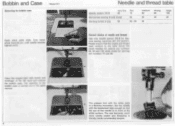
.... wheel towards you, until needle reaches highest point. The usual needles for sewing are numbers 80. 90 and 100 while those for Bernina sewing machines 807, 810 and 817. Open the hinged latch with the handwheel high enough so that the needle and thread used conform to the table above. The eye... 90 40 large 100 40 4i* eziltionto'd Correct choice of the left hand and remove the bobbin case. Bobbin and Case Removing the bobbin case Model 817 f Open stitch plate slide. Please ensure that the eye of the needle Is In front of the bobbin case Is carried out in the same...
.... wheel towards you, until needle reaches highest point. The usual needles for sewing are numbers 80. 90 and 100 while those for Bernina sewing machines 807, 810 and 817. Open the hinged latch with the handwheel high enough so that the needle and thread used conform to the table above. The eye... 90 40 large 100 40 4i* eziltionto'd Correct choice of the left hand and remove the bobbin case. Bobbin and Case Removing the bobbin case Model 817 f Open stitch plate slide. Please ensure that the eye of the needle Is In front of the bobbin case Is carried out in the same...

Manual
Page 10
...4 Fixing the needle. Threading the machine. Lead the thread with the flat side at the back and facing away. in its highest position. Now turn . Model 817 Darning. Move lever (20) to the right to the needle eye. For all normal sewing work the lever must be set to the sewing sign... in their highest positions. Pull both threads under the presser foot and lay them there sideways. Turn knob (20) to the sewing sign. '.1-i • Bernina has the unique advantage that during normal sewing the thread tension does not have to be in centre of the take -up lever (8) and again...
...4 Fixing the needle. Threading the machine. Lead the thread with the flat side at the back and facing away. in its highest position. Now turn . Model 817 Darning. Move lever (20) to the right to the needle eye. For all normal sewing work the lever must be set to the sewing sign... in their highest positions. Pull both threads under the presser foot and lay them there sideways. Turn knob (20) to the sewing sign. '.1-i • Bernina has the unique advantage that during normal sewing the thread tension does not have to be in centre of the take -up lever (8) and again...
Manual
Page 11
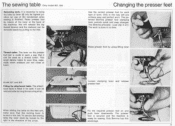
...: «Just clip it can be removed easily by means of the arrow. The sewing table Only model 807, 810 Removing work . It is fitted in no time. Only Bernina has this way will release the top thread tension and the material can be turned to the left. The attachment table is... arm. make sure that it oft« The work . When sliding the table on and I tf; Raise presser foot by use of work . Thread cutter. Model 807 and 810 Fitting the attachment table. Changing the presser feet Use the correct presser foot for each type of the handwheel when sewing is...
...: «Just clip it can be removed easily by means of the arrow. The sewing table Only model 807, 810 Removing work . It is fitted in no time. Only Bernina has this way will release the top thread tension and the material can be turned to the left. The attachment table is... arm. make sure that it oft« The work . When sliding the table on and I tf; Raise presser foot by use of work . Thread cutter. Model 807 and 810 Fitting the attachment table. Changing the presser feet Use the correct presser foot for each type of the handwheel when sewing is...

Manual
Page 12
... length The tine on the scale at CO". The marker line on material and higher the number, the wider the zig- rately adjusted with the Bernina Models )307, 810 or 817.
... length The tine on the scale at CO". The marker line on material and higher the number, the wider the zig- rately adjusted with the Bernina Models )307, 810 or 817.

Manual
Page 32
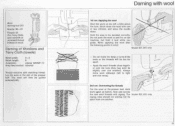
Thumb on extreme point of the hole taut over the hoop. Model 807 and 810 only Darning fine socks Small darning foot 285 Needle: 80-70 Thread: 50 Darning fine socks (also sleeves) Stitch width: 0 Stitch length: 0 Automatic: straight stitch (0) Needle position: centre Drop feed control: lowered It is obvious here that we do the 1st stitch run sideways and the 2nd run lengthways as we cannot turn the frame to another angle. Wrong Correct With the right hand keep the area of free arm. 31
Thumb on extreme point of the hole taut over the hoop. Model 807 and 810 only Darning fine socks Small darning foot 285 Needle: 80-70 Thread: 50 Darning fine socks (also sleeves) Stitch width: 0 Stitch length: 0 Automatic: straight stitch (0) Needle position: centre Drop feed control: lowered It is obvious here that we do the 1st stitch run sideways and the 2nd run lengthways as we cannot turn the frame to another angle. Wrong Correct With the right hand keep the area of free arm. 31
Manual
Page 34
... : Oversewing the threads Cut the wool at the ends or the threads will then be mended correctly. The wool will be too far apart. - The Model 807, 810 only zigzag rows should not overlap nor lie apart from one another . 33 121V-I1 Wool darning foot 272 Needle: 80-70 Thread...
... : Oversewing the threads Cut the wool at the ends or the threads will then be mended correctly. The wool will be too far apart. - The Model 807, 810 only zigzag rows should not overlap nor lie apart from one another . 33 121V-I1 Wool darning foot 272 Needle: 80-70 Thread...
Manual
Page 48
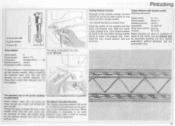
... them singly from take-up lever to be sewn be turned at right angles in one stitch leaving needle When designs are needed (for this : model 817 for automatic guiding. Thread the gimp through the hole in work . Pintucking Sewing Pintuck Corners Fancy Patterns with a single needle. Half turn . Com-....) pintuck foot. •M47 Insert bobbin case. (Do not bring between or points in the ves on the 1 presser foot is threaded like this: model 807, 810 (0) To sew pintucks, 2 top threads are sewn in between tucks, then a width of exactly up the bottom thread and clip on the...
... them singly from take-up lever to be sewn be turned at right angles in one stitch leaving needle When designs are needed (for this : model 817 for automatic guiding. Thread the gimp through the hole in work . Pintucking Sewing Pintuck Corners Fancy Patterns with a single needle. Half turn . Com-....) pintuck foot. •M47 Insert bobbin case. (Do not bring between or points in the ves on the 1 presser foot is threaded like this: model 807, 810 (0) To sew pintucks, 2 top threads are sewn in between tucks, then a width of exactly up the bottom thread and clip on the...
Manual
Page 53
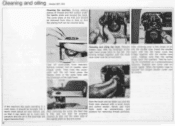
... time with the left . Lock the locking bridge together with the hook bridge together with a small brush and cotton duster. screw tightly. Cleaning and oiling Model 807. 810 Cleaning the machine. The cover plate of the into a tools such as also can be closed. Remove After cleaning pour a few drops of...
... time with the left . Lock the locking bridge together with the hook bridge together with a small brush and cotton duster. screw tightly. Cleaning and oiling Model 807. 810 Cleaning the machine. The cover plate of the into a tools such as also can be closed. Remove After cleaning pour a few drops of...
Manual
Page 54
...). The sewing machine should be removed. Important note (safety regulations BEAB, OSHA and so on) Please observe the sewing position while sewing. A 4 1, Removing frame cover (Model 807) The frame cover is raised slightly under spring tension by pressing the release knob (see illustration) and can easily be disconnected from the power...
...). The sewing machine should be removed. Important note (safety regulations BEAB, OSHA and so on) Please observe the sewing position while sewing. A 4 1, Removing frame cover (Model 807) The frame cover is raised slightly under spring tension by pressing the release knob (see illustration) and can easily be disconnected from the power...

Manual
Page 55
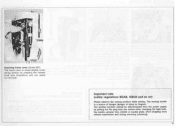
... of injury to fingers). Insert the shuttle case. The moving needle Is a source of danger (danger of machine to the left hand. Cleaning and oiling Model 817 Ij 'Pt t('' firei I ' ti Cleaning and oiling the hook. Lock the bridge to the back. Re- proper position again. •• Now the hook can...
... of injury to fingers). Insert the shuttle case. The moving needle Is a source of danger (danger of machine to the left hand. Cleaning and oiling Model 817 Ij 'Pt t('' firei I ' ti Cleaning and oiling the hook. Lock the bridge to the back. Re- proper position again. •• Now the hook can...


