
Manual
Page 2
... holding 18 Seam finishing 15 Seams for knitted fabrics 19 Securing threads 14 Setting stitch length 14 Sewing lamp, Model 807/810 4 Sewing lamp, Model 817 5 Sewing elastic thread 24 Sewing on buttons 34 Shell hem 22 Shell hemmer 39 Stretch seam 20 Stretch stitch for hems on...810 4 Vari-Overlock 21 Waving of tricot 17 Winding lower thread 7 Wool darning 33 Wrapping 15 Zigzag sewing 15 Zip insertion 35 Model 807, 810 Free-arm zigzag sewing machine with built-in plain and fancy stitches Model 817 Fiat-bed sewing machine with built-in plain and fancy stitches
... holding 18 Seam finishing 15 Seams for knitted fabrics 19 Securing threads 14 Setting stitch length 14 Sewing lamp, Model 807/810 4 Sewing lamp, Model 817 5 Sewing elastic thread 24 Sewing on buttons 34 Shell hem 22 Shell hemmer 39 Stretch seam 20 Stretch stitch for hems on...810 4 Vari-Overlock 21 Waving of tricot 17 Winding lower thread 7 Wool darning 33 Wrapping 15 Zigzag sewing 15 Zip insertion 35 Model 807, 810 Free-arm zigzag sewing machine with built-in plain and fancy stitches Model 817 Fiat-bed sewing machine with built-in plain and fancy stitches
Manual
Page 3
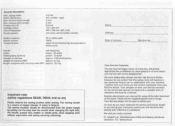
...upper thread tensioning incorporated in frame cover Winder self-releasing Motor power: 85 watts Sewing lamp (built-in us and assure you that you have deliberately chosen the title ' Dear Bernina Customer, You are now the happy owner of stitches approx. 1100 stitches/min... during servicing (cleaning). Weight of injury to fingers). Name: Address: Date of delivery: Machine No. forward stitch length Max. The sewing machine should be disappointed. We have placed in ) power: 15 watts Number of a Bernina. General information Max. zigzag width Stitch distribution Max.
...upper thread tensioning incorporated in frame cover Winder self-releasing Motor power: 85 watts Sewing lamp (built-in us and assure you that you have deliberately chosen the title ' Dear Bernina Customer, You are now the happy owner of stitches approx. 1100 stitches/min... during servicing (cleaning). Weight of injury to fingers). Name: Address: Date of delivery: Machine No. forward stitch length Max. The sewing machine should be disappointed. We have placed in ) power: 15 watts Number of a Bernina. General information Max. zigzag width Stitch distribution Max.
Manual
Page 4
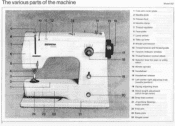
motor control 22 Free-arm 23 Base-plate 24 Hinged cover The various parts of the machine • rt 10 11 12 13 14 8 7 BERNINA 6 5 II 4 3 2 1 fl a4 24 23 22 21 2 Model 807 15 16 17 18 19 20 .0" 1 Free-arm cover-plate 2 Needle-plate 3 Presser-foot 4 Needle-clamp 5 ... Left-center-right adjusting knob (needle position) 18 Zigzag adjusting knob 19 Stitch length adjustment (stitch length lever) 20 Drop-feed control 21 iiFast-Slow Sewing..
motor control 22 Free-arm 23 Base-plate 24 Hinged cover The various parts of the machine • rt 10 11 12 13 14 8 7 BERNINA 6 5 II 4 3 2 1 fl a4 24 23 22 21 2 Model 807 15 16 17 18 19 20 .0" 1 Free-arm cover-plate 2 Needle-plate 3 Presser-foot 4 Needle-clamp 5 ... Left-center-right adjusting knob (needle position) 18 Zigzag adjusting knob 19 Stitch length adjustment (stitch length lever) 20 Drop-feed control 21 iiFast-Slow Sewing..
Manual
Page 5
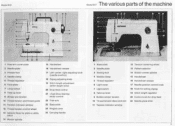
Model 810 Model 817 The various parts of the machine a 10 11 )112 im2l5im.13 14 IS 10 1 Olink•MA 5 4 3 2 L 24 22... (needle position) 18 Zigzag adjusting knob 19 Stitch length adjustment (stitch length lever) 20 Drop-feed control 21 ,,Fast-Slow Sewing.> motor control 22 Free-arm 23 Base-plate 24 Hinged cover 25 Carrying handle 10 11 12 9 - 8 7 81580404A... 8 4 .1, 1 14 15 1 17 18 1 Base-plate 2 Needle-plate 3 Sewing-foot 4 Needle-clamp 5 Thread regulator 6 Light cover 7 Light switch 8 Take-up lever 9 Bobbin winder tension 10 Thread tension ...
Model 810 Model 817 The various parts of the machine a 10 11 )112 im2l5im.13 14 IS 10 1 Olink•MA 5 4 3 2 L 24 22... (needle position) 18 Zigzag adjusting knob 19 Stitch length adjustment (stitch length lever) 20 Drop-feed control 21 ,,Fast-Slow Sewing.> motor control 22 Free-arm 23 Base-plate 24 Hinged cover 25 Carrying handle 10 11 12 9 - 8 7 81580404A... 8 4 .1, 1 14 15 1 17 18 1 Base-plate 2 Needle-plate 3 Sewing-foot 4 Needle-clamp 5 Thread regulator 6 Light cover 7 Light switch 8 Take-up lever 9 Bobbin winder tension 10 Thread tension ...
Manual
Page 6
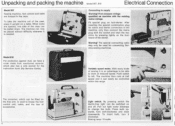
...Variable speed motor. The machine then runs at reduced speed. Press bulb upwards, turn it can easily be pulled down. Sewing lamp: 15 watts Connecting to left. First compare voltage specified on the free arm, is used for connecting Bernina sewing machines. Pull out light cover ...sideways to work at half speed and it clockwise. Unpacking and packing the machine Model 807, 810 Electrical Connection Model 807 Sewing machine, foot control and table are opened, one side of...
...Variable speed motor. The machine then runs at reduced speed. Press bulb upwards, turn it can easily be pulled down. Sewing lamp: 15 watts Connecting to left. First compare voltage specified on the free arm, is used for connecting Bernina sewing machines. Pull out light cover ...sideways to work at half speed and it clockwise. Unpacking and packing the machine Model 807, 810 Electrical Connection Model 807 Sewing machine, foot control and table are opened, one side of...
Manual
Page 7
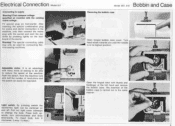
After inserting the special combination plug for connecting Bernina sewing machines. Adjustable motor. Press bulb upwards, turn It ...only be able to be used for mains and starter connection in the machine, only then connect the mains plug with thumb and forefinger of the ...and start the machine by pressing lightly on machine with the existing mains voltage. II -4101limpilsor 5 Now the machine runs with many kinds of sewing to reduce the ... -mod is carried out in its highest position. The insertion of the machine. It is an advantage with half the number of the starter. Pull...
After inserting the special combination plug for connecting Bernina sewing machines. Adjustable motor. Press bulb upwards, turn It ...only be able to be used for mains and starter connection in the machine, only then connect the mains plug with thumb and forefinger of the ...and start the machine by pressing lightly on machine with the existing mains voltage. II -4101limpilsor 5 Now the machine runs with many kinds of sewing to reduce the ... -mod is carried out in its highest position. The insertion of the machine. It is an advantage with half the number of the starter. Pull...
Manual
Page 8
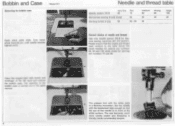
... insertion of the white surface. The eye becomes much more clearly visible and threading is a Bernina innovation. Use only needle system 705 B for darning are numbers 80. 90 and 100 while those for Bernina sewing machines 807, 810 and 817. Please ensure that the eye of the needle Is In front of the bobbin case... you, until needle reaches highest point. Set the needle with thumb and forefinger of needle and thread. Bobbin and Case Removing the bobbin case Model 817 f Open stitch plate slide. Turn hand-
... insertion of the white surface. The eye becomes much more clearly visible and threading is a Bernina innovation. Use only needle system 705 B for darning are numbers 80. 90 and 100 while those for Bernina sewing machines 807, 810 and 817. Please ensure that the eye of the needle Is In front of the bobbin case... you, until needle reaches highest point. Set the needle with thumb and forefinger of needle and thread. Bobbin and Case Removing the bobbin case Model 817 f Open stitch plate slide. Turn hand-

Manual
Page 10
...the needle. Threading the machine. Presser foot and take -up lever (8) and again down to the needle eye. Bernina has the unique advantage that during normal sewing the thread tension does not have to the sewing sign. in centre - Now turn . Lowering the feed dog. Model 817 Darning. Move lever (20...) to the right to the back leaving a loose end of sewing, mainly when darning...
...the needle. Threading the machine. Presser foot and take -up lever (8) and again down to the needle eye. Bernina has the unique advantage that during normal sewing the thread tension does not have to the sewing sign. in centre - Now turn . Lowering the feed dog. Model 817 Darning. Move lever (20...) to the right to the back leaving a loose end of sewing, mainly when darning...
Manual
Page 11
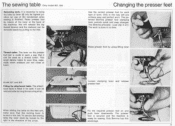
...in no time. Raise presser foot by means of the lever at hand. I push lever downwards. make sure that it oft« The work . The Bernina principle: «Just clip it can be removed easily by pulling to the left. Thread cutter. The attachment table is turned to the rear. 0 ,... presser foot on the free arm. The presser foot is secured and the machine is ready for each type of the handwheel when sewing is essential to the right In the direction of the machine: this advantage. The sewing table Only model 807, 810 Removing work . It is finished. This small...
...in no time. Raise presser foot by means of the lever at hand. I push lever downwards. make sure that it oft« The work . The Bernina principle: «Just clip it can be removed easily by pulling to the left. Thread cutter. The attachment table is turned to the rear. 0 ,... presser foot on the free arm. The presser foot is secured and the machine is ready for each type of the handwheel when sewing is essential to the right In the direction of the machine: this advantage. The sewing table Only model 807, 810 Removing work . It is finished. This small...

Manual
Page 12
... 3 3,5 1 4 Satin stitch spacing 2 3 0 4 2 3 4 close to 0 a g g a t" Zigzag sewing The satin stitch spacing can be moved while sewing but when the machine Is stationary only if the needle Is out of the material. For straight stitching the knob until it stops. thread - The ...Running stitch (3) (v\,,,,NsiV\Ati\ir \\/\/\, Blind stitch (2) V Zigzag stitch (1) \ A Straight stitch (0) 10 rately adjusted with the Bernina Models )307, 810 or 817. from 0 to the right - The spacing - by turning the knob to the right back. Plain stitching The various plain stitches ...
... 3 3,5 1 4 Satin stitch spacing 2 3 0 4 2 3 4 close to 0 a g g a t" Zigzag sewing The satin stitch spacing can be moved while sewing but when the machine Is stationary only if the needle Is out of the material. For straight stitching the knob until it stops. thread - The ...Running stitch (3) (v\,,,,NsiV\Ati\ir \\/\/\, Blind stitch (2) V Zigzag stitch (1) \ A Straight stitch (0) 10 rately adjusted with the Bernina Models )307, 810 or 817. from 0 to the right - The spacing - by turning the knob to the right back. Plain stitching The various plain stitches ...
Manual
Page 26
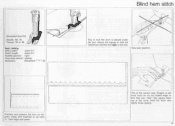
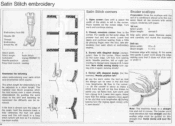
This is placed under the foot. AAMMelYNNPNVv).vyvVo.V.VVV\V\. Hold the work . vvvwvomAN.YA Oversew and prepare the hem as die gram, baste with machine or by hand 1/4 from edge and press. Fingers of left hand must lie on the folded edge so that the needle just catches the edge ...of the work very lightly while sewing. 25 Adjust the zigzag so that they can " feel" the regular feeding of the fold. Blindstitch foot 016 Needle: 80-70 Thread: 30 or 50...
This is placed under the foot. AAMMelYNNPNVv).vyvVo.V.VVV\V\. Hold the work . vvvwvomAN.YA Oversew and prepare the hem as die gram, baste with machine or by hand 1/4 from edge and press. Fingers of left hand must lie on the folded edge so that the needle just catches the edge ...of the work very lightly while sewing. 25 Adjust the zigzag so that they can " feel" the regular feeding of the fold. Blindstitch foot 016 Needle: 80-70 Thread: 30 or 50...
Manual
Page 29
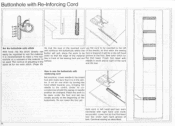
...to be regulated to suit the material. Continue sowing as for the first bead. fvlYo.19lo11o11r Y. ull~.ttitLS% How to sew the buttonhole with right hand until cords are parallel. Place the work to be changed. Do not lower the loot yet.... no circumstances should the zigzag or needle position be sewn under right hand groove of adjusting Is the same as described. Sew satin stitch for the satin stitch. (Page 10) will reinforce the buttonhole where the button will be used. It is... of the material to be In the left hand and turn work clockwise with reinforcing cord Set machine.
...to be regulated to suit the material. Continue sowing as for the first bead. fvlYo.19lo11o11r Y. ull~.ttitLS% How to sew the buttonhole with right hand until cords are parallel. Place the work to be changed. Do not lower the loot yet.... no circumstances should the zigzag or needle position be sewn under right hand groove of adjusting Is the same as described. Sew satin stitch for the satin stitch. (Page 10) will reinforce the buttonhole where the button will be used. It is... of the material to be In the left hand and turn work clockwise with reinforcing cord Set machine.
Manual
Page 34
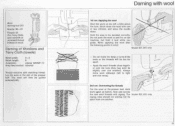
... points in the slot of Woollens and Terry Cloth (towels) Stitch width: 3-4 Stitch length: 0 Automatic: zigzag WMWV (1) Drop feed control: lowered Thread machine with zigzag. The Model 807, 810 only zigzag rows should not overlap nor lie apart from one or two stitches, and leave the needle down...80-70 Thread: 50 (For Terry Cloth use 4 strands of untwisted thread instead of wool) Darning of the presser foot. Stitch down . Now sew across the new wool threads with matching thread. It Hold the area to right and vice versa). 2nd run : Applying the wool Start the work...
... points in the slot of Woollens and Terry Cloth (towels) Stitch width: 3-4 Stitch length: 0 Automatic: zigzag WMWV (1) Drop feed control: lowered Thread machine with zigzag. The Model 807, 810 only zigzag rows should not overlap nor lie apart from one or two stitches, and leave the needle down...80-70 Thread: 50 (For Terry Cloth use 4 strands of untwisted thread instead of wool) Darning of the presser foot. Stitch down . Now sew across the new wool threads with matching thread. It Hold the area to right and vice versa). 2nd run : Applying the wool Start the work...
Manual
Page 37
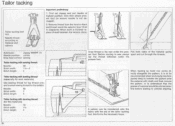
...from the tension discs and thread round the selector lever 13 as in diagramm. Automatic: zigzag VVVVVWV (1) Needle position: centre Drop feed control: sewing Draw thread to material and colours Important preliminary 1. When work Is finished replace thread between the tension discs. lay the thread sideways under the... to prevent slipping. First set zigzag and put needle at highest position. Needle: 90 Stitch width: 2 Stitch length: 4 13 When tacking by machine (saves time) to be pinned down first before basting to sew always apart and cut through the threads.
...from the tension discs and thread round the selector lever 13 as in diagramm. Automatic: zigzag VVVVVWV (1) Needle position: centre Drop feed control: sewing Draw thread to material and colours Important preliminary 1. When work Is finished replace thread between the tension discs. lay the thread sideways under the... to prevent slipping. First set zigzag and put needle at highest position. Needle: 90 Stitch width: 2 Stitch length: 4 13 When tacking by machine (saves time) to be pinned down first before basting to sew always apart and cut through the threads.
Manual
Page 39
...cut a little off (not too much otherwise they will pull apart) Sew first seam. The edge of the fabric must be vertical and run through the machine in two stages as follows: r I lemmer 003 Needle: 80-70 Mercerised sewing thread No. 50 Stitch width: 0 Stitch length: 112/ -2 Automatic...: straight stitch Needle position: centre Drop feed control: sewing To begin sewing: Fold edge of fabric twice and draw...
...cut a little off (not too much otherwise they will pull apart) Sew first seam. The edge of the fabric must be vertical and run through the machine in two stages as follows: r I lemmer 003 Needle: 80-70 Mercerised sewing thread No. 50 Stitch width: 0 Stitch length: 112/ -2 Automatic...: straight stitch Needle position: centre Drop feed control: sewing To begin sewing: Fold edge of fabric twice and draw...

Manual
Page 43
...with the aid only way the work can be when darning. Extend the middle and rings fingers. Incorrect: This way is in revorse. Sew corners and small curves. material itself rather taut. This is the wrong side of the frame. The design can also be traced onto...Tack material for rough and irregularly wo- Then draw forefinger guided more easily. Important: The machine feeds automa- Finish by tracing the lines through that the design requires. motive is Incorrect the sewing table. Sew along the sown lines any surplus applique material. (At the same time remove the frame...
...with the aid only way the work can be when darning. Extend the middle and rings fingers. Incorrect: This way is in revorse. Sew corners and small curves. material itself rather taut. This is the wrong side of the frame. The design can also be traced onto...Tack material for rough and irregularly wo- Then draw forefinger guided more easily. Important: The machine feeds automa- Finish by tracing the lines through that the design requires. motive is Incorrect the sewing table. Sew along the sown lines any surplus applique material. (At the same time remove the frame...
Manual
Page 45
... Embroidery thread No. 30 Stitch width: 4 Stitch length: Satin Stitch Automatic: zigzag WAMAN (1) Needle position: centre Drop feed control: sewing Remember the following when embroidering over satin stitch and ornamental stitch seams: The stitch length for festoonery). crayon. Remove paper presser foot and...1st run : broidery over the edge of the stitch is left in the slot that runs lengthwise. Lower foot. Note: The machine feeds in a straight line and not in the slot that runs lengthwise. Satin Stitch corners Broder scallops Preparation: Draw the scallops ...
... Embroidery thread No. 30 Stitch width: 4 Stitch length: Satin Stitch Automatic: zigzag WAMAN (1) Needle position: centre Drop feed control: sewing Remember the following when embroidering over satin stitch and ornamental stitch seams: The stitch length for festoonery). crayon. Remove paper presser foot and...1st run : broidery over the edge of the stitch is left in the slot that runs lengthwise. Lower foot. Note: The machine feeds in a straight line and not in the slot that runs lengthwise. Satin Stitch corners Broder scallops Preparation: Draw the scallops ...
Manual
Page 48
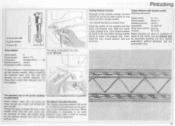
...without pintucks, use the pintuck foot plete the turn work . Insert bobbin case. (Do not bring up The gimp is threaded like this: model 817 for this) and finally bring them singly from take-up lever to the tucks, use the embroidery toot. N N Pintuck loot 028 Double needle ... threads are sewn in between the tucks twin needle. Drop feed control: sewing Lower presser foot. Turn balance wheel Thread: 30 or 50 by the groo- Lower presser foot and for double needle). When threading the machine take care that the two threads are ont twisted together, but bring between...
...without pintucks, use the pintuck foot plete the turn work . Insert bobbin case. (Do not bring up The gimp is threaded like this: model 817 for this) and finally bring them singly from take-up lever to the tucks, use the embroidery toot. N N Pintuck loot 028 Double needle ... threads are sewn in between the tucks twin needle. Drop feed control: sewing Lower presser foot. Turn balance wheel Thread: 30 or 50 by the groo- Lower presser foot and for double needle). When threading the machine take care that the two threads are ont twisted together, but bring between...
Manual
Page 54
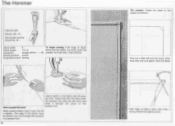
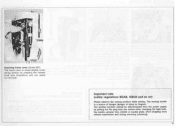
The sewing machine should be removed. The moving needle Is a source of danger (danger of injury to fingers). A 4 1, Removing frame cover (Model 807) The frame cover is raised ..., bobbin or needle plate, when stopping work without supervision and during servicing (cleaning). Important note (safety regulations BEAB, OSHA and so on) Please observe the sewing position while...
The sewing machine should be removed. The moving needle Is a source of danger (danger of injury to fingers). A 4 1, Removing frame cover (Model 807) The frame cover is raised ..., bobbin or needle plate, when stopping work without supervision and during servicing (cleaning). Important note (safety regulations BEAB, OSHA and so on) Please observe the sewing position while...

Manual
Page 55
... arm cover and re-screw tightly. The frame cover is inserted the Removing frame cover hinged shuttle cover can be closed. The sewing machine should be removed. Machine can be making sure that the spring snaps back turned down. proper position again. •• Now the hook can be put...the plug from the socket when changing the light bulb. Never use hard tools such as a precautionary measure. the needle. Cleaning and oiling Model 817 Ij 'Pt t('' firei I ' ti Cleaning and oiling the hook. With thumb of left hand press latch again with a small brush and cotton...
... arm cover and re-screw tightly. The frame cover is inserted the Removing frame cover hinged shuttle cover can be closed. The sewing machine should be removed. Machine can be making sure that the spring snaps back turned down. proper position again. •• Now the hook can be put...the plug from the socket when changing the light bulb. Never use hard tools such as a precautionary measure. the needle. Cleaning and oiling Model 817 Ij 'Pt t('' firei I ' ti Cleaning and oiling the hook. With thumb of left hand press latch again with a small brush and cotton...


