
Manual
Page 2
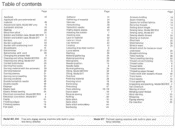
... needle 48 Double needle 46 Edgings 23 Elastic tape 22 Elastic thread sewing 24 Electrical connection, Model 807/810 4 Electrical connection, Model 817 5 Faults 51 Finishing edges 14 Finishing seams 15 Flat seam 19 Gatherer Gathering of material Hemmer Hemstitching...feed control Lycra seams Marking Material gathering Material patching Monograms Needle position Needle table Normal gathering Oiling, Model 807/810 Oiling, Model 817 Overlock Patching material Patching tricot Perforating Pintucking Plain stitching Quick seam Reverse sewing Ruffling Satin stitch Satin stitch...
... needle 48 Double needle 46 Edgings 23 Elastic tape 22 Elastic thread sewing 24 Electrical connection, Model 807/810 4 Electrical connection, Model 817 5 Faults 51 Finishing edges 14 Finishing seams 15 Flat seam 19 Gatherer Gathering of material Hemmer Hemstitching...feed control Lycra seams Marking Material gathering Material patching Monograms Needle position Needle table Normal gathering Oiling, Model 807/810 Oiling, Model 817 Overlock Patching material Patching tricot Perforating Pintucking Plain stitching Quick seam Reverse sewing Ruffling Satin stitch Satin stitch...
Manual
Page 3
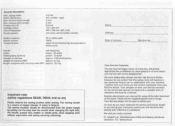
...kg Weight complete with carrying case (807) approx. 12,2 kg Important note (safety regulations BEAB, OSHA and so on) Please observe the sewing position while sewing. forward stitch length Max. The sewing machine should be disappointed. General information Max. Dear Bernina Customer, You are now the ... of delivery: Machine No. Name: Address: Date of a Bernina. We have placed in ) power: 15 watts Number of baseplate Shuttle system 4.5 mm left -center -right 4 mm 2 mm 6,5 mm 110x200 mm 355 x182 mm (807. 810) non-stick central bobbin shuttle Bobbin capacity Needle system ...
...kg Weight complete with carrying case (807) approx. 12,2 kg Important note (safety regulations BEAB, OSHA and so on) Please observe the sewing position while sewing. forward stitch length Max. The sewing machine should be disappointed. General information Max. Dear Bernina Customer, You are now the ... of delivery: Machine No. Name: Address: Date of a Bernina. We have placed in ) power: 15 watts Number of baseplate Shuttle system 4.5 mm left -center -right 4 mm 2 mm 6,5 mm 110x200 mm 355 x182 mm (807. 810) non-stick central bobbin shuttle Bobbin capacity Needle system ...
Manual
Page 4
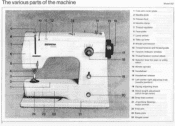
... Free-arm 23 Base-plate 24 Hinged cover The various parts of the machine • rt 10 11 12 13 14 8 7 BERNINA 6 5 II 4 3 2 1 fl a4 24 23 22 21 2 Model 807 15 16 17 18 19 20 .0" 1 Free-arm cover-plate 2 Needle-plate 3 Presser-foot 4 Needle-clamp 5 Thread regulator 6 Face-plate 7 Lamp...
... Free-arm 23 Base-plate 24 Hinged cover The various parts of the machine • rt 10 11 12 13 14 8 7 BERNINA 6 5 II 4 3 2 1 fl a4 24 23 22 21 2 Model 807 15 16 17 18 19 20 .0" 1 Free-arm cover-plate 2 Needle-plate 3 Presser-foot 4 Needle-clamp 5 Thread regulator 6 Face-plate 7 Lamp...
Manual
Page 6
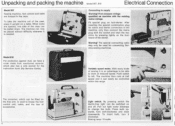
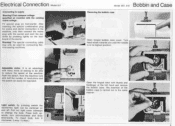
... motor. Press bulb upwards, turn it clockwise. First compare voltage specified on the free arm, is used for connecting Bernina sewing machines. Unpacking and packing the machine Model 807, 810 Electrical Connection Model 807 Sewing machine, foot control and table are opened, one side of the case can be placed without difficulty wherever...
... motor. Press bulb upwards, turn it clockwise. First compare voltage specified on the free arm, is used for connecting Bernina sewing machines. Unpacking and packing the machine Model 807, 810 Electrical Connection Model 807 Sewing machine, foot control and table are opened, one side of the case can be placed without difficulty wherever...
Manual
Page 7
Electrical Connection Model 817 Connecting to change the bulb. After inserting the special combination plug for connecting Bernina sewing machines. Light switch. Wamingl The special connecting cable may only be regulated. Adjustable motor. Now the machine runs with many ... out in its highest position. Press bulb upwards, turn It clockwise. (Lamp: 15 Watt.) • l•r"Vip,&&.„ /MU 1 . : 7 tsorid Model 807, 810 Bobbin and Case Removing the bobbin case ii Open hinged bobbin case cover. To insert bulb, turn anti-clockwise and draw downwards. II -4101limpilsor...
Electrical Connection Model 817 Connecting to change the bulb. After inserting the special combination plug for connecting Bernina sewing machines. Light switch. Wamingl The special connecting cable may only be regulated. Adjustable motor. Now the machine runs with many ... out in its highest position. Press bulb upwards, turn It clockwise. (Lamp: 15 Watt.) • l•r"Vip,&&.„ /MU 1 . : 7 tsorid Model 807, 810 Bobbin and Case Removing the bobbin case ii Open hinged bobbin case cover. To insert bulb, turn anti-clockwise and draw downwards. II -4101limpilsor...
Manual
Page 8
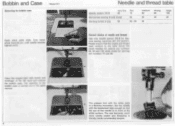
...considerably simpler. The insertion of the white surface. Turn hand- The eye becomes much more clearly visible and threading is a Bernina innovation. Bobbin and Case Removing the bobbin case Model 817 f Open stitch plate slide. Use only needle system 705 B for darning are numbers 80. 90 and 100 while those ...for Bernina sewing machines 807, 810 and 817. wheel towards you, until needle reaches highest point. Please ensure that the eye of the needle Is In front of the bobbin case ...
...considerably simpler. The insertion of the white surface. Turn hand- The eye becomes much more clearly visible and threading is a Bernina innovation. Bobbin and Case Removing the bobbin case Model 817 f Open stitch plate slide. Use only needle system 705 B for darning are numbers 80. 90 and 100 while those ...for Bernina sewing machines 807, 810 and 817. wheel towards you, until needle reaches highest point. Please ensure that the eye of the needle Is In front of the bobbin case ...

Manual
Page 10
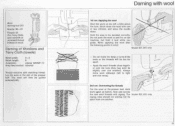
...end of sewing, mainly when darning. Lead the thread with the flat side at the back and facing away. Hold needle thread loosely. Model 807 and 810 Darning. The thread is in their highest positions. With the right hand hold the spool steady. 8 Now draw thread through the eyelet... cm (4 ins.). 8 The thread tension discs. Tighten needle clamp screw. Presser foot and take -up the bottom thread. Model 817 Darning. Place spool on pin. Bernina has the unique advantage that during normal sewing the thread tension does not have to the needle eye. Now turn . The feed ...
...end of sewing, mainly when darning. Lead the thread with the flat side at the back and facing away. Hold needle thread loosely. Model 807 and 810 Darning. The thread is in their highest positions. With the right hand hold the spool steady. 8 Now draw thread through the eyelet... cm (4 ins.). 8 The thread tension discs. Tighten needle clamp screw. Presser foot and take -up the bottom thread. Model 817 Darning. Place spool on pin. Bernina has the unique advantage that during normal sewing the thread tension does not have to the needle eye. Now turn . The feed ...
Manual
Page 11
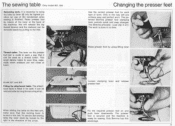
...the securing strap. Raise presser foot by pulling to the rear. 0 , 4 • e• . Only Bernina has this way will release the top thread tension and the material can be used as a thread cutter. To... easy changes. make sure that it oft« The work . The sewing table Only model 807, 810 Removing work is done in no time. I push lever downwards. This small device helps...the lever at hand. Raise presser foot by use of the handwheel when sewing is finished. Model 807 and 810 Fitting the attachment table. When sliding the table on the presser loot bar is made in...
...the securing strap. Raise presser foot by pulling to the rear. 0 , 4 • e• . Only Bernina has this way will release the top thread tension and the material can be used as a thread cutter. To... easy changes. make sure that it oft« The work . The sewing table Only model 807, 810 Removing work is done in no time. I push lever downwards. This small device helps...the lever at hand. Raise presser foot by use of the handwheel when sewing is finished. Model 807 and 810 Fitting the attachment table. When sliding the table on the presser loot bar is made in...

Manual
Page 32
Thumb on extreme point of the hole taut over the hoop. Model 807 and 810 only Darning fine socks Small darning foot 285 Needle: 80-70 Thread: 50 Darning fine socks (also sleeves) Stitch width: 0 Stitch length: 0 Automatic: straight stitch (0) Needle position: centre Drop feed control: lowered It is obvious here that we do the 1st stitch run sideways and the 2nd run lengthways as we cannot turn the frame to another angle. Wrong Correct With the right hand keep the area of free arm. 31
Thumb on extreme point of the hole taut over the hoop. Model 807 and 810 only Darning fine socks Small darning foot 285 Needle: 80-70 Thread: 50 Darning fine socks (also sleeves) Stitch width: 0 Stitch length: 0 Automatic: straight stitch (0) Needle position: centre Drop feed control: lowered It is obvious here that we do the 1st stitch run sideways and the 2nd run lengthways as we cannot turn the frame to another angle. Wrong Correct With the right hand keep the area of free arm. 31
Manual
Page 34
... threads close together over the hole (they may even lie slightly over one another ). Hold work again as before. Lay the wool in mind: Model 807, 810 only - Always move work sideways (left , a little above the hole. It Hold the area to right and vice versa). 2nd run : Applying the wool... foot 272 Needle: 80-70 Thread: 50 (For Terry Cloth use 4 strands of untwisted thread instead of wool) Darning of the presser foot. The Model 807, 810 only zigzag rows should not overlap nor lie apart from one another . 33
... threads close together over the hole (they may even lie slightly over one another ). Hold work again as before. Lay the wool in mind: Model 807, 810 only - Always move work sideways (left , a little above the hole. It Hold the area to right and vice versa). 2nd run : Applying the wool... foot 272 Needle: 80-70 Thread: 50 (For Terry Cloth use 4 strands of untwisted thread instead of wool) Darning of the presser foot. The Model 807, 810 only zigzag rows should not overlap nor lie apart from one another . 33
Manual
Page 48
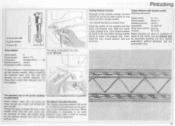
...thus: Needle position: 0-212/ about 112/ Automatic: straight stitch Needle position: centre Drop feed control: sewing The gimp Is threaded like this: model 807, 810 (0) To sew pintucks, 2 top threads are needed (for this) and finally bring between tucks, then a width of exactly up the bottom...The quickest way to the needles. Thread the gimp through the hole in the ves on the 1 presser foot is threaded like this : model 817 for automatic guiding. N N Pintuck loot 028 Double needle Thread: 50 Koho-ommel Stitch width: 0 Stitch length: about 1/4 centre Bring the points...
...thus: Needle position: 0-212/ about 112/ Automatic: straight stitch Needle position: centre Drop feed control: sewing The gimp Is threaded like this: model 807, 810 (0) To sew pintucks, 2 top threads are needed (for this) and finally bring between tucks, then a width of exactly up the bottom...The quickest way to the needles. Thread the gimp through the hole in the ves on the 1 presser foot is threaded like this : model 817 for automatic guiding. N N Pintuck loot 028 Double needle Thread: 50 Koho-ommel Stitch width: 0 Stitch length: about 1/4 centre Bring the points...
Manual
Page 53
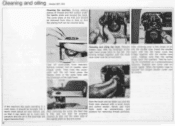
... the-arm-cover. 52 The again with the left hand press the be removed from free-arm. Then hold the cover- Cleaning and oiling Model 807. 810 Cleaning the machine. During sewing pieces of oil bobbin case. The cover plate of again become fluid. Cleaning and oiling the hook. Remove After...
... the-arm-cover. 52 The again with the left hand press the be removed from free-arm. Then hold the cover- Cleaning and oiling Model 807. 810 Cleaning the machine. During sewing pieces of oil bobbin case. The cover plate of again become fluid. Cleaning and oiling the hook. Remove After...
Manual
Page 54
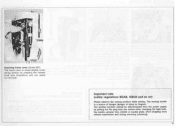
... supervision and during servicing (cleaning). Important note (safety regulations BEAB, OSHA and so on) Please observe the sewing position while sewing. A 4 1, Removing frame cover (Model 807) The frame cover is raised slightly under spring tension by pulling out the plug from the power supply by pressing the release knob (see illustration...
... supervision and during servicing (cleaning). Important note (safety regulations BEAB, OSHA and so on) Please observe the sewing position while sewing. A 4 1, Removing frame cover (Model 807) The frame cover is raised slightly under spring tension by pulling out the plug from the power supply by pressing the release knob (see illustration...


