
Manual
Page 1
GEGAUF LTD. C C I C I I C,3 BERNINA Model 740, BERNINA-Favorite Zigzag Sewing Machine with automatic ornamental stitch device Model 741 Zigzag Sewing Machine with automatic ornamental stitch device Model 742 Zigzag Sewing Machine without automatic ornamental stitch device FR. BERNINA SEWING MACHINE FACTORY STECKDORN Switurlond
GEGAUF LTD. C C I C I I C,3 BERNINA Model 740, BERNINA-Favorite Zigzag Sewing Machine with automatic ornamental stitch device Model 741 Zigzag Sewing Machine with automatic ornamental stitch device Model 742 Zigzag Sewing Machine without automatic ornamental stitch device FR. BERNINA SEWING MACHINE FACTORY STECKDORN Switurlond
Manual
Page 3
GEGAUF LTD. FR. Please complete and mail to the Buyer direct by the Importers. 'I he ..ininty Certificate is sent to them the card supplied with the machine. and they shall send yuu the Warranty Certificate. BERNINA SEWING MACHINE FACTORY STECKBORN Switzerland
GEGAUF LTD. FR. Please complete and mail to the Buyer direct by the Importers. 'I he ..ininty Certificate is sent to them the card supplied with the machine. and they shall send yuu the Warranty Certificate. BERNINA SEWING MACHINE FACTORY STECKBORN Switzerland
Manual
Page 4
...740. 711. nor in the instructions for use. Terms of Guarantee We engage ourael'es to repair free of charge any damage caused by faulty packing are used. A buyer wishing to claim under the guarantee should return the machine to the Bernina representative next to faulty manipulations are not covered by this guarantee. BERNINA SEWING MACHINE... FACTORY STECKBORN Switzerland a. or 712 sewing machine supplied by us ...
...740. 711. nor in the instructions for use. Terms of Guarantee We engage ourael'es to repair free of charge any damage caused by faulty packing are used. A buyer wishing to claim under the guarantee should return the machine to the Bernina representative next to faulty manipulations are not covered by this guarantee. BERNINA SEWING MACHINE... FACTORY STECKBORN Switzerland a. or 712 sewing machine supplied by us ...
Manual
Page 5
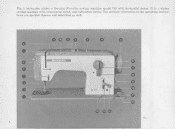
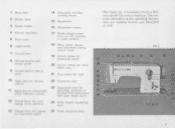
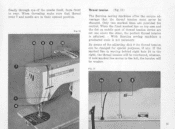
The controls referred to in the operating instructions are marked thereon and identified as well. 00 0 0 • BERNINA • r Yla I 4 It is is zigzag sewing machine with horizontal motor. Fig. 1 hereunder shows a Bernina -Favorite sewing machine model 740 with ornamental stitch and buttonhole device.
The controls referred to in the operating instructions are marked thereon and identified as well. 00 0 0 • BERNINA • r Yla I 4 It is is zigzag sewing machine with horizontal motor. Fig. 1 hereunder shows a Bernina -Favorite sewing machine model 740 with ornamental stitch and buttonhole device.
Manual
Page 6
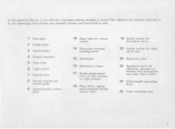
... : cli 10 Sight hole for tension control 11 Sight hole for clang or ornamental stitch 25 Vied retracting knob The figure no. 2 hereunder ashore a Bernina model 741 sewing machine. and • . 12 Switch lever for ornamental nit+ selection 24 :.:titeh o„ lever 13 Change lever for ornamental alit/A indicator refitted 22 Extension plat...
... : cli 10 Sight hole for tension control 11 Sight hole for clang or ornamental stitch 25 Vied retracting knob The figure no. 2 hereunder ashore a Bernina model 741 sewing machine. and • . 12 Switch lever for ornamental nit+ selection 24 :.:titeh o„ lever 13 Change lever for ornamental alit/A indicator refitted 22 Extension plat...
Manual
Page 8
zigzag. medium. and buttonhole sewing control knob 19 Switch button for buttonhole device 20 Switch button for satin stitch stop 22 Extension plate 23 Regulation knob for adjusting closeness of ... hole for tension control 14 Flap-plate covering ,pooling device 15 llandwhcel 16 Nandwheel release 17 Needle displacement lever on left. no. 3 you will bee a Bernina sewing machine of stiteheu with buttonholes and satin stitch seam. 24 Stitch length rerdatIng lover 25 Feed retracting knob 7 In the opposite fig. or right position 18...
zigzag. medium. and buttonhole sewing control knob 19 Switch button for buttonhole device 20 Switch button for satin stitch stop 22 Extension plate 23 Regulation knob for adjusting closeness of ... hole for tension control 14 Flap-plate covering ,pooling device 15 llandwhcel 16 Nandwheel release 17 Needle displacement lever on left. no. 3 you will bee a Bernina sewing machine of stiteheu with buttonholes and satin stitch seam. 24 Stitch length rerdatIng lover 25 Feed retracting knob 7 In the opposite fig. or right position 18...
Manual
Page 10
... by means of a %%belt acting directly onto the groove of the 3-pole type. The seeing light The lamp is not introduced the wrong way ! The Bernina-Favorite sewing machines, models 740 and 74], as well as the cablewith plug for junction to enable ;In even distribution of light over the entire... sewing urea, completely free from any glare. Drive is of the balancewheel. The coupling plug 29 is effected by a horizontal motor fixed at the front aide .1 ...
... by means of a %%belt acting directly onto the groove of the 3-pole type. The seeing light The lamp is not introduced the wrong way ! The Bernina-Favorite sewing machines, models 740 and 74], as well as the cablewith plug for junction to enable ;In even distribution of light over the entire... sewing urea, completely free from any glare. Drive is of the balancewheel. The coupling plug 29 is effected by a horizontal motor fixed at the front aide .1 ...
Manual
Page 15
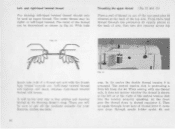
...tension 8 is protruding a little bit from slot 44. The under thread may be the best way to buy sewing and darning thread at the right of the top arm. roer- or left -hand twisted thread should only be...determined as upper thread. With both Threading the upper thread (fig. I ho left or at the Bernina dealer's shop. When sewing with the thumb turn thread towards you will be right- At the front pass the thread down once... lever 7, down to get all the products suitable for your Bernina sewing machine. There you . Then up again through needle holder eyelet 45, and 11
...tension 8 is protruding a little bit from slot 44. The under thread may be the best way to buy sewing and darning thread at the right of the top arm. roer- or left -hand twisted thread should only be...determined as upper thread. With both Threading the upper thread (fig. I ho left or at the Bernina dealer's shop. When sewing with the thumb turn thread towards you will be right- At the front pass the thread down once... lever 7, down to get all the products suitable for your Bernina sewing machine. There you . Then up again through needle holder eyelet 45, and 11
Manual
Page 16
... for control. Only two marked lines are in their upmost position. • • 9.1 9 • 14.12 BERNINA Thread tension (fig. 13) The Bernina sewing machines offer the unique advantage that thread lever 7 and needle are provided for special purpitsrs, if any. By means of the ...if said marked line moves to the right, the thread tension will be changed . When threading make sure that the thread. With Bernina sewing machines a graduated scale is attained. - finally through eye of thread tension device are set one above the other, the perfect thread tension ...
... for control. Only two marked lines are in their upmost position. • • 9.1 9 • 14.12 BERNINA Thread tension (fig. 13) The Bernina sewing machines offer the unique advantage that thread lever 7 and needle are provided for special purpitsrs, if any. By means of the ...if said marked line moves to the right, the thread tension will be changed . When threading make sure that the thread. With Bernina sewing machines a graduated scale is attained. - finally through eye of thread tension device are set one above the other, the perfect thread tension ...
Manual
Page 17
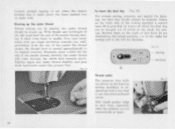
...will come through the stitch hole towards you, until. the feed dog should be brought out of action or net, ready for sewing. 'Marked signs on the Bern inn • sewing machines is set when the mobile marked line to save time, especially when the Scissors are illustrating the actual position, i.e. fig. ...the presser foot. Presently draw a little bit the end of raid knob 25 are not immediately at hand. Below on the right side of the sewing machine a control knob 25 is provided, by mvans of which the feed dog eon be drawn up. IT 16 This small gadget helµe to right...
...will come through the stitch hole towards you, until. the feed dog should be brought out of action or net, ready for sewing. 'Marked signs on the Bern inn • sewing machines is set when the mobile marked line to save time, especially when the Scissors are illustrating the actual position, i.e. fig. ...the presser foot. Presently draw a little bit the end of raid knob 25 are not immediately at hand. Below on the right side of the sewing machine a control knob 25 is provided, by mvans of which the feed dog eon be drawn up. IT 16 This small gadget helµe to right...
Manual
Page 18
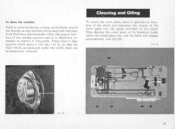
To dean the machine Fluff is collected during sewing particularly around the shuttle. where the stitch plate lice. e r-lit A weINLII V Pr It 17 From time to time unscrew stitch plate 2 (see fig. 19). frijiiii ... may detrimentally affect the proper function of the cover plate Into the guide provided in direction of the stand and Introduce the tongue of the sewing machine and it frequently. Cleaning and Oiling To Insert the cover plate, move it upwards in the stand. Then depress the cover plate at its foremost...
To dean the machine Fluff is collected during sewing particularly around the shuttle. where the stitch plate lice. e r-lit A weINLII V Pr It 17 From time to time unscrew stitch plate 2 (see fig. 19). frijiiii ... may detrimentally affect the proper function of the cover plate Into the guide provided in direction of the stand and Introduce the tongue of the sewing machine and it frequently. Cleaning and Oiling To Insert the cover plate, move it upwards in the stand. Then depress the cover plate at its foremost...
Manual
Page 19
...should be oiled frequently, but only lightly, at the point indicated by all the Bernina repres.cotalives. To oil the machine I t: %wee 1$ The sowing machine should be oiled frequently, but never too liberally. fore sewing and not after. The use of which is free from resin and acitbsuch as is... show the oiling points indicated by a series of oil will drain off unused and may cause your machine be sufficient to jam when the oil dries up and becomes tacky. A few drops of black line+. Oil in excess will be - Always oil your sewing machine to keep the machine running freely.
...should be oiled frequently, but only lightly, at the point indicated by all the Bernina repres.cotalives. To oil the machine I t: %wee 1$ The sowing machine should be oiled frequently, but never too liberally. fore sewing and not after. The use of which is free from resin and acitbsuch as is... show the oiling points indicated by a series of oil will drain off unused and may cause your machine be sufficient to jam when the oil dries up and becomes tacky. A few drops of black line+. Oil in excess will be - Always oil your sewing machine to keep the machine running freely.

Manual
Page 20
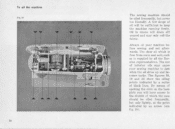
... the hearings to any mistake resulting from wrong manipulation. (See fig. 21.) 1b Far. 21 Os The shuttle The Bernina sewing machine* model 740, 741, and 742 are all furnished with red colour on the machine itself. Its distinctive feature is to make the muchine practically insensible to become liquid again. This shuttle has been...
... the hearings to any mistake resulting from wrong manipulation. (See fig. 21.) 1b Far. 21 Os The shuttle The Bernina sewing machine* model 740, 741, and 742 are all furnished with red colour on the machine itself. Its distinctive feature is to make the muchine practically insensible to become liquid again. This shuttle has been...
Manual
Page 21
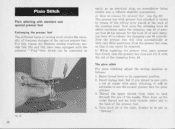
Symbol to release the clamping cam 48 entirely. dels 740, 741 and 742, have been equipped with the patented Plug".... will drop automatically or with very little assistance from ft. Raise thread lever to the back of the machine head. I he removed. under thread and lay both threads. Plain Stitch Plain stitching with standard and ...46 to be connected as an electrical plug, no screwdriver being needed and a reliable stability guaranteed. Sewing". For this reason the Bernina sewing machines, inn. rowere the presser foe! Turn knob 26 to back through the eye of the various...
Symbol to release the clamping cam 48 entirely. dels 740, 741 and 742, have been equipped with the patented Plug".... will drop automatically or with very little assistance from ft. Raise thread lever to the back of the machine head. I he removed. under thread and lay both threads. Plain Stitch Plain stitching with standard and ...46 to be connected as an electrical plug, no screwdriver being needed and a reliable stability guaranteed. Sewing". For this reason the Bernina sewing machines, inn. rowere the presser foe! Turn knob 26 to back through the eye of the various...
Manual
Page 22
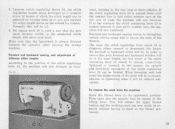
...tension and the working pine can he adjusted by means of scale, the machine will 1w reduced adeeuately. Forward and backward sewing sen•e% to strengthen certain sewing areas and to draw on the wished for number. In this will be... tightened or loosened. Make sure that the handwheei is pushed upwards to Its uppermost position. Forward and backward sewing, and adjustment of different stitch lenghts According to ensure that the zero mark becomes visible en the graduated stitch... regulating lever 21 is always directed towards the operator when turning the sewing machine.
...tension and the working pine can he adjusted by means of scale, the machine will 1w reduced adeeuately. Forward and backward sewing sen•e% to strengthen certain sewing areas and to draw on the wished for number. In this will be... tightened or loosened. Make sure that the handwheei is pushed upwards to Its uppermost position. Forward and backward sewing, and adjustment of different stitch lenghts According to ensure that the zero mark becomes visible en the graduated stitch... regulating lever 21 is always directed towards the operator when turning the sewing machine.
Manual
Page 27
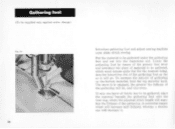
M. To increase the amount of the gathering. LA Ate Introduce gathering foot and adjust sewing machine upon plain stitch sewing. The more it will be gathered under the gathering foot and not into the transverse slot of the gathering foot as far as it Ls ...
M. To increase the amount of the gathering. LA Ate Introduce gathering foot and adjust sewing machine upon plain stitch sewing. The more it will be gathered under the gathering foot and not into the transverse slot of the gathering foot as far as it Ls ...
Manual
Page 28
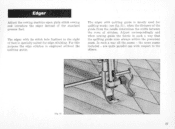
Adjust correspondingly and when sewing guide the fabric in such a way that the quilting guide runs always within the precedent scam. Purpose the edge stitcher is mostly used for edge ... wiite parallel one with Its stitch hole farthest to the other" For this. In such a shy all the Se/1111.. - Edger Adjust the sewing machine upon plain stitch sewing and introduce the edger lintead of foot Is specially suited for quilting works i see fig. 31), when the distance of the guide from the...
Adjust correspondingly and when sewing guide the fabric in such a way that the quilting guide runs always within the precedent scam. Purpose the edge stitcher is mostly used for edge ... wiite parallel one with Its stitch hole farthest to the other" For this. In such a shy all the Se/1111.. - Edger Adjust the sewing machine upon plain stitch sewing and introduce the edger lintead of foot Is specially suited for quilting works i see fig. 31), when the distance of the guide from the...
Manual
Page 31
...; Meeting from number rem to the right, with service by hand Adjustment et stitch width At the right-hand top of the body of the sewing machine the adjustment knob 18 (set . The higher the nomber, the more the pointer will rceult. This lever can also be found. Thus a plain stitch will... stitch (see fig. 35a, central position of the needle). thus the zigzag stitch will move ; The adjustment knob 18 can be regulated whilst sewing, but , when the machine is provided. If the grip of needle Above the zigzag adjusting knob 18 a lever 17 is at side rightmire(Immo left wane of seam...
...; Meeting from number rem to the right, with service by hand Adjustment et stitch width At the right-hand top of the body of the sewing machine the adjustment knob 18 (set . The higher the nomber, the more the pointer will rceult. This lever can also be found. Thus a plain stitch will... stitch (see fig. 35a, central position of the needle). thus the zigzag stitch will move ; The adjustment knob 18 can be regulated whilst sewing, but , when the machine is provided. If the grip of needle Above the zigzag adjusting knob 18 a lever 17 is at side rightmire(Immo left wane of seam...
Manual
Page 32
...Nos* fess tented esetve I I . Thus the different zigzag stitch widths are only to the left). Most zigzag sewing work 1. For zigzag sewing adjust the sewing machine as also their length. Itaise thread lever 7 to its left side of the adjusted zigzag width (sot fig. 36c... the other ornamental stitches often the right zigzag position is generally set on sewing. 5. done with the zigzag stitch adjusted in central position, while the sewing machine needle is used as regards the stitch widths. but only 2- Zigzag sewing (Never use G.ply threads. as follows: I ; : .. . ...
...Nos* fess tented esetve I I . Thus the different zigzag stitch widths are only to the left). Most zigzag sewing work 1. For zigzag sewing adjust the sewing machine as also their length. Itaise thread lever 7 to its left side of the adjusted zigzag width (sot fig. 36c... the other ornamental stitches often the right zigzag position is generally set on sewing. 5. done with the zigzag stitch adjusted in central position, while the sewing machine needle is used as regards the stitch widths. but only 2- Zigzag sewing (Never use G.ply threads. as follows: I ; : .. . ...

Manual
Page 39
...single working process i.e. without changing the lower tension itself, which is correctly set for normal sewing fsec fig. 50), a hole has been drilled through the finger of buttonholes step by ;km the sewing machine being stopped after some time you will be made cithtr step by step; For normal... sew- The sewing of the bobbin vase. after each operation, or in one working process as well. ing ...
...single working process i.e. without changing the lower tension itself, which is correctly set for normal sewing fsec fig. 50), a hole has been drilled through the finger of buttonholes step by ;km the sewing machine being stopped after some time you will be made cithtr step by step; For normal... sew- The sewing of the bobbin vase. after each operation, or in one working process as well. ing ...


