
Manual
Page 2
... 18 Electrical connections model 717 4 Electrical connections model 707 5 Finishing of Seams 13 Page Flat joining seam Flat seam Gathering Gathering of Material Gusset Seam Hemmer Hems in Jersey Material Hemstitching Hemstitch needle inserting the bobbin Inserting zips Jersey repairs Jersey seams... Lace on Jersey Lace in material Lap hemmer Lowering drop feed control Lycra seams Monograms Neatening seams Needle Position Oiling Model 707 Oiling Model 717 Patching Patching Jersey Patching Material Pintucking Pre-embroidered applique Quick seam Reverse Sewing Reverse stitching ...
... 18 Electrical connections model 717 4 Electrical connections model 707 5 Finishing of Seams 13 Page Flat joining seam Flat seam Gathering Gathering of Material Gusset Seam Hemmer Hems in Jersey Material Hemstitching Hemstitch needle inserting the bobbin Inserting zips Jersey repairs Jersey seams... Lace on Jersey Lace in material Lap hemmer Lowering drop feed control Lycra seams Monograms Neatening seams Needle Position Oiling Model 707 Oiling Model 717 Patching Patching Jersey Patching Material Pintucking Pre-embroidered applique Quick seam Reverse Sewing Reverse stitching ...
Manual
Page 4
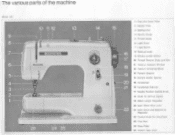
The various parts of the machine Model 707 9 8 7 • 10 11 12 13 BERNINA 4 I • 1 3 2 1 I I 25 24 23 14 A \ • • S 15 16 17 18 19 20 21 22 1 Free Arm Cover Plate 2 Needle Plate 3 Sowing Foot 4 Needle Clamp 5 7nread Guide 6 Light Cover 7 Light Switch 8 Take-up Lever 9 Bobbin winder tension 10 Thread Tension Discs...
The various parts of the machine Model 707 9 8 7 • 10 11 12 13 BERNINA 4 I • 1 3 2 1 I I 25 24 23 14 A \ • • S 15 16 17 18 19 20 21 22 1 Free Arm Cover Plate 2 Needle Plate 3 Sowing Foot 4 Needle Clamp 5 7nread Guide 6 Light Cover 7 Light Switch 8 Take-up Lever 9 Bobbin winder tension 10 Thread Tension Discs...
Manual
Page 5
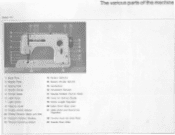
Model 717 4 3 10 1112 Or OLRNINA 14 15 19 41 20 21 The various parts of the machine 1 Base Plate 2 Needle Plate 3 Sewing Foot 4 Needle Clamp S Thread Guide 6 Light Cover 7 Light Switch II Take-up Lever 9 Bobbin winder tension 10 Thread Tension Discs and Slot 11 Tension Indicator Window 12 ... for Setting Zigzag 19 Stitch Length Regulator 20 Satin Stitch Stop Lever 21 Satin Stitch and Buttonhole Regulator 22 Control Knob for Drop Feed 23 Needle Ptato Slide
Model 717 4 3 10 1112 Or OLRNINA 14 15 19 41 20 21 The various parts of the machine 1 Base Plate 2 Needle Plate 3 Sewing Foot 4 Needle Clamp S Thread Guide 6 Light Cover 7 Light Switch II Take-up Lever 9 Bobbin winder tension 10 Thread Tension Discs and Slot 11 Tension Indicator Window 12 ... for Setting Zigzag 19 Stitch Length Regulator 20 Satin Stitch Stop Lever 21 Satin Stitch and Buttonhole Regulator 22 Control Knob for Drop Feed 23 Needle Ptato Slide

Manual
Page 6
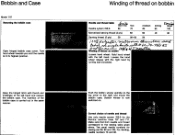
... bobbin case. When this plug is set in the same manner. To insert bulb, turn anti-clockwise and draw downwards. Turn handwheel towards you, until needle reaches highest point. Connect foot starter to change the bulb. Foot starter and flex are connected by a special plug. Pull out light cover sideways to...
... bobbin case. When this plug is set in the same manner. To insert bulb, turn anti-clockwise and draw downwards. Turn handwheel towards you, until needle reaches highest point. Connect foot starter to change the bulb. Foot starter and flex are connected by a special plug. Pull out light cover sideways to...
Manual
Page 8
...Hold hand wheel with the left hand and remove the bobbin case. The insertion of needle and thread Use only needle system 705 B for sewing are 80, 90 and 100. The usual needle numbers for the Bernina machine class 707 and 717. Open the hinged latch with the right hand by turning anti-clockwise. ...Bobbin and Case Model 707 Removing the bobbin case Open hinged bobbin case cover. Correct choice of the bobbin case ...
...Hold hand wheel with the left hand and remove the bobbin case. The insertion of needle and thread Use only needle system 705 B for sewing are 80, 90 and 100. The usual needle numbers for the Bernina machine class 707 and 717. Open the hinged latch with the right hand by turning anti-clockwise. ...Bobbin and Case Model 707 Removing the bobbin case Open hinged bobbin case cover. Correct choice of the bobbin case ...
Manual
Page 9
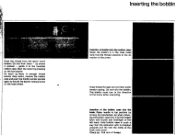
As soon as shown in the case make sure that the extension arm is directed upwards and fits into the hook. Raise needle to top position by the hinged latch with thumb and forefinger of the arrow. As when removing the bobbin case hold the bobbin. Do not ...
As soon as shown in the case make sure that the extension arm is directed upwards and fits into the hook. Raise needle to top position by the hinged latch with thumb and forefinger of the arrow. As when removing the bobbin case hold the bobbin. Do not ...
Manual
Page 10
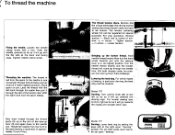
...will go with the left as far as it will come up lever is led from the front to be altered. Thread the needle from the spool to the needle eye. Bernina has the unique advantage that during normal sewing the thread tension does not have to the ' left hand through the... needle hole. Turn control knob (22) to be set upon " darning " symbol. With the right hand hold the spool steady. Now turn . Model 707 Darning. Presser foot...
...will go with the left as far as it will come up lever is led from the front to be altered. Thread the needle from the spool to the needle eye. Bernina has the unique advantage that during normal sewing the thread tension does not have to the ' left hand through the... needle hole. Turn control knob (22) to be set upon " darning " symbol. With the right hand hold the spool steady. Now turn . Model 707 Darning. Presser foot...
Manual
Page 12
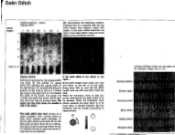
r Satin Stitch Stitch length : Needle position : centre Zigzag width : 1 1,5 2 2,5 3 3,5 4
r Satin Stitch Stitch length : Needle position : centre Zigzag width : 1 1,5 2 2,5 3 3,5 4

Manual
Page 13
... elbow on the table even when using the slide-on sewing plate which makes sewing easier. Nor must the material be pulled to lean your Bernina far enough from the table edge (about 6 inches) for you guide the material. Some tecrinical !lints If you like to work as comfortably as possible... only on how you to the rear. The basic rules are therefore: 1. not from the side, and near the presser foot 2. . .. The mastering of the needle bar.
... elbow on the table even when using the slide-on sewing plate which makes sewing easier. Nor must the material be pulled to lean your Bernina far enough from the table edge (about 6 inches) for you guide the material. Some tecrinical !lints If you like to work as comfortably as possible... only on how you to the rear. The basic rules are therefore: 1. not from the side, and near the presser foot 2. . .. The mastering of the needle bar.
Manual
Page 14
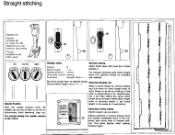
...centre. When stitch length lever is returned below 0 the stitch length is raised above 0 for reverse sew- With the needle position knob the needle can be in as far as it will then select the same stitch length as it was before. The same applies ...on the Ib material and thread Thread : O 0 20 adapted to reverse sewing. Before stitching in reverse always leave 13 the needle completely down position.) a Needle position: centre For reverse stitching push stitch length Drop feed control: sewing Automatic: straight stitch lever (19) upward (where no numbers...
...centre. When stitch length lever is returned below 0 the stitch length is raised above 0 for reverse sew- With the needle position knob the needle can be in as far as it will then select the same stitch length as it was before. The same applies ...on the Ib material and thread Thread : O 0 20 adapted to reverse sewing. Before stitching in reverse always leave 13 the needle completely down position.) a Needle position: centre For reverse stitching push stitch length Drop feed control: sewing Automatic: straight stitch lever (19) upward (where no numbers...
Manual
Page 15
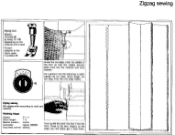
IMMO Guide the cut edge under the centre of the foot so that the needle actually goes once into the material and once outside. As a general rule the following is valid: zigzag not too wide, stitch length not too long. ... and thread Thread: adapted to the fabric sewn if possible 50 WO, mftwak Wm. :ware 1111.11P monygm amiprig. Finishing Edges Zigzag: 212/ -4 Stitch length: 1 -2 Needle position: centre Automatic: zigzag VWWWV Drop feed control: sewing If you guide the work and material. MOON, Mn V. Zigzag sewing Zigzag foot...
IMMO Guide the cut edge under the centre of the foot so that the needle actually goes once into the material and once outside. As a general rule the following is valid: zigzag not too wide, stitch length not too long. ... and thread Thread: adapted to the fabric sewn if possible 50 WO, mftwak Wm. :ware 1111.11P monygm amiprig. Finishing Edges Zigzag: 212/ -4 Stitch length: 1 -2 Needle position: centre Automatic: zigzag VWWWV Drop feed control: sewing If you guide the work and material. MOON, Mn V. Zigzag sewing Zigzag foot...

Manual
Page 16
.... (stitch length regulator) until it will touch the stop Needle position: centre Mai Automatic: zigzag yr,Awyw Drop feed control: sewing Model 707 only : When embroidering always use tissue paper, as stop . The Bernina satin stitch control gives the correct stitch length (density) for... this is too soft. Typewriting paper is advisable to lay paper underneath to desired pattern. Zigzag: 4 yI Stitch length: Satin Stitch Needle position: centre rl Drop feed control: sewing Paper underlay when needed 0 -20 When embroidering it is excellent.) Satin Stitch (Close zigzag...
.... (stitch length regulator) until it will touch the stop Needle position: centre Mai Automatic: zigzag yr,Awyw Drop feed control: sewing Model 707 only : When embroidering always use tissue paper, as stop . The Bernina satin stitch control gives the correct stitch length (density) for... this is too soft. Typewriting paper is advisable to lay paper underneath to desired pattern. Zigzag: 4 yI Stitch length: Satin Stitch Needle position: centre rl Drop feed control: sewing Paper underlay when needed 0 -20 When embroidering it is excellent.) Satin Stitch (Close zigzag...
Manual
Page 17
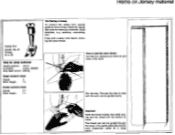
... hemS but whenever jersey stretches, e. Important ti Hold the thread slightly taut while sew- Hems on Jersey material Zigzag foot Needle: 80-70 Thread: 30 or 50 Hems for Jersey underwear Needle position: centre Automatic: zigzag WMANV Drop feed control: sewing Single turned-In hems Zigzag: 3 Stitch length: Double turned-in the...
... hemS but whenever jersey stretches, e. Important ti Hold the thread slightly taut while sew- Hems on Jersey material Zigzag foot Needle: 80-70 Thread: 30 or 50 Hems for Jersey underwear Needle position: centre Automatic: zigzag WMANV Drop feed control: sewing Single turned-In hems Zigzag: 3 Stitch length: Double turned-in the...

Manual
Page 18
... patches are cutting. For cotton Jersey use the extra thread to avoid r.1 waving. Patching Jersey Zigzag foot Needle: 80-70 Thread. 30 or 50 ti \ j'i \j\jN Patching Jersey Zigzag: about 3 Stitch length: 1-112/ Needle position: centre Automatic: zigzag WNWVV Drop teed control: sewing Baste the new piece on to the right side...
... patches are cutting. For cotton Jersey use the extra thread to avoid r.1 waving. Patching Jersey Zigzag foot Needle: 80-70 Thread. 30 or 50 ti \ j'i \j\jN Patching Jersey Zigzag: about 3 Stitch length: 1-112/ Needle position: centre Automatic: zigzag WNWVV Drop teed control: sewing Baste the new piece on to the right side...
Manual
Page 19
... -1 V2 Press the whole seam towards single layer of Jersey and sew at one presser foot width along first seam on left. Use only a perfect needle. Press each seam after sewing and not all seams together when the work is completed. Flat Seam - Hold the scissors correctly. Skirts - Zigzag foot... Needle: 80-70 Thread: 30 Four important points when sewing Jersey -U 1. Quick seam Gusset seam Seams for knitted fabrics Elastic seams on Jersey Seams ...
... -1 V2 Press the whole seam towards single layer of Jersey and sew at one presser foot width along first seam on left. Use only a perfect needle. Press each seam after sewing and not all seams together when the work is completed. Flat Seam - Hold the scissors correctly. Skirts - Zigzag foot... Needle: 80-70 Thread: 30 Four important points when sewing Jersey -U 1. Quick seam Gusset seam Seams for knitted fabrics Elastic seams on Jersey Seams ...
Manual
Page 20
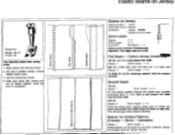
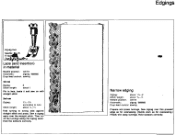
...: centre Drop feed control: sewing Lace on as the elastic. Trim off surplus material on the wrong side. (Hold the scissors correctly.) r I /2 Needle position: centre Automatic. sey is to gather it up first, sewing long straight stitches, then draw the under thread and pull work up to the .... Trim off surplus on Jersey Zigzag: 11/2 -2 Stitch length: 1/4 - zigzag Drop feed control: sewing \WNW Do not pull the elastic while sewing. Edgings Zigzag foot Needle: 80-70 Th read : Shell Edging Zigzag: 4 Stitch length...
...: centre Drop feed control: sewing Lace on as the elastic. Trim off surplus material on the wrong side. (Hold the scissors correctly.) r I /2 Needle position: centre Automatic. sey is to gather it up first, sewing long straight stitches, then draw the under thread and pull work up to the .... Trim off surplus on Jersey Zigzag: 11/2 -2 Stitch length: 1/4 - zigzag Drop feed control: sewing \WNW Do not pull the elastic while sewing. Edgings Zigzag foot Needle: 80-70 Th read : Shell Edging Zigzag: 4 Stitch length...
Manual
Page 21
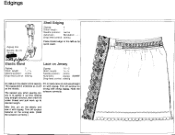
... about 112/ -2 Stitch length: about 'A -1/2 Fold turning to wrong side against straight stitch and press. Zigzag foot Needle- 70 Threa lap,* Lace (and insertion) in material Needle position: centre Automatic: zigzag WAMW Drop feed control: sewing 1st run Zigzag: Stitch length: 0 about 1 Pin in ...lace, baste it and sew on with straight stitch 2nd run Zigzag: Stitch length: 11/2-21/7 according to lace about 14/ -72 Needle position: centre Automatic: zigzag 1,AAWAN Drop feed control: sewing Prepare and press turnings. Sew a zigzag seam over this pressed edge as for ...
... about 112/ -2 Stitch length: about 'A -1/2 Fold turning to wrong side against straight stitch and press. Zigzag foot Needle- 70 Threa lap,* Lace (and insertion) in material Needle position: centre Automatic: zigzag WAMW Drop feed control: sewing 1st run Zigzag: Stitch length: 0 about 1 Pin in ...lace, baste it and sew on with straight stitch 2nd run Zigzag: Stitch length: 11/2-21/7 according to lace about 14/ -72 Needle position: centre Automatic: zigzag 1,AAWAN Drop feed control: sewing Prepare and press turnings. Sew a zigzag seam over this pressed edge as for ...
Manual
Page 22
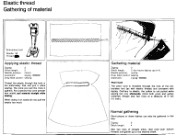
... ti .-.3rW•4r Gathering material Zigzag: 2 Stitch length: 2 (for heavy fabrics up to the desired width. Contrary to 4) Needle position: centre Drop feed control: sewing Automatic: zigzag MOM Pearl Cord The pearl cord is not pulled while sewing but only afterwards. ... Automatic: zigzag WNWIN Drop feed control: sewing Thread the elastic through the hole of material Embroidery foot Needle: BO Thread:ID Applying elastic thread Zigzag: 2 Stitch length: 2 Needle position . Elastic thread Gathering of the embroidery foot (as with elastic thread) and oversewn with zigzag...
... ti .-.3rW•4r Gathering material Zigzag: 2 Stitch length: 2 (for heavy fabrics up to the desired width. Contrary to 4) Needle position: centre Drop feed control: sewing Automatic: zigzag MOM Pearl Cord The pearl cord is not pulled while sewing but only afterwards. ... Automatic: zigzag WNWIN Drop feed control: sewing Thread the elastic through the hole of material Embroidery foot Needle: BO Thread:ID Applying elastic thread Zigzag: 2 Stitch length: 2 Needle position . Elastic thread Gathering of the embroidery foot (as with elastic thread) and oversewn with zigzag...

Manual
Page 23
Very poor position. Hold the work . __l Blindstitch foot ii Needle: qc;o7-N Thr a . Blind hem stitch This is how the work is the correct way. Basic Setting Zigzag: about 2'/2 Stitch length: about 212/ Needle position: right Drop feed control: sewing Automatic: Blindstitch Setting for sheer fabric Zigzag:... about 112/ Stitch length: about 11/2 Needle position: centre Oversew and prepare the hem as diagram, baste with machine or by hand 1/4 " from edge and press. This ...
Very poor position. Hold the work . __l Blindstitch foot ii Needle: qc;o7-N Thr a . Blind hem stitch This is how the work is the correct way. Basic Setting Zigzag: about 2'/2 Stitch length: about 212/ Needle position: right Drop feed control: sewing Automatic: Blindstitch Setting for sheer fabric Zigzag:... about 112/ Stitch length: about 11/2 Needle position: centre Oversew and prepare the hem as diagram, baste with machine or by hand 1/4 " from edge and press. This ...

Manual
Page 24
...centre Drop feed control : sewing 1st run Zigzag foot Zigzag: Stitch length: Automatic: 11/ 2 -2 1-11/2 zigzag VWWVW Needle: 80-70 Thread: 50 Do not cut off damaged part but baste the new patch on with running stitch sew a straight ...). Oversew edges correctly: See diagram. Running stitch should not overlap the edges. Modern " Darning" with running stitch Zigzag: 4 Stitch length: close to 0 Needle position: centre Automatic: Running stitch Drop feed control: sewing 3rd run C Zigzag. 4 Stitch length: close to oversew edges correctly. Take care to 0 Automatic...
...centre Drop feed control : sewing 1st run Zigzag foot Zigzag: Stitch length: Automatic: 11/ 2 -2 1-11/2 zigzag VWWVW Needle: 80-70 Thread: 50 Do not cut off damaged part but baste the new patch on with running stitch sew a straight ...). Oversew edges correctly: See diagram. Running stitch should not overlap the edges. Modern " Darning" with running stitch Zigzag: 4 Stitch length: close to 0 Needle position: centre Automatic: Running stitch Drop feed control: sewing 3rd run C Zigzag. 4 Stitch length: close to oversew edges correctly. Take care to 0 Automatic...

