
Manual
Page 2
...grounding. Do not operate where aerosol (spray) products are provided instead of burns, fire, electric shock or injury to break. Switch the sewing machine off («0») position, then remove plug from all instructions before using this manual. 3. Return the appliance to break. 9. Use...the like. 10. A double insulated product is intended for its intended use . 17. DANGER To reduce the risk of the sewing machine and foot controller free from the electric outlet immediately after using and before relamping. Keep ventilation openings of electric shock: 1. SAVE THESE...
...grounding. Do not operate where aerosol (spray) products are provided instead of burns, fire, electric shock or injury to break. Switch the sewing machine off («0») position, then remove plug from all instructions before using this manual. 3. Return the appliance to break. 9. Use...the like. 10. A double insulated product is intended for its intended use . 17. DANGER To reduce the risk of the sewing machine and foot controller free from the electric outlet immediately after using and before relamping. Keep ventilation openings of electric shock: 1. SAVE THESE...
Manual
Page 3
You are now the proud owner of an overlock sewing machine which provide even more scope for using Dear Customer the various overlock stitches, roll hem, cover and chain stitch. On the last page of ...you step by step through the features and handling of your BERNINA 2500DCET overlocker. Hanspeter Ueltschi BERNINA INTERNATIONAL AKTIENGESELLSCHAFT President BERNINA International AG, CH-8266 Steckborn Our comprehensive instruction manual takes you years of pleasure. The unique stitch selection and pre-set tensions make sewing easier than ever and will find a list of optional ...
You are now the proud owner of an overlock sewing machine which provide even more scope for using Dear Customer the various overlock stitches, roll hem, cover and chain stitch. On the last page of ...you step by step through the features and handling of your BERNINA 2500DCET overlocker. Hanspeter Ueltschi BERNINA INTERNATIONAL AKTIENGESELLSCHAFT President BERNINA International AG, CH-8266 Steckborn Our comprehensive instruction manual takes you years of pleasure. The unique stitch selection and pre-set tensions make sewing easier than ever and will find a list of optional ...
Manual
Page 4
...machine 6 Setting up the machine 11 Functions and general operating instructions 14 Needles, thread, fabric 23 Stitch chart and stitch selection 24 Threading instructions for overlock, cover/chain stitch and top & bottom cover stitch 30 Overlock threading 31 Overlock test sewing...cover stitch / Cover stitch test sewing and fine tuning 51 Chain stitch threading (position G) 53 Chain stitch test sewing and fine tuning 55 Converting ... 60 Overlock practical sewing, needles and threads 61 Cover stitch/ top & bottom cover stitch practical sewing 67 Chain stitch practical sewing 70 Maintenance 71 ...
...machine 6 Setting up the machine 11 Functions and general operating instructions 14 Needles, thread, fabric 23 Stitch chart and stitch selection 24 Threading instructions for overlock, cover/chain stitch and top & bottom cover stitch 30 Overlock threading 31 Overlock test sewing...cover stitch / Cover stitch test sewing and fine tuning 51 Chain stitch threading (position G) 53 Chain stitch test sewing and fine tuning 55 Converting ... 60 Overlock practical sewing, needles and threads 61 Cover stitch/ top & bottom cover stitch practical sewing 67 Chain stitch practical sewing 70 Maintenance 71 ...
Manual
Page 5
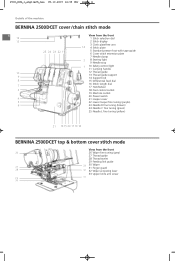
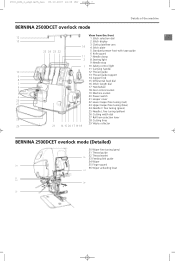
... Details of the machine BERNINA 2500DCET cover /chain stitch mode 6 12 13 10 9 8 7 3 4 5 6 25 24 23 22 11 View from the front 1 Stitch selection dial 2 Stitch display 3 Cloth plate/free arm 14 4 Stitch plate 5 Standard presser foot with tape guide 6 Cover stitch extension plate 7 Needle clamp 2 8 Sewing light 9 Needle ...18 Foot control socket 19 Machine socket 20 Power switch 21 Looper cover 22 Lower looper fine tuning (purple) 23 Needle R fine tuning (brown) 24 Needle C fine tuning (green) 25 Needle L fine tuning (yellow) 21 16 15 20 17 19 18 BERNINA 2500DCET top & bottom cover stitch...
... Details of the machine BERNINA 2500DCET cover /chain stitch mode 6 12 13 10 9 8 7 3 4 5 6 25 24 23 22 11 View from the front 1 Stitch selection dial 2 Stitch display 3 Cloth plate/free arm 14 4 Stitch plate 5 Standard presser foot with tape guide 6 Cover stitch extension plate 7 Needle clamp 2 8 Sewing light 9 Needle ...18 Foot control socket 19 Machine socket 20 Power switch 21 Looper cover 22 Lower looper fine tuning (purple) 23 Needle R fine tuning (brown) 24 Needle C fine tuning (green) 25 Needle L fine tuning (yellow) 21 16 15 20 17 19 18 BERNINA 2500DCET top & bottom cover stitch...
Manual
Page 6
...:33 Uhr Seite 7 Details of the machine BERNINA 2500DCET overlock mode View from the front 7 12 1 Stitch selection dial 13 2 Stitch display 3 Cloth plate/free arm 14 4 Stitch plate 25 24 23 22 5 Standard presser foot with tape guide 6 Knife guard 11 7 Needle clamp 2 8 Sewing light 9 Needle stop 1 10 Safety ...yellow) 26 Cutting width dial 27 Roll hem selection lever 28 28 Cutting lines 29 Waste collector 29 21 16 15 20 17 19 18 BERNINA 2500DCET overlock mode (Detailed) 30 Wiper fine tuning (grey) 31 Thread guide 32 Thread eyelet 35 33 Feeding link guide 2 34 Wiper 30...
...:33 Uhr Seite 7 Details of the machine BERNINA 2500DCET overlock mode View from the front 7 12 1 Stitch selection dial 13 2 Stitch display 3 Cloth plate/free arm 14 4 Stitch plate 25 24 23 22 5 Standard presser foot with tape guide 6 Knife guard 11 7 Needle clamp 2 8 Sewing light 9 Needle stop 1 10 Safety ...yellow) 26 Cutting width dial 27 Roll hem selection lever 28 28 Cutting lines 29 Waste collector 29 21 16 15 20 17 19 18 BERNINA 2500DCET overlock mode (Detailed) 30 Wiper fine tuning (grey) 31 Thread guide 32 Thread eyelet 35 33 Feeding link guide 2 34 Wiper 30...
Manual
Page 10
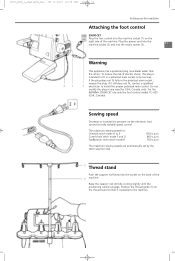
...not modify the plug in the polarized main socket , reverse the plug. Sewing speed Decrease or increase the pressure on the electronic foot control for : Overlock stitch mode A to the machine. The maximum sewing speed for fully variable speed control. Position the thread guide (5) on ... stitch mode F and G Top&botom cover stitch mode H 1500 s.p.m. 800 s.p.m. 500 s.p.m. For the BERNINA 2500DCET use only the foot control model YC-425 (USA, Canada). Plug the power cord into the machine socket (2) and into the mains socket (3). 11 2 1 Warning This appliance has a polarized plug (one...
...not modify the plug in the polarized main socket , reverse the plug. Sewing speed Decrease or increase the pressure on the electronic foot control for : Overlock stitch mode A to the machine. The maximum sewing speed for fully variable speed control. Position the thread guide (5) on ... stitch mode F and G Top&botom cover stitch mode H 1500 s.p.m. 800 s.p.m. 500 s.p.m. For the BERNINA 2500DCET use only the foot control model YC-425 (USA, Canada). Plug the power cord into the machine socket (2) and into the mains socket (3). 11 2 1 Warning This appliance has a polarized plug (one...

Manual
Page 11
... spool holder caps, rounded side downwards. Place the stabilizers on the looper cover. 2500_DCE_1_englisch_neu 09.10.2007 14:33 Uhr Seite 12 Setting up the machine 12 Waste collector Hang the waste collector onto the opening provided on the spool pins when using thread cones. Thread, cones, spools Cones or domestic... on your working area neat and tidy. Remove the stabilizers for household spools, but secure the spools with the wider edge at the top. When sewing with large industrial spools, use the stabilizers upside down, i.e. It catches the cut-off fabric as you...
... spool holder caps, rounded side downwards. Place the stabilizers on the looper cover. 2500_DCE_1_englisch_neu 09.10.2007 14:33 Uhr Seite 12 Setting up the machine 12 Waste collector Hang the waste collector onto the opening provided on the spool pins when using thread cones. Thread, cones, spools Cones or domestic... on your working area neat and tidy. Remove the stabilizers for household spools, but secure the spools with the wider edge at the top. When sewing with large industrial spools, use the stabilizers upside down, i.e. It catches the cut-off fabric as you...

Manual
Page 13
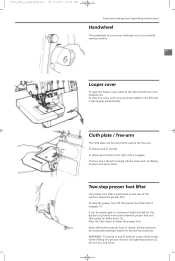
... cut -out after 2 seconds, after cooling down , i.e. Note: If you stop sewing, the needle(s) will stop. when you turn the stitch selection dial while sewing, the control lamp will blink and the machine will stop in the fabric. The Needle stop for threading or changing needles. The control...instructions 14 1 2 4 3 Power switch The power switch is on the handwheel side of the machine in front of the presser foot lifter. 1 = ON 2 = OFF Electronics/Safety/Needle stop Your Bernina overlocker is equipped with the needle in their highest position, the ideal position for cover and chain ...
... cut -out after 2 seconds, after cooling down , i.e. Note: If you stop sewing, the needle(s) will stop. when you turn the stitch selection dial while sewing, the control lamp will blink and the machine will stop in the fabric. The Needle stop for threading or changing needles. The control...instructions 14 1 2 4 3 Power switch The power switch is on the handwheel side of the machine in front of the presser foot lifter. 1 = ON 2 = OFF Electronics/Safety/Needle stop Your Bernina overlocker is equipped with the needle in their highest position, the ideal position for cover and chain ...
Manual
Page 14
... this position to provide more space between presser foot and stitch plate for sewing tubular items such as on the rear of the machine above the presser foot. 2 To raise the presser foot, lift the presser foot lifter until it will engage automatically. 2500_DCE_1_englisch_neu 09.10.2007...handwheel turns counter-clockwise as ribbing, trousers and sleeve hems. Two-step presser foot lifter The presser foot lifter is positioned on a household 15 sewing machine. 15 15 Looper cover To open the looper cover, press to the right and tilt the cover towards you. Cloth plate / free-arm The...
... this position to provide more space between presser foot and stitch plate for sewing tubular items such as on the rear of the machine above the presser foot. 2 To raise the presser foot, lift the presser foot lifter until it will engage automatically. 2500_DCE_1_englisch_neu 09.10.2007...handwheel turns counter-clockwise as ribbing, trousers and sleeve hems. Two-step presser foot lifter The presser foot lifter is positioned on a household 15 sewing machine. 15 15 Looper cover To open the looper cover, press to the right and tilt the cover towards you. Cloth plate / free-arm The...

Manual
Page 15
...The indents on the centre section (1) indicate the needle positions and act as bindings or sewing on the foot. The cover stitch presser foot consists of a solid centre section and... two spring-loaded side sections. To attach the foot, place it easier to needle(s) or machine. The spring-loaded side sections (2) guide the fabric and prevent sideways movement. To swing out: ... and general operating instructions Swing-out presser foot 16 The swing-out foot (exclusive by BERNINA) provides easy access for topstitching hems with elastic, folded edges, seams and ribbings as...
...The indents on the centre section (1) indicate the needle positions and act as bindings or sewing on the foot. The cover stitch presser foot consists of a solid centre section and... two spring-loaded side sections. To attach the foot, place it easier to needle(s) or machine. The spring-loaded side sections (2) guide the fabric and prevent sideways movement. To swing out: ... and general operating instructions Swing-out presser foot 16 The swing-out foot (exclusive by BERNINA) provides easy access for topstitching hems with elastic, folded edges, seams and ribbings as...

Manual
Page 16
...of overlock stitches is determined by the selected stitch length. 17 The stitch length is infinitely variable from 1- 4 mm and can be adjusted while sewing. Position of the lower knife. The 17 amount of movement is done with a stitch length of 2.5 mm (marking on the dial). The ...mm The upper knife and upper knife arm are sewn without knives. Note cover/chain stitch: Cover and chain stitches are fully raised when the machine is done with a basic stitch length setting of between 3 and 4. 2500_DCE_1_englisch_neu 09.10.2007 14:33 Uhr Seite 17 Stitch length Functions and...
...of overlock stitches is determined by the selected stitch length. 17 The stitch length is infinitely variable from 1- 4 mm and can be adjusted while sewing. Position of the lower knife. The 17 amount of movement is done with a stitch length of 2.5 mm (marking on the dial). The ...mm The upper knife and upper knife arm are sewn without knives. Note cover/chain stitch: Cover and chain stitches are fully raised when the machine is done with a basic stitch length setting of between 3 and 4. 2500_DCE_1_englisch_neu 09.10.2007 14:33 Uhr Seite 17 Stitch length Functions and...

Manual
Page 22
...Needle and fabric A Needles must move easily and · Use the deco-guide when without resistance through the long groove BERNINA overlocker. The thread sew your work Neatening edges Soft seams in knits, rolled hems Seams in perfect condition. the thread guides and threads (see page... . 2500_DCE_1_englisch_neu 09.10.2007 14:34 Uhr Seite 23 Needles, thread, fabric Needles and machine Your BERNINA overlocker is the BERNINA 2500DCET cover stitch or JLx2 needles 23 equipped with thread used When sewing, the thread is needles no. 70-90 on your depends on the thread.
...Needle and fabric A Needles must move easily and · Use the deco-guide when without resistance through the long groove BERNINA overlocker. The thread sew your work Neatening edges Soft seams in knits, rolled hems Seams in perfect condition. the thread guides and threads (see page... . 2500_DCE_1_englisch_neu 09.10.2007 14:34 Uhr Seite 23 Needles, thread, fabric Needles and machine Your BERNINA overlocker is the BERNINA 2500DCET cover stitch or JLx2 needles 23 equipped with thread used When sewing, the thread is needles no. 70-90 on your depends on the thread.

Manual
Page 26
...as tablecloths, table mats, napkins, cushions and curtains. ■ Narrow seams in the finest of silks, cotton or synthetic jersey. Neatening and sewing seams in clothing and home dec articles. Particularly suitable for top & bottom cover stitch. Symbols: Yellow line = insert needle L and thread...needle Attach the upper looper converter (upper looper is pre-set tensions for all types of seam allowances, hems and facings. The machine must be converted (see page 60). Neatening seams in clothing and home dec articles. Suitable for overlock stitches using all-purpose overlock...
...as tablecloths, table mats, napkins, cushions and curtains. ■ Narrow seams in the finest of silks, cotton or synthetic jersey. Neatening and sewing seams in clothing and home dec articles. Particularly suitable for top & bottom cover stitch. Symbols: Yellow line = insert needle L and thread...needle Attach the upper looper converter (upper looper is pre-set tensions for all types of seam allowances, hems and facings. The machine must be converted (see page 60). Neatening seams in clothing and home dec articles. Suitable for overlock stitches using all-purpose overlock...
Manual
Page 29
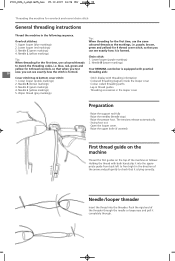
...can see exactly how it is formed. 4. blue, red, green and yellow for 4-thread overlock, so that when you test Your BERNINA overlocker is equipped with practical 30 sew, you 3. threading aids: Cover stitch/top & bottom cover stitch: 1. Needle R (brown markings) 3. The tensions release automatically. ...foot out. · Open the looper cover. · Raise the upper knife (if wanted) First thread guide on the machine Thread the first guides on the top of the machine as the markings, i.e. Needle C (green markings) 4. Needle L (yellow markings) Chain stitch: Tip: 1. Lower looper ...
...can see exactly how it is formed. 4. blue, red, green and yellow for 4-thread overlock, so that when you test Your BERNINA overlocker is equipped with practical 30 sew, you 3. threading aids: Cover stitch/top & bottom cover stitch: 1. Needle R (brown markings) 3. The tensions release automatically. ...foot out. · Open the looper cover. · Raise the upper knife (if wanted) First thread guide on the machine Thread the first guides on the top of the machine as the markings, i.e. Needle C (green markings) 4. Needle L (yellow markings) Chain stitch: Tip: 1. Lower looper ...
Manual
Page 33
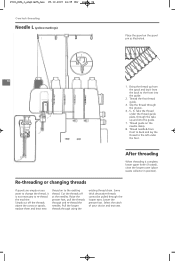
... through the groove. 4., 5., 6. Thread the first thread guide. 3. Thread guide on the spool pin as illustrated. 34 2 3 5 6 4 7 8 1. Select the stitch of your choice and test sew. Take the thread under the foot. Re-threading or changing threads If spools are empty or you want to change the thread, it from front... into the guide. 2. Cut the threads off the threads above the cones or spools, replace them and knot new thread on to re-thread the machine.
... through the groove. 4., 5., 6. Thread the first thread guide. 3. Thread guide on the spool pin as illustrated. 34 2 3 5 6 4 7 8 1. Select the stitch of your choice and test sew. Take the thread under the foot. Re-threading or changing threads If spools are empty or you want to change the thread, it from front... into the guide. 2. Cut the threads off the threads above the cones or spools, replace them and knot new thread on to re-thread the machine.

Manual
Page 35
Test sew. Rayon No. 40: take threads through the deco guide without threading the first machine guide or tension slit. 3/4 thread overlock with medium to the needles. Position the guide over the top of the thread slits (1) and tighten screw (2). Take ... 09.10.2007 14:35 Uhr Seite 36 Overlock sewing test and fine tuning 2 1 36 Deco guide The deco guide (in the accessory bag) is specially designed for sewing wide seams and edges with heavy thread: position the guide over one of the machine over the lower looper tension. 3 thread overlock with fine...
Test sew. Rayon No. 40: take threads through the deco guide without threading the first machine guide or tension slit. 3/4 thread overlock with medium to the needles. Position the guide over the top of the thread slits (1) and tighten screw (2). Take ... 09.10.2007 14:35 Uhr Seite 36 Overlock sewing test and fine tuning 2 1 36 Deco guide The deco guide (in the accessory bag) is specially designed for sewing wide seams and edges with heavy thread: position the guide over one of the machine over the lower looper tension. 3 thread overlock with fine...
Manual
Page 41
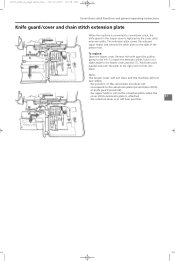
... the looper cover, position (1), hold both parts parallel and push the plate to the left. Note: The looper cover will not close and the machine will not sew when: · the position of the presser foot. ▼ To replace: ▲ Open the looper cover. 2500_DCE_2_englisch_neu 09.10.2007 14:59 Uhr Seite...
... the looper cover, position (1), hold both parts parallel and push the plate to the left. Note: The looper cover will not close and the machine will not sew when: · the position of the presser foot. ▼ To replace: ▲ Open the looper cover. 2500_DCE_2_englisch_neu 09.10.2007 14:59 Uhr Seite...
Manual
Page 48
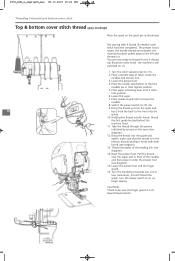
...or two revolutions, this will thread the wiper, turn the power switch to the front into position. 6. Test sewing with both hands, thread the first guide located behind the machine head. 11. Take the thread through the groove indicated by pulling it from the spool and 48 lay it... Thread the eyelet of fabric under the presser foot (see diagram). 14. You are in the tension discs by arrows on «l», begin sewing. Lower the presser foot. 4. Press wiper activating lever until it under the needles and presser foot. 3. Bring the thread into the guide and ...
...or two revolutions, this will thread the wiper, turn the power switch to the front into position. 6. Test sewing with both hands, thread the first guide located behind the machine head. 11. Take the thread through the groove indicated by pulling it from the spool and 48 lay it... Thread the eyelet of fabric under the presser foot (see diagram). 14. You are in the tension discs by arrows on «l», begin sewing. Lower the presser foot. 4. Press wiper activating lever until it under the needles and presser foot. 3. Bring the thread into the guide and ...

Manual
Page 49
... cut. The presser foot is raised, the needle threads are now ready to thread for 5 thread top & bottom cover stitch on «l». The machine is in its lowest fixed position. 49 2500_DCE_2_englisch_neu 09.10.2007 15:00 Uhr Seite 49 Threading 4-thread top & bottom cover stitch (5mm) Top &... bottom cover stitch thread (grey markings) Test sewing with 3 thread (2-needles, 5mm) cover stitch has been completed. You are released, the material has been pulled away to be sure the finger guard is...
... cut. The presser foot is raised, the needle threads are now ready to thread for 5 thread top & bottom cover stitch on «l». The machine is in its lowest fixed position. 49 2500_DCE_2_englisch_neu 09.10.2007 15:00 Uhr Seite 49 Threading 4-thread top & bottom cover stitch (5mm) Top &... bottom cover stitch thread (grey markings) Test sewing with 3 thread (2-needles, 5mm) cover stitch has been completed. You are released, the material has been pulled away to be sure the finger guard is...

Manual
Page 78
... for teenagers and children and crafts all feature on new in easy to follow steps. Ask your BERNINA overlocker and sewing machines is enormous. We also of your BERNINA dealer for BERNINA sewing machines, overlockers and special presser feet guarantee sewing success. Comprehensive and fully illustrated instructions for details. However, the creative potential of course report on a regular...
... for teenagers and children and crafts all feature on new in easy to follow steps. Ask your BERNINA overlocker and sewing machines is enormous. We also of your BERNINA dealer for BERNINA sewing machines, overlockers and special presser feet guarantee sewing success. Comprehensive and fully illustrated instructions for details. However, the creative potential of course report on a regular...


