
Manual
Page 2
... in . 2. Always unplug before relamping. Switch the sewing machine off *0* position then remove plug from the national Importer or a Bernina dealer. Adapter Grounding means Grounding pin If this appliance is the equipmentgrounding conductor. The plug must be grounded. The conductor with or ...operate this plug to be used only until a properly grounded outlet can cause the needle to break «GROUNDING INSTRUCTIONS» (Model 2000 D, USA only) This product must be held in th, instruction manual. 11. A temporary adaptor which looks like the plug illustrated ...
... in . 2. Always unplug before relamping. Switch the sewing machine off *0* position then remove plug from the national Importer or a Bernina dealer. Adapter Grounding means Grounding pin If this appliance is the equipmentgrounding conductor. The plug must be grounded. The conductor with or ...operate this plug to be used only until a properly grounded outlet can cause the needle to break «GROUNDING INSTRUCTIONS» (Model 2000 D, USA only) This product must be held in th, instruction manual. 11. A temporary adaptor which looks like the plug illustrated ...
Manual
Page 3
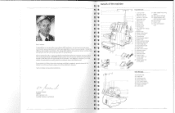
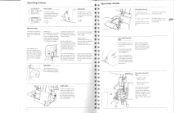
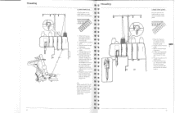
...From the front E E E lil F I: 2 6 E 6 5 E 2 4 I am delighted to welcome you to the millions of satisfied Bernina sewing machine and overlock owners around the world. CH-8266 Steckborn, Switzerland IE g 38 39 40 IE a 33 This was the beginning of the...-18 19 70 21 22 31 1 Cutting width adjustment knob 2 Selection lever for the company. The Bernina t 2000 is a new concept in terms of an overlock sewing machine which fulfils every expectation in overlocking. E... about your overlocker or sewing in general, please do not hesitate to contact your Bernina 2000 overlocker.
...From the front E E E lil F I: 2 6 E 6 5 E 2 4 I am delighted to welcome you to the millions of satisfied Bernina sewing machine and overlock owners around the world. CH-8266 Steckborn, Switzerland IE g 38 39 40 IE a 33 This was the beginning of the...-18 19 70 21 22 31 1 Cutting width adjustment knob 2 Selection lever for the company. The Bernina t 2000 is a new concept in terms of an overlock sewing machine which fulfils every expectation in overlocking. E... about your overlocker or sewing in general, please do not hesitate to contact your Bernina 2000 overlocker.
Manual
Page 4
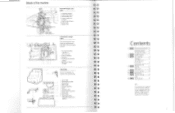
... holder 5 Large screwdriver mj CZ= 4 3 6 Oiler 7 Accessory bag 8 Upper looper converter 10 -5 9 Dust cover 10 Deco guide 11 11 Seam guide right (Optional accessory for 2000 0) ; 9 E S E S E E k t t E 9 E 3 E 3 E 3 E 3 E 3 E 3 E 3 E 3 E 3 E E E t Contents 1 Setting up the machine 10 Operating controls 12 ... 27 Stitch chart 31 5 Practical sewing 35 6 Maintenance 7 Trouble-shooting 43 Index 8 Technical Data 47 Note: The model Bernina 2000 DE is micro computer controlled and equipped with the symbol * 7 Details of the machine 0- View with looper cover open 1...
... holder 5 Large screwdriver mj CZ= 4 3 6 Oiler 7 Accessory bag 8 Upper looper converter 10 -5 9 Dust cover 10 Deco guide 11 11 Seam guide right (Optional accessory for 2000 0) ; 9 E S E S E E k t t E 9 E 3 E 3 E 3 E 3 E 3 E 3 E 3 E 3 E 3 E E E t Contents 1 Setting up the machine 10 Operating controls 12 ... 27 Stitch chart 31 5 Practical sewing 35 6 Maintenance 7 Trouble-shooting 43 Index 8 Technical Data 47 Note: The model Bernina 2000 DE is micro computer controlled and equipped with the symbol * 7 Details of the machine 0- View with looper cover open 1...

Manual
Page 5
r t s t s t t t t I. i k r5 E E .7m.0 E xa h 0 ci E E- Setting up the machine Attaching the foot control 10 Thread stand 10 Threads, cones, spools 11 Waste collector 11 Operating controls Power switch 12 Light switch 12 Electronics*/safety 12 Handwheel 12 Looper cover 12 Cloth plate/free arm 13 2-step presser foot lifter 13 Swing-out presser foot 13 Changing the presser foot 14 Inserting the needle 14 Raising the upper knife 14 9
r t s t s t t t t I. i k r5 E E .7m.0 E xa h 0 ci E E- Setting up the machine Attaching the foot control 10 Thread stand 10 Threads, cones, spools 11 Waste collector 11 Operating controls Power switch 12 Light switch 12 Electronics*/safety 12 Handwheel 12 Looper cover 12 Cloth plate/free arm 13 2-step presser foot lifter 13 Swing-out presser foot 13 Changing the presser foot 14 Inserting the needle 14 Raising the upper knife 14 9
Manual
Page 6
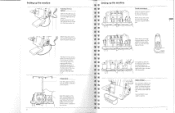
...with cones, first place the stabilizing cones on the spool holder pins. Plug the power cord into the machine socket (2) and into the power socket (3). 2000 D: Plug foot control into machine socket (1) and then into the opening on the looper I cover. When sewing with the wider edge at the top.... It catches the cut-off fabric as you sew, keeping your Bernina overlocker. O 10 The electronic foot control allows very fine adjustment from minimum to the machine. = Setting up the machine 1 0 Attaching the foot control...
...with cones, first place the stabilizing cones on the spool holder pins. Plug the power cord into the machine socket (2) and into the power socket (3). 2000 D: Plug foot control into machine socket (1) and then into the opening on the looper I cover. When sewing with the wider edge at the top.... It catches the cut-off fabric as you sew, keeping your Bernina overlocker. O 10 The electronic foot control allows very fine adjustment from minimum to the machine. = Setting up the machine 1 0 Attaching the foot control...
Manual
Page 7
... E in E 3 The control lamp lights up (2). in their highest position, the Safety cut off. This makes it is also easier to Bernina) permits easy access for threading etc. Raise the needles (Needle stop se- (1). The swing-out foot (exclusive to change the needles and insert ...swing-out presser foot - Note: When the pressefoot is in this position to the left. E 1 = ON 2 2 = OFF E Electronics/safety Your Bernina overlocker is opened, the electricity sup- 2 control lamp will not sewing can be raised again to Y maximum height and held in selection dial while sewing...
... E in E 3 The control lamp lights up (2). in their highest position, the Safety cut off. This makes it is also easier to Bernina) permits easy access for threading etc. Raise the needles (Needle stop se- (1). The swing-out foot (exclusive to change the needles and insert ...swing-out presser foot - Note: When the pressefoot is in this position to the left. E 1 = ON 2 2 = OFF E Electronics/safety Your Bernina overlocker is opened, the electricity sup- 2 control lamp will not sewing can be raised again to Y maximum height and held in selection dial while sewing...
Manual
Page 8
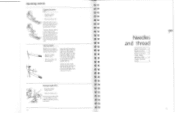
Press the catch (1) to the right. Lower the shank and the presser foot will engage automatically. Place right needle, flat sides towards the back, into the hole of the needle inserter (1) and insert the needle as far as possible into the needle clamp (2). To attach the foot, place it under the shaft. Raise the needles (Needle stop *) - Raise the presser foot. Tighten the right needle setscrew lightly and then insert the left . Los - Turn the knob (2) clockwise until the knife locks. 14 Needles and thread Needles and machine 16 Needles and fabric 16 Needles and ...
Press the catch (1) to the right. Lower the shank and the presser foot will engage automatically. Place right needle, flat sides towards the back, into the hole of the needle inserter (1) and insert the needle as far as possible into the needle clamp (2). To attach the foot, place it under the shaft. Raise the needles (Needle stop *) - Raise the presser foot. Tighten the right needle setscrew lightly and then insert the left . Los - Turn the knob (2) clockwise until the knife locks. 14 Needles and thread Needles and machine 16 Needles and fabric 16 Needles and ...
Manual
Page 9
...). The needle should be in all fabrics Neatening edges, rolled hems 3 a • 3 k -3 Overlock stitches and stitch selection Bernina 2000 stitches 18 Upper looper converter 18 Stich selection lever/ roll hem 18 Overlock stitch width 19 Stitch selection dial 19 Sewing positions 19 Stitch... purchasing thread. - Always test sew when using decorative threads. Needles and threads Needles and machine Needle and fabric Your Bernina overlocker is Needles must move easily and without resistance through the long groove in accessory bag). - When sewing the thread...
...). The needle should be in all fabrics Neatening edges, rolled hems 3 a • 3 k -3 Overlock stitches and stitch selection Bernina 2000 stitches 18 Upper looper converter 18 Stich selection lever/ roll hem 18 Overlock stitch width 19 Stitch selection dial 19 Sewing positions 19 Stitch... purchasing thread. - Always test sew when using decorative threads. Needles and threads Needles and machine Needle and fabric Your Bernina overlocker is Needles must move easily and without resistance through the long groove in accessory bag). - When sewing the thread...
Manual
Page 10
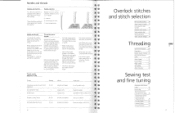
... io • •O 9 a i -§ • •O E Stitch display/stitch selection dial Sewing position/stitch display The Bernina 2000 is displayed by LED* lamps or marked green. Position B stitches are the same as position A but it diverts the lower looper thread ... by simply turning the stitch selection dial. The basic settings for onelooper stitches. Overlock stitches and stitch selection 404#(41.,1 Bernina 2000 stitches The Bernina 2000 sews 9 different stitches. tegrated safety seam 3 thread overlock/flatlock/ roll hem/narrow seam Examples: 3 thread super stretch ...
... io • •O 9 a i -§ • •O E Stitch display/stitch selection dial Sewing position/stitch display The Bernina 2000 is displayed by LED* lamps or marked green. Position B stitches are the same as position A but it diverts the lower looper thread ... by simply turning the stitch selection dial. The basic settings for onelooper stitches. Overlock stitches and stitch selection 404#(41.,1 Bernina 2000 stitches The Bernina 2000 sews 9 different stitches. tegrated safety seam 3 thread overlock/flatlock/ roll hem/narrow seam Examples: 3 thread super stretch ...

Manual
Page 11
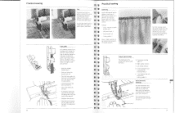
... lay the thread underneath it from back to front in the blue guide. 2 Thread the first machine guide. 3 Slip the thread through . 20 Threading b 1. Your Bernina overlocker is formed. Threading accessories in the direction of the machine are colour coded and simple to match the threading codes, i.e. Tip: When threading for...
... lay the thread underneath it from back to front in the blue guide. 2 Thread the first machine guide. 3 Slip the thread through . 20 Threading b 1. Your Bernina overlocker is formed. Threading accessories in the direction of the machine are colour coded and simple to match the threading codes, i.e. Tip: When threading for...
Manual
Page 12
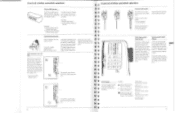
Lower looper (red) Place the spool on the threader. Tip: When sewing with the left of the upper looper to its normal position. 12 Thread the lower looper•: eye. Thread the needle from back to front in the green guide. 0 2 Thread the first machine guide. 3 0 3 Slip the thread through 0 0 the groove. 4, 5 Take the thread under - d neath the green thread guide. 0 0 0 11 10 8 ® 1 Bring the thread up from spool and lay it under the presser foot. 22 1 Bring the thread up -. Swing the presser foot back and lay the thread under the presser foot....
Lower looper (red) Place the spool on the threader. Tip: When sewing with the left of the upper looper to its normal position. 12 Thread the lower looper•: eye. Thread the needle from back to front in the green guide. 0 2 Thread the first machine guide. 3 0 3 Slip the thread through 0 0 the groove. 4, 5 Take the thread under - d neath the green thread guide. 0 0 0 11 10 8 ® 1 Bring the thread up from spool and lay it under the presser foot. 22 1 Bring the thread up -. Swing the presser foot back and lay the thread under the presser foot....

Manual
Page 13
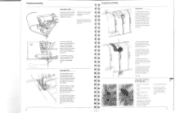
Left needle (yellow) Raise the presser foot. Thread the needle from below. First thread the looper and then rethread the needles. To reduce the tension, move the fine tuning lever up . E t 3 • 4"1 A • • • 24 0 34 Starting to sew/Thread cutter Raise the tip of the presser Tip: When sewing with the ' foot with the stitch formations on the waste collector or on the threading diagram inside the looper cover. The chain. r, tomatically. low guide. 2 Thread the first thread t 3 guide. Note: If the lower looper has to...
Left needle (yellow) Raise the presser foot. Thread the needle from below. First thread the looper and then rethread the needles. To reduce the tension, move the fine tuning lever up . E t 3 • 4"1 A • • • 24 0 34 Starting to sew/Thread cutter Raise the tip of the presser Tip: When sewing with the ' foot with the stitch formations on the waste collector or on the threading diagram inside the looper cover. The chain. r, tomatically. low guide. 2 Thread the first thread t 3 guide. Note: If the lower looper has to...
Manual
Page 14
Reduce the upper looper thread tension (blue). Increase the needle thread tension (yellow or green). +1111111 26 3 The right needle thread forms loops on the underside. Increase the needle (yellow or green) or lower looper tension (red). E 3 Fine tuning for 3 thread super stretch 2 thread wrapped overlock 2 thread roll hem The left needle thread tension (yellow). Fine tuning for 3 thread roll hem: E 3 t 9 The loops do not meet at the line of the 3 thread super stretch stitch can be increased by reducing the right and/or left needle thread tension (yellow). The loops are ...
Reduce the upper looper thread tension (blue). Increase the needle thread tension (yellow or green). +1111111 26 3 The right needle thread forms loops on the underside. Increase the needle (yellow or green) or lower looper tension (red). E 3 Fine tuning for 3 thread super stretch 2 thread wrapped overlock 2 thread roll hem The left needle thread tension (yellow). Fine tuning for 3 thread roll hem: E 3 t 9 The loops do not meet at the line of the 3 thread super stretch stitch can be increased by reducing the right and/or left needle thread tension (yellow). The loops are ...
Manual
Page 15
... dogs on the dial). 3 I 2 t 9 G 3 t 9 t 3 E 3 E Cutting width t The cutting width is determined by the rear feed dog is greater than that of 2.5 mm (marking on your Bernina overlockerone front (A) and one complete feed-dog movement. It right or left needle. The most common use for the differential feed is to the position...
... dogs on the dial). 3 I 2 t 9 G 3 t 9 t 3 E 3 E Cutting width t The cutting width is determined by the rear feed dog is greater than that of 2.5 mm (marking on your Bernina overlockerone front (A) and one complete feed-dog movement. It right or left needle. The most common use for the differential feed is to the position...
Manual
Page 16
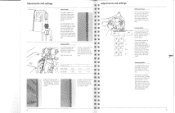
sweatshirt, velours, interlock N Normal feed Most woven fabrics 0,7 Stretching el no fluting Fine to «ND when se wing knit. E -9 E 9 k 9 E 9 E 9 E 9 E E t t Rt E or_ E gl E 3 IA 0 0. 00°P 30 Presser foot pressure E g E The presser loot pressure N = Normal pressure: Bask ensures perfect fabric feed. Always set to medium weight knits, e.g. Always test sew. Charmeuse, linings, satin. t .4 ste, linings. normal sewing work . Adjustments and settings Adjusting the differential feed Simply turn the dial in the direction desired. Setting Effect Fabric...
sweatshirt, velours, interlock N Normal feed Most woven fabrics 0,7 Stretching el no fluting Fine to «ND when se wing knit. E -9 E 9 k 9 E 9 E 9 E 9 E E t t Rt E or_ E gl E 3 IA 0 0. 00°P 30 Presser foot pressure E g E The presser loot pressure N = Normal pressure: Bask ensures perfect fabric feed. Always set to medium weight knits, e.g. Always test sew. Charmeuse, linings, satin. t .4 ste, linings. normal sewing work . Adjustments and settings Adjusting the differential feed Simply turn the dial in the direction desired. Setting Effect Fabric...
Manual
Page 17
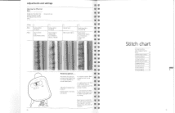
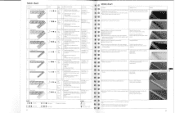
pOyester thread B Upper/lower toper. N-0,7 tworensI 2 Phri:-.: E7 • A 5-7 mm. ail-puroose overiock thread. embroidery or during thread B Lowerlooier.: woolly nylon or swath=ram* thread Need,: all -purpose airlock thread Stitch length: 1-1,8 Cutting width. 1-1.5 Differential N-0,7 1,5rm. embroidery or darning thread, rayon thread II laver toper: Wooly nylon Needle: all :pose oarlock thread, polyester dread Stitch WINO 2,5 Cutting width: 2 Differenual. rayon Thread 8 3 threat l-.i.: •. • 3-5 rem D Upper looper: Sind' iength nun 2,5 • I • &#...
pOyester thread B Upper/lower toper. N-0,7 tworensI 2 Phri:-.: E7 • A 5-7 mm. ail-puroose overiock thread. embroidery or during thread B Lowerlooier.: woolly nylon or swath=ram* thread Need,: all -purpose airlock thread Stitch length: 1-1,8 Cutting width. 1-1.5 Differential N-0,7 1,5rm. embroidery or darning thread, rayon thread II laver toper: Wooly nylon Needle: all :pose oarlock thread, polyester dread Stitch WINO 2,5 Cutting width: 2 Differenual. rayon Thread 8 3 threat l-.i.: •. • 3-5 rem D Upper looper: Sind' iength nun 2,5 • I • &#...

Manual
Page 18
Practical sewing Pins 36 Tape guide 36 Gathering 37 Presser foot markings 37 Seam allowance markings 37 Seam guide right* 38 Seam guide left 38 Deco guide 39 Seam begin, sewing in the thread chain 39 Seam end, sewing in the thread chain 40 Securing the thread chain 40 Sewing curves 40 Sewing corners 41 6 Sewing circular or turbular items 42 Unpicking seams 42 35
Practical sewing Pins 36 Tape guide 36 Gathering 37 Presser foot markings 37 Seam allowance markings 37 Seam guide right* 38 Seam guide left 38 Deco guide 39 Seam begin, sewing in the thread chain 39 Seam end, sewing in the thread chain 40 Securing the thread chain 40 Sewing curves 40 Sewing corners 41 6 Sewing circular or turbular items 42 Unpicking seams 42 35
Manual
Page 19
... fabric easily and perfectly Vs according to suit the width of the tape (W. - Or pin parallel to a garment. Tip: Use pins with a pin or the Bernina seam ripper and pull the threads gently to gather fine fabrics. 1'4 INNiII Presser foot markings The markings on the tape. - Raise the needles (Needle stop...
... fabric easily and perfectly Vs according to suit the width of the tape (W. - Or pin parallel to a garment. Tip: Use pins with a pin or the Bernina seam ripper and pull the threads gently to gather fine fabrics. 1'4 INNiII Presser foot markings The markings on the tape. - Raise the needles (Needle stop...
Manual
Page 20
... cutting fabric strips, e.g. Sew 2-3 stitches on the fabric. 39 Position the guide over the top of the machine over the screw and retighten the screw. 2000 D: The seam guide is an ideal aid for approx. 2 cm (1") and cut off the excess chain with the cutting line on the presser foot shaft...
... cutting fabric strips, e.g. Sew 2-3 stitches on the fabric. 39 Position the guide over the top of the machine over the screw and retighten the screw. 2000 D: The seam guide is an ideal aid for approx. 2 cm (1") and cut off the excess chain with the cutting line on the presser foot shaft...
Manual
Page 21
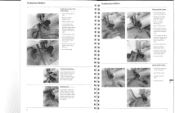
Raise the needles (Needle stop down*). - Sew carefully over the edge of the fabric. - Securing thread chains Leave enough chain at the back slightly to the stitching line. - Raise the presser foot. - Turn the fabric and lay it under the presser foot so that the cut edge of the foot and turn work out at the beginning and end of the seam. - Lower the presser foot. - Turn the fabric over towards the knife. Guide fabric in the thread chain - Sew up to clear the tfhinrgeeard.s from you and lay it can be knotted or pulled through the first/last few stitches with ...
Raise the needles (Needle stop down*). - Sew carefully over the edge of the fabric. - Securing thread chains Leave enough chain at the back slightly to the stitching line. - Raise the presser foot. - Turn the fabric and lay it under the presser foot so that the cut edge of the foot and turn work out at the beginning and end of the seam. - Lower the presser foot. - Turn the fabric over towards the knife. Guide fabric in the thread chain - Sew up to clear the tfhinrgeeard.s from you and lay it can be knotted or pulled through the first/last few stitches with ...
