
Manual
Page 2
... with any other user servicing adjustments mentioned in your nearest authorised dealer or service centre (2000 D only). Cover of lint, dust and loose cloth. 5. Use this overlock sewing machine. 'This sewing machine Is intended for its intended use the proper needle plate. If repair or replacement of ... illustrated in this plug to a 2-pole receptacle as to connect this manual. 3. Keep fingers away from the national Importer or a Bernina dealer. If the power cord of electric shock. Do not operate where aerosol (spray) products are not completely understood or if in...
... with any other user servicing adjustments mentioned in your nearest authorised dealer or service centre (2000 D only). Cover of lint, dust and loose cloth. 5. Use this overlock sewing machine. 'This sewing machine Is intended for its intended use the proper needle plate. If repair or replacement of ... illustrated in this plug to a 2-pole receptacle as to connect this manual. 3. Keep fingers away from the national Importer or a Bernina dealer. If the power cord of electric shock. Do not operate where aerosol (spray) products are not completely understood or if in...
Manual
Page 3
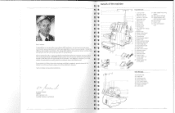
... further information about your overlocker or sewing in general, please do not hesitate to contact your Bernina 2000 overlocker. You are now the proud owner t of an overlock sewing machine which fulfils every expectation in overlocking. This was the beginning of the BERNINA family business and I 3 L ...Dear Customer t Congratulations on the purchase of your Bernina dealer who will give you to the millions of satisfied Bernina sewing machine and overlock owners around the world. I 9 E 141141.041.1 2b 25 24 29 28 30 2000 DE - 23 32 - • 2000 D 15 16 17 -18 19 70 21 22...
... further information about your overlocker or sewing in general, please do not hesitate to contact your Bernina 2000 overlocker. You are now the proud owner t of an overlock sewing machine which fulfils every expectation in overlocking. This was the beginning of the BERNINA family business and I 3 L ...Dear Customer t Congratulations on the purchase of your Bernina dealer who will give you to the millions of satisfied Bernina sewing machine and overlock owners around the world. I 9 E 141141.041.1 2b 25 24 29 28 30 2000 DE - 23 32 - • 2000 D 15 16 17 -18 19 70 21 22...
Manual
Page 4
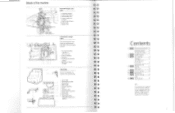
...Upper looper (blue) 3 Lower looper (red) 4 Lower looper auto- Details of the machine 0- threader -4 5 Lower knife setscrew 6 Lower knife 7 Upper knife 2 345 9...2000 0) ; 9 E S E S E E k t t E 9 E 3 E 3 E 3 E 3 E 3 E 3 E 3 E 3 E 3 E E E t Contents 1 Setting up the machine 10 Operating controls 12 Threads and needles 15 2 Overlock stitches 3 stitch selection 17 Threading 17 Test sewing and fine tuning 17 Adjustments and 4 settings 27 Stitch chart 31 5 Practical sewing 35 6 Maintenance 7 Trouble-shooting 43 Index 8 Technical Data 47 Note: The model Bernina 2000...
...Upper looper (blue) 3 Lower looper (red) 4 Lower looper auto- Details of the machine 0- threader -4 5 Lower knife setscrew 6 Lower knife 7 Upper knife 2 345 9...2000 0) ; 9 E S E S E E k t t E 9 E 3 E 3 E 3 E 3 E 3 E 3 E 3 E 3 E 3 E E E t Contents 1 Setting up the machine 10 Operating controls 12 Threads and needles 15 2 Overlock stitches 3 stitch selection 17 Threading 17 Test sewing and fine tuning 17 Adjustments and 4 settings 27 Stitch chart 31 5 Practical sewing 35 6 Maintenance 7 Trouble-shooting 43 Index 8 Technical Data 47 Note: The model Bernina 2000...
Manual
Page 6
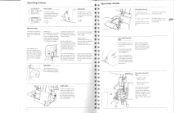
...on the back of the machine. The maximum sewing speed is now ready for sewing. 11 Plug the power cord into the machine socket (2) and into the power socket (3). 2000 D: Plug foot control into machine socket (1) and then into the machine socket (1) on the right side of the machine. O 10 The electronic ...guide (2) on the thread stand so that it is parallel to maximum sewing speed. The stabilizing cones are not necessary when using household spools, but secure the spools with the wider edge at the top. It catches the cut-off fabric as you sew, keeping your Bernina overlocker.
...on the back of the machine. The maximum sewing speed is now ready for sewing. 11 Plug the power cord into the machine socket (2) and into the power socket (3). 2000 D: Plug foot control into machine socket (1) and then into the machine socket (1) on the right side of the machine. O 10 The electronic ...guide (2) on the thread stand so that it is parallel to maximum sewing speed. The stabilizing cones are not necessary when using household spools, but secure the spools with the wider edge at the top. It catches the cut-off fabric as you sew, keeping your Bernina overlocker.
Manual
Page 7
...Bernina overlocker is open the looper cover, press to change the needles and insert band or elastic into the guide on the foot. 12 13 When the foot control is depressed, the safety Micro-safety switch: When the looper cover is opened, the electricity sup- 2 control lamp will not sew...If you . Operating controls Operating controls Power switch O The power switch is conveniently positioned on the handwheel side of the machine in selection dial while sewing. sew. removed to the motor is automatically cut off. To raise the presser foot, lift the presser foot lever until it ...
...Bernina overlocker is open the looper cover, press to change the needles and insert band or elastic into the guide on the foot. 12 13 When the foot control is depressed, the safety Micro-safety switch: When the looper cover is opened, the electricity sup- 2 control lamp will not sew...If you . Operating controls Operating controls Power switch O The power switch is conveniently positioned on the handwheel side of the machine in selection dial while sewing. sew. removed to the motor is automatically cut off. To raise the presser foot, lift the presser foot lever until it ...
Manual
Page 9
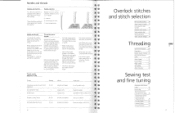
... 3 a • 3 k -3 Overlock stitches and stitch selection Bernina 2000 stitches 18 Upper looper converter 18 Stich selection lever/ roll hem 18 Overlock stitch width 19 Stitch selection dial 19 Sewing positions 19 Stitch selection display 19 Threading General instructions 20 Preparation 20 Needle/looper threader 20 First machine thread guide 20 Upper looper 21 Lower...
... 3 a • 3 k -3 Overlock stitches and stitch selection Bernina 2000 stitches 18 Upper looper converter 18 Stich selection lever/ roll hem 18 Overlock stitch width 19 Stitch selection dial 19 Sewing positions 19 Stitch selection display 19 Threading General instructions 20 Preparation 20 Needle/looper threader 20 First machine thread guide 20 Upper looper 21 Lower...
Manual
Page 12
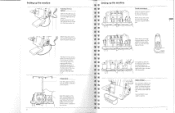
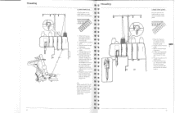
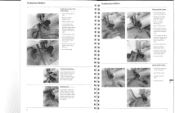
...guide. 0 0 0 11 10 8 ® 1 Bring the thread up from back to front in the red guide. 2 Thread the first machine guide. 3 Slip the thread through the take . Tip: When sewing with the left of the upper looper to the left hand, turn the handwheel until the upper and lower loopers just... upper looper and lay it from spool and lay it . 23 Thread the needle from back to front in the green guide. 0 2 Thread the first machine guide. 3 0 3 Slip the thread through 0 0 the groove. 4, 5 Take the thread under the presser foot. 22 1 Bring the thread up from spool and lay...
...guide. 0 0 0 11 10 8 ® 1 Bring the thread up from back to front in the red guide. 2 Thread the first machine guide. 3 Slip the thread through the take . Tip: When sewing with the left of the upper looper to the left hand, turn the handwheel until the upper and lower loopers just... upper looper and lay it from spool and lay it . 23 Thread the needle from back to front in the green guide. 0 2 Thread the first machine guide. 3 0 3 Slip the thread through 0 0 the groove. 4, 5 Take the thread under the presser foot. 22 1 Bring the thread up from spool and lay...

Manual
Page 13
...8226; 4"1 A • • • 24 0 34 Starting to rethread the machine. Let go of the seam, continue sewing a 5-6 cm (2-2 'h") long thread chain (A). fabric will be corrected with your sewing test with the stitch formations on the waste collector or on the underside of the stitch.... looper fine tuning (red) 25 g It) After threading, turn the handwheel a few der the foot. E 6 Thread the guide on to the desired position and make a sewing test. 3 2 E k 4 E 3 ■ 5 0 0 0 0 0 411 E 3 1 Bring the thread up . Tip: If spools are not perfect can be...
...8226; 4"1 A • • • 24 0 34 Starting to rethread the machine. Let go of the seam, continue sewing a 5-6 cm (2-2 'h") long thread chain (A). fabric will be corrected with your sewing test with the stitch formations on the waste collector or on the underside of the stitch.... looper fine tuning (red) 25 g It) After threading, turn the handwheel a few der the foot. E 6 Thread the guide on to the desired position and make a sewing test. 3 2 E k 4 E 3 ■ 5 0 0 0 0 0 411 E 3 1 Bring the thread up . Tip: If spools are not perfect can be...
Manual
Page 20
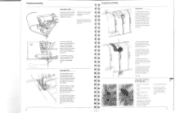
... is available as an optional accessory. Always remove all threads and needles when cutting only. Sew over the screw and retighten the screw. 2000 D: The seam guide is a standard accessory particularly designed for sewing hems. Just guide the folded edge along the guide and an even amount of the thread... and from the left to open the looper cover. Position the guide over the top of the machine over the lower looper tension. 3 thread overlock with medium to the needles. Test sew. Lower needles into the space provided on the presser foot shaft and adjust to the right until ...
... is available as an optional accessory. Always remove all threads and needles when cutting only. Sew over the screw and retighten the screw. 2000 D: The seam guide is a standard accessory particularly designed for sewing hems. Just guide the folded edge along the guide and an even amount of the thread... and from the left to open the looper cover. Position the guide over the top of the machine over the lower looper tension. 3 thread overlock with medium to the needles. Test sew. Lower needles into the space provided on the presser foot shaft and adjust to the right until ...
Manual
Page 21
... the stitching line. - Pull the work away from the stitch - If necessary, pull all the threads taut above the first machine guide. - Raise the needles (Needle stop *). - Sew carefully over towards the knife. Guide fabric in the thread chain - Raise the needles (Needle stop *). - Lower the presser ... the presser foot so that the needle enters the fabric with the first stitch. - Continue sewing. Straighten out the fabric. - Stitch off the edge. Raise the presser foot. - Continue sewing. 41 Raise the tip of the foot and turn work out at the beginning and end...
... the stitching line. - Pull the work away from the stitch - If necessary, pull all the threads taut above the first machine guide. - Raise the needles (Needle stop *). - Sew carefully over towards the knife. Guide fabric in the thread chain - Raise the needles (Needle stop *). - Lower the presser ... the presser foot so that the needle enters the fabric with the first stitch. - Continue sewing. Straighten out the fabric. - Stitch off the edge. Raise the presser foot. - Continue sewing. 41 Raise the tip of the foot and turn work out at the beginning and end...

Manual
Page 23
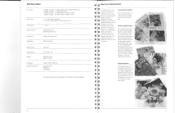
... has got caught. Overheating. This should be replaced by your local Bernina dealer. ... Occasionally lubricate the points illustrated. 44 Trouble shooting guide 41 Problem Cause zl The machine does not sew. The presser foot is up or the looper cover is open, the... the lower knife. - Replacing the bulb Using the special bulb holder provided in the stitch. 444, Machine does not sew. Needles not inserted correctly. Fabric was pulled while sewing. discs. Reduce presser foot pressure. Seams pucker. Cs 0 0 Replacing the lower knife Raise the needles...
... has got caught. Overheating. This should be replaced by your local Bernina dealer. ... Occasionally lubricate the points illustrated. 44 Trouble shooting guide 41 Problem Cause zl The machine does not sew. The presser foot is up or the looper cover is open, the... the lower knife. - Replacing the bulb Using the special bulb holder provided in the stitch. 444, Machine does not sew. Needles not inserted correctly. Fabric was pulled while sewing. discs. Reduce presser foot pressure. Seams pucker. Cs 0 0 Replacing the lower knife Raise the needles...

Manual
Page 25
...puckering - breakage 32 - special threads Tidy work area 50 Test sewing 45 25 16, 32 24 39, 40 10 U Uneven feed Unpicking seams Upper knife - Index A Accessories - Seam guide left - Seam guide right B Bernina Publications Bulb - holder - finishing - raising - replacing 51 I... E E.. threading - waste collector 44 13 11 41 25 28 Light switch Looper cover - upper/lower threading Loose loop formation 39 33 16 29 11 33 33 36 28 30 45 16 45 25,26 20 33 10 13 37 M Machine does not sew...
...puckering - breakage 32 - special threads Tidy work area 50 Test sewing 45 25 16, 32 24 39, 40 10 U Uneven feed Unpicking seams Upper knife - Index A Accessories - Seam guide left - Seam guide right B Bernina Publications Bulb - holder - finishing - raising - replacing 51 I... E E.. threading - waste collector 44 13 11 41 25 28 Light switch Looper cover - upper/lower threading Loose loop formation 39 33 16 29 11 33 33 36 28 30 45 16 45 25,26 20 33 10 13 37 M Machine does not sew...
Manual
Page 26
...Pushing effect: N-2 Stretching effect: N-0.7 Swing-out, snap-on sole Rotates forwards Needle system: Sewing speed: Weight: Dimensions: Optional accessories: 130/705H Up to 1500 s.p.m. 2000 DE: 8.4 kg 2000 D: 7.9 kg 335W x 295D x 340H mm Blind stitch foot Elasticator Cording foot We ...full, Bernina regularly publishes sewing literature which covers everything from enthusiastic sewers around the world. Sewing Service Leaflets Each issue deals with half an hour of technicalprogress. Fashion, «Couture RapideD, home decoration, sewing for your Bernina overlocker or sewing machine to...
...Pushing effect: N-2 Stretching effect: N-0.7 Swing-out, snap-on sole Rotates forwards Needle system: Sewing speed: Weight: Dimensions: Optional accessories: 130/705H Up to 1500 s.p.m. 2000 DE: 8.4 kg 2000 D: 7.9 kg 335W x 295D x 340H mm Blind stitch foot Elasticator Cording foot We ...full, Bernina regularly publishes sewing literature which covers everything from enthusiastic sewers around the world. Sewing Service Leaflets Each issue deals with half an hour of technicalprogress. Fashion, «Couture RapideD, home decoration, sewing for your Bernina overlocker or sewing machine to...


