

Manual
Page 2
...electrical appliance, basic safety precautions should always be left unattended when plugged in. 2. GROUNDING INSTRUCTIONS (for its intended use as described in the needle area, such as a toy. only) DANGER To reduce the risk of lint, dust, and loose cloth. 5. An appliance should never be...be connected to persons: 1. Always unplug sewing machine from the electric outlet immediately after using this appliance only for U.S.A. Do not use bent needles. 8. If repair or replacement of the cord of burns, fire, electric shock, or injury to a permanent ground such as shown in...
...electrical appliance, basic safety precautions should always be left unattended when plugged in. 2. GROUNDING INSTRUCTIONS (for its intended use as described in the needle area, such as a toy. only) DANGER To reduce the risk of lint, dust, and loose cloth. 5. An appliance should never be...be connected to persons: 1. Always unplug sewing machine from the electric outlet immediately after using this appliance only for U.S.A. Do not use bent needles. 8. If repair or replacement of the cord of burns, fire, electric shock, or injury to a permanent ground such as shown in...

Manual
Page 5
Display/Control panel 1 2 2 (D: d 2
Display/Control panel 1 2 2 (D: d 2

Manual
Page 6
... adjustment knob 10 Red stitches 11 Green stitches 12 Selector lever 13 Bobbin spindle 14 Bobbin winder stop 15 Handwheel 16 Stitch width knob 17 Needle position knob 18 Buttonhole knob 19 Power/light switch 20 Stitch length knob 21 Securing pins for sewing table 22 Stitch programme color indicator (RED.../Darning selector knob 26 Presser foot lever 27 Carrying handle 28 Thread guide 29 Thread holder pins 30 Supplementary thread guide 31 Thread cutter ipmminnmug BERNINA *-7,I We' %MI Ono Min Milva Aft !, • .
... adjustment knob 10 Red stitches 11 Green stitches 12 Selector lever 13 Bobbin spindle 14 Bobbin winder stop 15 Handwheel 16 Stitch width knob 17 Needle position knob 18 Buttonhole knob 19 Power/light switch 20 Stitch length knob 21 Securing pins for sewing table 22 Stitch programme color indicator (RED.../Darning selector knob 26 Presser foot lever 27 Carrying handle 28 Thread guide 29 Thread holder pins 30 Supplementary thread guide 31 Thread cutter ipmminnmug BERNINA *-7,I We' %MI Ono Min Milva Aft !, • .

Manual
Page 8
... provides storage for the instruction manual, foot control and cable. Cover, accessories . The machine is very easy to carry with the practical, retractable handle. 6 bobbins Needle assortment Seam ripper Small screwdriver Special screwdriver Bulb holder Cleaning brush Oiler, filled Reverse pattern foot Overlock foot Blind stitch foot Buttonhole foot Zip foot...
... provides storage for the instruction manual, foot control and cable. Cover, accessories . The machine is very easy to carry with the practical, retractable handle. 6 bobbins Needle assortment Seam ripper Small screwdriver Special screwdriver Bulb holder Cleaning brush Oiler, filled Reverse pattern foot Overlock foot Blind stitch foot Buttonhole foot Zip foot...

Manual
Page 10
... on the free arm (Fig.1). When the bobbin is now engaged. The bobbin winder is full, the bobbin winder will stop (Fig. 5). Check that the needle is now disengaged (Fig. 3). WARNING: Please refer to the safety instructions. bobbin winder stop auto- The sewing machine is raised. Open the hinged front cover...
... on the free arm (Fig.1). When the bobbin is now engaged. The bobbin winder is full, the bobbin winder will stop (Fig. 5). Check that the needle is now disengaged (Fig. 3). WARNING: Please refer to the safety instructions. bobbin winder stop auto- The sewing machine is raised. Open the hinged front cover...

Manual
Page 11
... bobbin Hold the bobbin case in a clockwise direction, see arrow. Take the thread anticlockwise to the slot. Inserting the bobbin case Make sure that the needle is pulled, the bobbin should turn clockwise, in the direction of the spring. Insert the bobbin with the thread running in the left hand. Pull...
... bobbin Hold the bobbin case in a clockwise direction, see arrow. Take the thread anticlockwise to the slot. Inserting the bobbin case Make sure that the needle is pulled, the bobbin should turn clockwise, in the direction of the spring. Insert the bobbin with the thread running in the left hand. Pull...

Manual
Page 12
Firmly clip the thread into the thread tension. Always thread the needle h BERNINA. Pull the thread approx. 10 cm (4") through the thread guide on the handle. Raise the presser foot. Then pull it through the long slot (A) into ... white plate on one of the machine. Place the reel of thread on the front of the machine, take the thread from front to the needle holder thread guide Co). from the slot downwards under the thread regulator ®, then up to the safety instructions. On the front of the presser...
Firmly clip the thread into the thread tension. Always thread the needle h BERNINA. Pull the thread approx. 10 cm (4") through the thread guide on the handle. Raise the presser foot. Then pull it through the long slot (A) into ... white plate on one of the machine. Place the reel of thread on the front of the machine, take the thread from front to the needle holder thread guide Co). from the slot downwards under the thread regulator ®, then up to the safety instructions. On the front of the presser...
Manual
Page 14
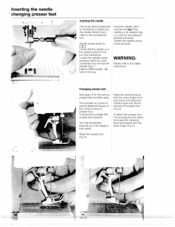
...downwards with the index finger of presser foot. CAitteleat=.4 .1' . Set the power switch to o Check that the needle is provided in the raised position. Tighten the needle clamp screw securely. Turn the handwheel towards you until it reaches the top. If not, turn (anticlockwise) and ...remove the needle (Fig.1). Changing presser feet See page 14 for loosening or tightening the needle clamp is in the accessories box. Loosen the needle clamp screw by half a turn the handwheel. flat side to the safety...
...downwards with the index finger of presser foot. CAitteleat=.4 .1' . Set the power switch to o Check that the needle is provided in the raised position. Tighten the needle clamp screw securely. Turn the handwheel towards you until it reaches the top. If not, turn (anticlockwise) and ...remove the needle (Fig.1). Changing presser feet See page 14 for loosening or tightening the needle clamp is in the accessories box. Loosen the needle clamp screw by half a turn the handwheel. flat side to the safety...

Manual
Page 15
... the table edge. To remove the work, raise the presser foot and check that the height of your BERNINA far enough away from the side with the fingers of the needle, i.e. Ensure that the needle is raised. When sewing delicate work, it a little at a time rather than let the work slide beneath the...
... the table edge. To remove the work, raise the presser foot and check that the height of your BERNINA far enough away from the side with the fingers of the needle, i.e. Ensure that the needle is raised. When sewing delicate work, it a little at a time rather than let the work slide beneath the...

Manual
Page 16
... H-J Extra fine point Twill, workwear, heavy linen, denim, canvas. bent needles B. blunt needles C. stI * * * •* * Threads and needles Needle table Needle and sewing machine Your BERNINA has needle system 130/705 H. The finer the needle, the lower the number.The opposite applies to the front of needle The needle must match the thread. When sewing, the thread lies in perfect...
... H-J Extra fine point Twill, workwear, heavy linen, denim, canvas. bent needles B. blunt needles C. stI * * * •* * Threads and needles Needle table Needle and sewing machine Your BERNINA has needle system 130/705 H. The finer the needle, the lower the number.The opposite applies to the front of needle The needle must match the thread. When sewing, the thread lies in perfect...

Manual
Page 17
... result n "pile-ups. Holding back will be unable to grip the fabric. b) i If the presser foot is governed by one step. c) Place a piece of the needle hole. stitch length, the steps are quite a dstance apart because of the width of fabric, neatly folded to do its job properly. a) The two rows...
... result n "pile-ups. Holding back will be unable to grip the fabric. b) i If the presser foot is governed by one step. c) Place a piece of the needle hole. stitch length, the steps are quite a dstance apart because of the width of fabric, neatly folded to do its job properly. a) The two rows...

Manual
Page 22
... previously selected stitch. When the knob is in the centre. Securing thick seams When changing from being bent by thick fabrics. • iJ 0- 3- Straight stitch Needle positions 1 51 1 5 2 14 2 4 2 5 0/5 _3 0 16 CD 15 CD 14 (I) 13 tD 12 11 9/19 A cHeleleielee 5 8 5 7 2 4 6 134 5 4 4 5 3... to thread 0 1-5 according to left and right in five positions with the needle position knob. 0 12 34 s 0 12 34 5 / 0 12 34 5 0 1 2 34 5 0 1234 5 For normal sewing, the needle is released again, the machine will again sew forwards with the selected stitch length...
... previously selected stitch. When the knob is in the centre. Securing thick seams When changing from being bent by thick fabrics. • iJ 0- 3- Straight stitch Needle positions 1 51 1 5 2 14 2 4 2 5 0/5 _3 0 16 CD 15 CD 14 (I) 13 tD 12 11 9/19 A cHeleleielee 5 8 5 7 2 4 6 134 5 4 4 5 3... to thread 0 1-5 according to left and right in five positions with the needle position knob. 0 12 34 s 0 12 34 5 / 0 12 34 5 0 1 2 34 5 0 1234 5 For normal sewing, the needle is released again, the machine will again sew forwards with the selected stitch length...

Manual
Page 23
... with the stitch width knob. Adjust the stitch density from the basic setting according to the right until it locks. It is now 0. The needle must not be left (mark at the top. Stitch length is infinitely variable up to thread 1-5 1-5 centre sewing_ samommow Stitch width 5 Stitch... length 5 Presser foot: Thread: Needle: Stitch width: Stitch length: Generally, the zig-zag should not be altered during sewing or while the machine is stopped. Zig-zag Satin stitch ...
... with the stitch width knob. Adjust the stitch density from the basic setting according to the right until it locks. It is now 0. The needle must not be left (mark at the top. Stitch length is infinitely variable up to thread 1-5 1-5 centre sewing_ samommow Stitch width 5 Stitch... length 5 Presser foot: Thread: Needle: Stitch width: Stitch length: Generally, the zig-zag should not be altered during sewing or while the machine is stopped. Zig-zag Satin stitch ...

Manual
Page 24
...Universal stitch Presser foot: Stitch: Stitch width: Stitch length: Needle position: Feed-dog: Colour indicator: Blind stitch Presser foot: Stitch: Stitch width: Stitch length: Needle position: Feed-dog: Colour indicator: Vari-overlook Presser foot: ...; 4 I a) 3 214 0 3 1 0/3 2/11/2 sa) 2 010W 1,440" 14 8 5 L_Fl_J-I.J-1J- 4 V --V -V -V -V 3 ---V\AAN 1/2 2MERMIEWir- r • a Presser foot b Stitch width c Stitch length d Needle position Push the selector lever to the right to green. The presser foot display recommends the appropriate foot for the basic setting is the same...
...Universal stitch Presser foot: Stitch: Stitch width: Stitch length: Needle position: Feed-dog: Colour indicator: Blind stitch Presser foot: Stitch: Stitch width: Stitch length: Needle position: Feed-dog: Colour indicator: Vari-overlook Presser foot: ...; 4 I a) 3 214 0 3 1 0/3 2/11/2 sa) 2 010W 1,440" 14 8 5 L_Fl_J-I.J-1J- 4 V --V -V -V -V 3 ---V\AAN 1/2 2MERMIEWir- r • a Presser foot b Stitch width c Stitch length d Needle position Push the selector lever to the right to green. The presser foot display recommends the appropriate foot for the basic setting is the same...

Manual
Page 25
...Triple zig-zag Presser foot: Stitch: Stitch width: Stitch length: Needle position: Feed-dog: Colour indicator: Towelling stitch Presser foot: Stitch: Stitch width: Stitch length: Needle position: Feed-dog: Colour indicator: Double overlook Presser foot: Stitch... 3 0/3 2/1'S 1/2 •••%00V....."ftri 8 A.A../L.A.A.A.A._ 6 Li16.11...ii 5 1.1-1./1...r1.1- 4 VW-NI-VW 3 - - VA/V\/ 1/2 a Presser foot b Stitch width c Stitch length d Needle position Push the selector lever to the right to red. The stitch width and length can be adjusted to the type of the stitch selected.
...Triple zig-zag Presser foot: Stitch: Stitch width: Stitch length: Needle position: Feed-dog: Colour indicator: Towelling stitch Presser foot: Stitch: Stitch width: Stitch length: Needle position: Feed-dog: Colour indicator: Double overlook Presser foot: Stitch... 3 0/3 2/1'S 1/2 •••%00V....."ftri 8 A.A../L.A.A.A.A._ 6 Li16.11...ii 5 1.1-1./1...r1.1- 4 VW-NI-VW 3 - - VA/V\/ 1/2 a Presser foot b Stitch width c Stitch length d Needle position Push the selector lever to the right to red. The stitch width and length can be adjusted to the type of the stitch selected.
Manual
Page 26
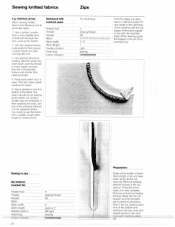
..., Fr o &0,-fl,,IF4IPOPIY1), jt11:t Sewing in the zip, starting each side at the bottom and sewing to the top, once with needle position right and once:with the neckline edge.When sewing, guide the edges to ladder. 2. The seam should be adjusted where necessary to ... stitches can also damage the knit. 3. Use a slightly longer stitch length for fine jerseys. Sewing knitted fabrics e.g. Use a perfect needle. Even a very slightly blunt needle will make subsequent work easier. 5. interlock, jersey When sewing knitted fabrics, the following points generally apply: 1. of zip and sew ...
..., Fr o &0,-fl,,IF4IPOPIY1), jt11:t Sewing in the zip, starting each side at the bottom and sewing to the top, once with needle position right and once:with the neckline edge.When sewing, guide the edges to ladder. 2. The seam should be adjusted where necessary to ... stitches can also damage the knit. 3. Use a slightly longer stitch length for fine jerseys. Sewing knitted fabrics e.g. Use a perfect needle. Even a very slightly blunt needle will make subsequent work easier. 5. interlock, jersey When sewing knitted fabrics, the following points generally apply: 1. of zip and sew ...

Manual
Page 27
... 2 sewing thread 80 4 approx. 1 right sewing 1.1111111111111111111111111111 Visible hem with Triple zig-zag Presser foot: Thread: Needle: Stitch: Stitch width: Stitch length: Needle position: Feed-dog: Colour indicator: Hard-wearing hem for closely woven fabrics, denim, etc. 1 sewing thread 80 ...8226;Af%Ani 212/ -5 according to fabric 2-3 centre sewing amonommi Visible hem with Universal stitch Presser foot: Thread: Needle: Stitch: Stitch width: Stitch length: Needle position: Feed-dog: Colour indicator: sewing thread 80 approx. 4 /4 - 1 centre sewing tommstimm Stretchy hem for beachwear...
... 2 sewing thread 80 4 approx. 1 right sewing 1.1111111111111111111111111111 Visible hem with Triple zig-zag Presser foot: Thread: Needle: Stitch: Stitch width: Stitch length: Needle position: Feed-dog: Colour indicator: Hard-wearing hem for closely woven fabrics, denim, etc. 1 sewing thread 80 ...8226;Af%Ani 212/ -5 according to fabric 2-3 centre sewing amonommi Visible hem with Universal stitch Presser foot: Thread: Needle: Stitch: Stitch width: Stitch length: Needle position: Feed-dog: Colour indicator: sewing thread 80 approx. 4 /4 - 1 centre sewing tommstimm Stretchy hem for beachwear...

Manual
Page 28
... thread 80 ' -1 centre sewing i.tair I0- 40100AM Triple straight stitch seam 99 Stretch seam Presser foot: Thread: Needle: Stitch: Stitch width: Stitch length: Needle position: Feed-doq: Coloiir indicator: Especially for silk, cotton and wool interlock. Practical stitch seams There are two types... - thuyarc quick to he let out Overlock seams These are scums that are not bulky - I Presser foot: Thread: Needle: Stitch: Stitch width: Stitch length: Needle position: Feed-dog: ' Colour indicator: sewing thread 80 A/VVVVVVVVVVV\ 1 112/ centre sewing .,zgailmrkwiwzAs Zig-zag seam Stretch...
... thread 80 ' -1 centre sewing i.tair I0- 40100AM Triple straight stitch seam 99 Stretch seam Presser foot: Thread: Needle: Stitch: Stitch width: Stitch length: Needle position: Feed-doq: Coloiir indicator: Especially for silk, cotton and wool interlock. Practical stitch seams There are two types... - thuyarc quick to he let out Overlock seams These are scums that are not bulky - I Presser foot: Thread: Needle: Stitch: Stitch width: Stitch length: Needle position: Feed-dog: ' Colour indicator: sewing thread 80 A/VVVVVVVVVVV\ 1 112/ centre sewing .,zgailmrkwiwzAs Zig-zag seam Stretch...

Manual
Page 29
...seam Stretchy overlock seam for all fine jersey fabrics, wear, nightwear, etc. Presser foot: Stitch: Stitch width: Stitch length: Needle position: Feed-dog: Colour indicator: A.,A A A A..A.A A..A.A.A.A./ 4 1 right sewing Double-overlock seam Stretchy overlock seam for casual... crafts, etc. Practical stitch seams Vari-overlock seam Stretchy overlock seam for towelling felt, leather, denim, casual Presser foot: Stitch: Stitch width: Stitch length: Needle position: Feed-dog: Colour indicator: wear, crafts, etc. - 2 centre sewing Is P. •i $ • to • °# t•...
...seam Stretchy overlock seam for all fine jersey fabrics, wear, nightwear, etc. Presser foot: Stitch: Stitch width: Stitch length: Needle position: Feed-dog: Colour indicator: A.,A A A A..A.A A..A.A.A.A./ 4 1 right sewing Double-overlock seam Stretchy overlock seam for casual... crafts, etc. Practical stitch seams Vari-overlock seam Stretchy overlock seam for towelling felt, leather, denim, casual Presser foot: Stitch: Stitch width: Stitch length: Needle position: Feed-dog: Colour indicator: wear, crafts, etc. - 2 centre sewing Is P. •i $ • to • °# t•...
Manual
Page 30
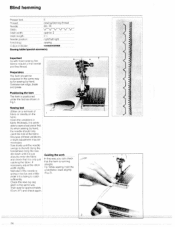
...should only catch the fold of the fabric. able to the left. catching the fabric. Tip: While sewing, hold the Narrower if the needle is positioned under the foot as for approximately 10 cm (4") and check again. 2 24 Positioning the hem The hem is underfabric back slightly ...right/half right Feed-dog:_ sewim Colour indicator: misimmum Sewing table/special accessory Important p As with hand sewing, fine fabrics require a fine needle and fine thread. Check the next zig-zag stitch in Fig.1. If that it is only just In this way, you can check ...
...should only catch the fold of the fabric. able to the left. catching the fabric. Tip: While sewing, hold the Narrower if the needle is positioned under the foot as for approximately 10 cm (4") and check again. 2 24 Positioning the hem The hem is underfabric back slightly ...right/half right Feed-dog:_ sewim Colour indicator: misimmum Sewing table/special accessory Important p As with hand sewing, fine fabrics require a fine needle and fine thread. Check the next zig-zag stitch in Fig.1. If that it is only just In this way, you can check ...

