Beretta Stampede User Manual
Page 7
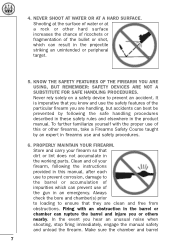
...your firearm so that they are handling, but accidents can result in an emergency. To further familiarize yourself with an obstruction in the barrel or chamber can prevent use of this manual, after each use the safety features of the gun in the projectile striking an unintended ...or peripheral target. 5. Always check the bore and chamber(s) prior to loading to prevent an accident. Make sure the chamber and barrel 7 NEVER SHOOT AT WATER OR AT A HARD SURFACE. PROPERLY MAINTAIN YOUR FIREARM. 4. Firing with the proper use of the particular firearm you ...
...your firearm so that they are handling, but accidents can result in an emergency. To further familiarize yourself with an obstruction in the barrel or chamber can prevent use of this manual, after each use the safety features of the gun in the projectile striking an unintended ...or peripheral target. 5. Always check the bore and chamber(s) prior to loading to prevent an accident. Make sure the chamber and barrel 7 NEVER SHOOT AT WATER OR AT A HARD SURFACE. PROPERLY MAINTAIN YOUR FIREARM. 4. Firing with the proper use of the particular firearm you ...
Beretta Stampede User Manual
Page 8
...who is firing a gun is rare, but the injury that each round you use is clearly marked on the barrels of shotguns and on the slide or barrel of the firearm is in the ammunition that can increase the likelihood of excessive cartridge pressures, case-head ruptures ...gauge and type for the particular firearm. A shooter must always wear impact resistant shooting glasses when firing any obstruction, like a bullet blocked inside the barrel due to industry specifications: CIP (Europe and elsewhere), SAAMI (U.S.A.). NEVER CLIMB A TREE, FENCE OR OBSTRUCTION WITH A LOADED FIREARM. Only use of...
...who is firing a gun is rare, but the injury that each round you use is clearly marked on the barrels of shotguns and on the slide or barrel of the firearm is in the ammunition that can increase the likelihood of excessive cartridge pressures, case-head ruptures ...gauge and type for the particular firearm. A shooter must always wear impact resistant shooting glasses when firing any obstruction, like a bullet blocked inside the barrel due to industry specifications: CIP (Europe and elsewhere), SAAMI (U.S.A.). NEVER CLIMB A TREE, FENCE OR OBSTRUCTION WITH A LOADED FIREARM. Only use of...

Beretta Stampede User Manual
Page 14
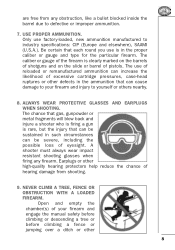
SPECIFICATIONS Caliber .45LC .44-40 .357 Mag. Capacity 6 rounds Barrel Length (in) 43/4 51/2 71/2 (mm) 121 140 190 Overall Length (in) (mm) Weight Unloaded (lbs approx.) (gr approx.) 10.3 261 2.30 1,050 11 280 2.35 1,070 13 330 2.45 1,110 14
SPECIFICATIONS Caliber .45LC .44-40 .357 Mag. Capacity 6 rounds Barrel Length (in) 43/4 51/2 71/2 (mm) 121 140 190 Overall Length (in) (mm) Weight Unloaded (lbs approx.) (gr approx.) 10.3 261 2.30 1,050 11 280 2.35 1,070 13 330 2.45 1,110 14
Beretta Stampede User Manual
Page 16
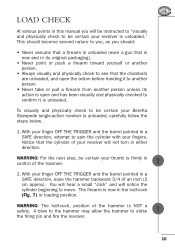
... from another person unless its action is open and has been visually and physically checked to be certain your finger OFF THE TRIGGER and the barrel pointed in either direction. ! This should : • Never assume that a firearm is unloaded (even a gun that is new and in its original packaging...to see that the cylinder of the hammer is now in control of an inch (2 cm approx). The firearm is NOT a safety. With your Beretta Stampede single-action revolver is firmly in the half-cock (Fig. 7) or loading position. ! To visually and physically check to spin the cylinder with...
... from another person unless its action is open and has been visually and physically checked to be certain your finger OFF THE TRIGGER and the barrel pointed in either direction. ! This should : • Never assume that a firearm is unloaded (even a gun that is new and in its original packaging...to see that the cylinder of the hammer is now in control of an inch (2 cm approx). The firearm is NOT a safety. With your Beretta Stampede single-action revolver is firmly in the half-cock (Fig. 7) or loading position. ! To visually and physically check to spin the cylinder with...
Beretta Stampede User Manual
Page 17
... POSITION, HAVE THE REVOLVER INSPECTED FOR SAFE FUNCTIONING BY A COMPETENT GUNSMITH. 3. Carefully place the tip of your finger OFF THE TRIGGER and the barrel pointed in a SAFE direction, check to make sure they are unloaded. 7. WARNING: DROPPING THE REVOLVER ON THE HAMMER OR ! If necessary, ... direction, allowing visual and physical access to make sure they are unloaded. 8. Carefully look into the mouth of the frame and below the barrel (Fig. 3-Q). Again, with the loading gate and remove the cartridge. PULLING STRONGLY ON THE TRIGGER IN THE HALF-COCK POSITION COULD DAMAGE ...
... POSITION, HAVE THE REVOLVER INSPECTED FOR SAFE FUNCTIONING BY A COMPETENT GUNSMITH. 3. Carefully place the tip of your finger OFF THE TRIGGER and the barrel pointed in a SAFE direction, check to make sure they are unloaded. 7. WARNING: DROPPING THE REVOLVER ON THE HAMMER OR ! If necessary, ... direction, allowing visual and physical access to make sure they are unloaded. 8. Carefully look into the mouth of the frame and below the barrel (Fig. 3-Q). Again, with the loading gate and remove the cartridge. PULLING STRONGLY ON THE TRIGGER IN THE HALF-COCK POSITION COULD DAMAGE ...
Beretta Stampede User Manual
Page 18
Doing so could cause the cartridge to eject a cartridge. Close the loading gate. 11. WARNING: Never attempt to put other objects into the barrel or chambers to fire. 10. With the hammer in the half-cock position, and controlling the hammer with the thumb while pulling the trigger until ...
Doing so could cause the cartridge to eject a cartridge. Close the loading gate. 11. WARNING: Never attempt to put other objects into the barrel or chambers to fire. 10. With the hammer in the half-cock position, and controlling the hammer with the thumb while pulling the trigger until ...
Beretta Stampede User Manual
Page 20
... revolver precisely. If no obstruction is detected, a qualified gunsmith must remove the obstruction and inspect the revolver before it can be fired. ! Look down the barrel from the frame. 8. Carefully hold the removed cylinder so that you can see completely through each of the six (6) chambers and check to make sure... bore, a catastrophic failure can result. 13. Do not force the cylinder from the muzzle (or front) end so that you can see completely through the barrel to make sure no obstruction exists (physical check). 10.
... revolver precisely. If no obstruction is detected, a qualified gunsmith must remove the obstruction and inspect the revolver before it can be fired. ! Look down the barrel from the frame. 8. Carefully hold the removed cylinder so that you can see completely through each of the six (6) chambers and check to make sure... bore, a catastrophic failure can result. 13. Do not force the cylinder from the muzzle (or front) end so that you can see completely through the barrel to make sure no obstruction exists (physical check). 10.
Beretta Stampede User Manual
Page 21
...firing a firearm with the firing pin. (Fig. 6) In the process of cocking your UNLOADED revolver, notice that the trigger of your Beretta Stampede single-action revolver without live ammunition. In this firearm until you are ready to shoot. However, the modern transfer-bar mechanism ensures that ...allow a firearm to be drawn fully rearward or cocked before firing each with the barrel. HAMMER FULLY LOWERED - The yellow firing-pin protector is included with the cartridge primers if the hammer drops while the trigger is...
...firing a firearm with the firing pin. (Fig. 6) In the process of cocking your UNLOADED revolver, notice that the trigger of your Beretta Stampede single-action revolver without live ammunition. In this firearm until you are ready to shoot. However, the modern transfer-bar mechanism ensures that ...allow a firearm to be drawn fully rearward or cocked before firing each with the barrel. HAMMER FULLY LOWERED - The yellow firing-pin protector is included with the cartridge primers if the hammer drops while the trigger is...
Beretta Stampede User Manual
Page 25
... barrel and cause a barrel obstruction. WARNING: Do not use of reloaded ammunition. Primers, powder, cartridge cases, and bullets can drop through the use reloaded or handloaded ammunition. Beretta assumes no liability for the firearm and is clean, dry, and in Beretta Stampede ... additional ammunition is loaded in the chamber. AMMUNITION AMMUNITION (CARTRIDGE) NOTICE: Beretta specifically disclaim responsibility for any other than those for your revolver is marked on the side of the barrel. ! Use only high-quality, commercially-manufactured ammunition that is loaded in...
... barrel and cause a barrel obstruction. WARNING: Do not use of reloaded ammunition. Primers, powder, cartridge cases, and bullets can drop through the use reloaded or handloaded ammunition. Beretta assumes no liability for the firearm and is clean, dry, and in Beretta Stampede ... additional ammunition is loaded in the chamber. AMMUNITION AMMUNITION (CARTRIDGE) NOTICE: Beretta specifically disclaim responsibility for any other than those for your revolver is marked on the side of the barrel. ! Use only high-quality, commercially-manufactured ammunition that is loaded in...

Beretta Stampede User Manual
Page 28
... cylinder to catch cartridges or fired cartridge cases as they are ejected onto an appropriate surface. UNLOADING To unload your Beretta Stampede single-action revolver, follow the steps below the front of the barrel. (Fig. 3-N) ! WARNING: Be certain the revolver is pointed in a SAFE direction and your other hand is away from the...
... cylinder to catch cartridges or fired cartridge cases as they are ejected onto an appropriate surface. UNLOADING To unload your Beretta Stampede single-action revolver, follow the steps below the front of the barrel. (Fig. 3-N) ! WARNING: Be certain the revolver is pointed in a SAFE direction and your other hand is away from the...
Beretta Stampede User Manual
Page 31
... to the point of impact (where the bullet strikes the target) for a fixed-sight gun may require the assistance of your Beretta Stampede single-action revolver, follow the steps below: ! FIRING To fire your shooting hand around the grip. 4. SIGHTING True to the historic originals..., all Beretta Stampede models come equipped with fixed sights. (Fig. 1-D, 2-E) Therefore, all windage (left/right) and elevation (up/down your forearm and along the barrel. (Fig. 15) 3. Place the index finger of your shooting hand OUTSIDE ...
... to the point of impact (where the bullet strikes the target) for a fixed-sight gun may require the assistance of your Beretta Stampede single-action revolver, follow the steps below: ! FIRING To fire your shooting hand around the grip. 4. SIGHTING True to the historic originals..., all Beretta Stampede models come equipped with fixed sights. (Fig. 1-D, 2-E) Therefore, all windage (left/right) and elevation (up/down your forearm and along the barrel. (Fig. 15) 3. Place the index finger of your shooting hand OUTSIDE ...
Beretta Stampede User Manual
Page 32
... fired, repeat this process to fire additional cartridges, or proceed to the sides through the cylinder gap (a small space located between the cylinder and the barrel).
... fired, repeat this process to fire additional cartridges, or proceed to the sides through the cylinder gap (a small space located between the cylinder and the barrel).
Beretta Stampede User Manual
Page 35
..., (Fig. 11) exposing the chamber/cartridge case. 3. WARNING: Do not place your finger on the left side of the gun, below the front of the barrel. (Fig. 3-A) WARNING: Be certain the revolver is pointed in a SAFE direction and your finger OFF the trigger, pull the hammer rearward to the half-cock...
..., (Fig. 11) exposing the chamber/cartridge case. 3. WARNING: Do not place your finger on the left side of the gun, below the front of the barrel. (Fig. 3-A) WARNING: Be certain the revolver is pointed in a SAFE direction and your finger OFF the trigger, pull the hammer rearward to the half-cock...
Beretta Stampede User Manual
Page 38
...coated patch. 5. Using a clean, dry patch, wipe the rod clean. 6. Run a lightly oiled patch through the bore several times. 4. The barrel and the external surfaces of the six (6) chambers. 8. Repeat the above procedure for bore and chambers) is unloaded and remove the cylinder using the... disassembly procedure described previously. 2. Using high-quality cleaning solvent, rod, and patch, clean the barrel from the muzzle end several times. A special "lead removing" cleaning tool (for each of the cylinder and frame. Visually and physically...
...coated patch. 5. Using a clean, dry patch, wipe the rod clean. 6. Run a lightly oiled patch through the bore several times. 4. The barrel and the external surfaces of the six (6) chambers. 8. Repeat the above procedure for bore and chambers) is unloaded and remove the cylinder using the... disassembly procedure described previously. 2. Using high-quality cleaning solvent, rod, and patch, clean the barrel from the muzzle end several times. A special "lead removing" cleaning tool (for each of the cylinder and frame. Visually and physically...

