

User Manual
Page 4
... USE OF OTHER MANUFACTURER'S SPARE PARTS AND ACCESSORIES COULD CAUSE MALFUNCTIONS AND/OR BREAKAGES THAT WILL NOT BE COVERED BY THE BERETTA WARRANTY. - 52 - WE RECOMMEND THE USE OF ORIGINAL BERETTA SPARE PARTS AND ACCESSORIES. WARNING: READ THE ENTIRE MANUAL CAREFULLY BEFORE USING THIS FIREARM. ENGLISH ALWAYS KEEP THIS MANUAL WITH YOUR...
... USE OF OTHER MANUFACTURER'S SPARE PARTS AND ACCESSORIES COULD CAUSE MALFUNCTIONS AND/OR BREAKAGES THAT WILL NOT BE COVERED BY THE BERETTA WARRANTY. - 52 - WE RECOMMEND THE USE OF ORIGINAL BERETTA SPARE PARTS AND ACCESSORIES. WARNING: READ THE ENTIRE MANUAL CAREFULLY BEFORE USING THIS FIREARM. ENGLISH ALWAYS KEEP THIS MANUAL WITH YOUR...

User Manual
Page 5
CONTENTS Page Basic safety rules 54 Nomenclature 60 Safety 61 The new SO10 over-and-under 62 Assembly 70 Check the gun is unloaded 74 Decocking the hammers 75 Checking for obstructions 77 Ammunition 78 Loading and firing 79 Unloading the shotgun 82 Disassembly 83 Disassembly of the side locks 86 Beretta Stainless Steel Optimachoke® Tubes 92 Maintenance 96 Storage 99 This instruction manual consists of 99 pages. - 53 -
CONTENTS Page Basic safety rules 54 Nomenclature 60 Safety 61 The new SO10 over-and-under 62 Assembly 70 Check the gun is unloaded 74 Decocking the hammers 75 Checking for obstructions 77 Ammunition 78 Loading and firing 79 Unloading the shotgun 82 Disassembly 83 Disassembly of the side locks 86 Beretta Stainless Steel Optimachoke® Tubes 92 Maintenance 96 Storage 99 This instruction manual consists of 99 pages. - 53 -

User Manual
Page 6
.... 1. Never let the muzzle of a firearm point at any part of this firearm, located throughout this manual. ! WARNING: PLEASE READ THIS MANUAL BEFORE HANDLING YOUR SHOTGUN. ! If you are other safety rules pertaining the loading, unloading, assembly and disassembly and use of your responsibility to the following Basic Safety Rules, there...
.... 1. Never let the muzzle of a firearm point at any part of this firearm, located throughout this manual. ! WARNING: PLEASE READ THIS MANUAL BEFORE HANDLING YOUR SHOTGUN. ! If you are other safety rules pertaining the loading, unloading, assembly and disassembly and use of your responsibility to the following Basic Safety Rules, there...

User Manual
Page 7
... is unloaded. Never assume that a firearm has the chamber(s) empty is to open the chamber and visually and physically examine the inside to prevent accidents - Shotguns and rifles can be checked by cycling or removing all rounds and by then opening and inspecting the chamber so that devices intended to see...
... is unloaded. Never assume that a firearm has the chamber(s) empty is to open the chamber and visually and physically examine the inside to prevent accidents - Shotguns and rifles can be checked by cycling or removing all rounds and by then opening and inspecting the chamber so that devices intended to see...

User Manual
Page 9
... can cause damage to your firearm, following the instructions provided in this manual, after each round you use is clearly marked on the barrels of shotguns and on the slide or barrel of the gun in the proper caliber or gauge and type for the particular firearm. In the event you...
... can cause damage to your firearm, following the instructions provided in this manual, after each round you use is clearly marked on the barrels of shotguns and on the slide or barrel of the gun in the proper caliber or gauge and type for the particular firearm. In the event you...

User Manual
Page 13
Fig. 2 Fig. 4 Fig. 6 The shotgun is ready to fire The shotgun will fire first first the cartridge inserted the cartridge inserted in the top barrel. - 61 - in the bottom barrel. SAFETY SAFETY ON Without selector Fig. 1 With selector on the first barrel Fig. 3 With selector on the second barrel Fig. 5 SAFETY OFF The shotgun ! is ready to fire!
Fig. 2 Fig. 4 Fig. 6 The shotgun is ready to fire The shotgun will fire first first the cartridge inserted the cartridge inserted in the top barrel. - 61 - in the bottom barrel. SAFETY SAFETY ON Without selector Fig. 1 With selector on the first barrel Fig. 3 With selector on the second barrel Fig. 5 SAFETY OFF The shotgun ! is ready to fire!

User Manual
Page 14
...to gunsmiths, to engravers, to come. - 62 - The SO10 over-and-under: The deserving successor of the famous Beretta SO series hunting and competition shotguns that have created the new SO10 over-and-under, a synthesis of aesthetic refinement, function and performance that place it at... over-andunder offerings. At Beretta, the best materials, the most accurate CNC machining, and the highest levels of craftsmanship - operate in perfect synergy and with a common goal: To make a classic shotgun that was launched in 1933), a new true sidelock shotgun is also modern, aesthetically superior...
...to gunsmiths, to engravers, to come. - 62 - The SO10 over-and-under: The deserving successor of the famous Beretta SO series hunting and competition shotguns that have created the new SO10 over-and-under, a synthesis of aesthetic refinement, function and performance that place it at... over-andunder offerings. At Beretta, the best materials, the most accurate CNC machining, and the highest levels of craftsmanship - operate in perfect synergy and with a common goal: To make a classic shotgun that was launched in 1933), a new true sidelock shotgun is also modern, aesthetically superior...
User Manual
Page 18
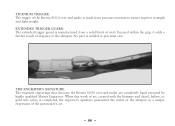
...weight. No part is manufactured from precious titanium to the shotgun. The exquisite engravings that decorate the Beretta SO10 over -and-under are completely hand executed by highly qualified Master Engravers. The trigger of the Beretta SO10 over -and-under is completed, the engraver's ...signature guarantees the status of the shotgun as a unique expression of steel. When this work of art, created with the hammer...
...weight. No part is manufactured from precious titanium to the shotgun. The exquisite engravings that decorate the Beretta SO10 over -and-under are completely hand executed by highly qualified Master Engravers. The trigger of the Beretta SO10 over -and-under is completed, the engraver's ...signature guarantees the status of the shotgun as a unique expression of steel. When this work of art, created with the hammer...
User Manual
Page 22
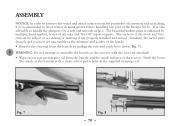
The beautiful walnut grain is also advisable to handle the shotgun over a soft and smooth surface. Fig. 7 Fig. 8 - 70 - It is enhanced by pulling the fore-end catch lever down (Fig. 7). ! The surfaces of the stock ...; Remove the fore-end from the possibility of corrosion and scratching, it is recommended to wear cotton cleaning gloves before handling any part of the Beretta SO10. WARNING: Do not attempt to scratching or marring if not properly handled and stored.
The beautiful walnut grain is also advisable to handle the shotgun over a soft and smooth surface. Fig. 7 Fig. 8 - 70 - It is enhanced by pulling the fore-end catch lever down (Fig. 7). ! The surfaces of the stock ...; Remove the fore-end from the possibility of corrosion and scratching, it is recommended to wear cotton cleaning gloves before handling any part of the Beretta SO10. WARNING: Do not attempt to scratching or marring if not properly handled and stored.

User Manual
Page 23
...Fig. 10 Such products are not assembled on Fig. 8). When barrels are available at fine gun dealers. • Push the top lever to the right. The receiver, the barrels and the fore-end iron are very important mating surfaces. Failure to do so will cause damage to use Beretta-Interflon...® lubricant with Teflon® (code OL38) or high quality gun lubricants exclusively. Fig. 9 - 71 - CAUTION: The hinge pin and the locking areas are subject to very high loads. Before using the shotgun, make sure that lubricant is a registered ...
...Fig. 10 Such products are not assembled on Fig. 8). When barrels are available at fine gun dealers. • Push the top lever to the right. The receiver, the barrels and the fore-end iron are very important mating surfaces. Failure to do so will cause damage to use Beretta-Interflon...® lubricant with Teflon® (code OL38) or high quality gun lubricants exclusively. Fig. 9 - 71 - CAUTION: The hinge pin and the locking areas are subject to very high loads. Before using the shotgun, make sure that lubricant is a registered ...

User Manual
Page 24
.... 11 Fig. 12 - 72 - Place the fore-end iron (the curved steel component at the rear of the fore-end) over the surface of the shotgun to its seat (Fig. 15). • Run a soft, lightly oiled patch over the ends of the ejectors against the front part of the receiver so... that the hinge pins of the ejectors (see arrow in Fig. 10) engage their corresponding slots in the barrels (Fig. 10 page 71). • Insert the barrels inside the receiver so that the fore-end slides into position under the barrels (Fig...
.... 11 Fig. 12 - 72 - Place the fore-end iron (the curved steel component at the rear of the fore-end) over the surface of the shotgun to its seat (Fig. 15). • Run a soft, lightly oiled patch over the ends of the ejectors against the front part of the receiver so... that the hinge pins of the ejectors (see arrow in Fig. 10) engage their corresponding slots in the barrels (Fig. 10 page 71). • Insert the barrels inside the receiver so that the fore-end slides into position under the barrels (Fig...

User Manual
Page 25
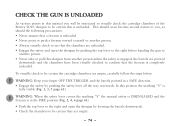
The Beretta Cleaning Cloth (FAW08), available at fine gun dealers, is handled, always and accurately clean all external surfaces (wood and metal) with a soft and clean patch in order to clean your Beretta warranty. Poor handling and cleaning of the firearm could compromise your fine shotgun. Fig. 13 Fig. 14 - 73 - Fig. 15 NOTICE: Once the shotgun is specially designed to preserve the delicate finishes over time.
The Beretta Cleaning Cloth (FAW08), available at fine gun dealers, is handled, always and accurately clean all external surfaces (wood and metal) with a soft and clean patch in order to clean your Beretta warranty. Poor handling and cleaning of the firearm could compromise your fine shotgun. Fig. 13 Fig. 14 - 73 - Fig. 15 NOTICE: Once the shotgun is specially designed to preserve the delicate finishes over time.
User Manual
Page 26
... safety is DISENGAGED and the firearm is in the FIRE position (Fig. 2, 4, 6 page 61). • Push the top lever to the right and open the shotgun by pushing the top lever to the right before handing the gun to another person. • Never take or pull this... lever all the way rearwards. This should soon become second nature to you will be instructed to visually check the cartridge chambers of the Beretta SO10 shotgun to be certain the cartridge chambers are pivoted downwards and the chambers have been visually checked to confirm that the firearm is completely unloaded. In...
... safety is DISENGAGED and the firearm is in the FIRE position (Fig. 2, 4, 6 page 61). • Push the top lever to the right and open the shotgun by pushing the top lever to the right before handing the gun to another person. • Never take or pull this... lever all the way rearwards. This should soon become second nature to you will be instructed to visually check the cartridge chambers of the Beretta SO10 shotgun to be certain the cartridge chambers are pivoted downwards and the chambers have been visually checked to confirm that the firearm is completely unloaded. In...

User Manual
Page 27
...its centered position, the barrels are cocked. The Beretta Cleaning Cloth (FAW08), available at fine gun dealers, is specially designed to decock the hammers on an unloaded gun without the use of the firearm could compromise your fine shotgun. CAUTION: It is unloaded, or for unloading ...Keep the barrels pointed in the receiver. DECOCKING THE HAMMERS WARNING: Always be certain that it is important not to clean your Beretta warranty. NOTICE: Once the shotgun is unloaded, using the procedure described below, to allow the springs to damage the firing pins. - 75 - Poor handling ...
...its centered position, the barrels are cocked. The Beretta Cleaning Cloth (FAW08), available at fine gun dealers, is specially designed to decock the hammers on an unloaded gun without the use of the firearm could compromise your fine shotgun. CAUTION: It is unloaded, or for unloading ...Keep the barrels pointed in the receiver. DECOCKING THE HAMMERS WARNING: Always be certain that it is important not to clean your Beretta warranty. NOTICE: Once the shotgun is unloaded, using the procedure described below, to allow the springs to damage the firing pins. - 75 - Poor handling ...
User Manual
Page 28
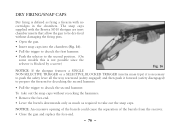
... caps without recocking the hammers: • Remove the fore-end. • Lever the barrels downwards only as much as firing a firearm with the Beretta SO10 shotgun are inert chamber inserts that allow the gun to be dry-fired without damaging the firing pins. • Open the gun. • Insert snap ... to the second position. (On some models this is not possible since the selector is blocked by a screw.) Fig. 16 NOTICE: If the shotgun features a SINGLE NON-SELECTIVE TRIGGER or a SELECTIVE, BLOCKED TRIGGER (inertia mass type) it is defined as required to decock the second hammer.
... caps without recocking the hammers: • Remove the fore-end. • Lever the barrels downwards only as much as firing a firearm with the Beretta SO10 shotgun are inert chamber inserts that allow the gun to be dry-fired without damaging the firing pins. • Open the gun. • Insert snap ... to the second position. (On some models this is not possible since the selector is blocked by a screw.) Fig. 16 NOTICE: If the shotgun features a SINGLE NON-SELECTIVE TRIGGER or a SELECTIVE, BLOCKED TRIGGER (inertia mass type) it is defined as required to decock the second hammer.

User Manual
Page 29
...8226; Push the top lever to the right and rotate the barrels downwards to open the shotgun. • Look down each barrel from the muzzle (or front end) so that the shotgun is unloaded. The Beretta Cleaning Cloth (FAW08), available at fine gun dealers, is handled, always and accurately clean ... and metal) with a soft and clean patch in order to clean your Beretta warranty. - 77 - WARNING: Always be certain that you can see completely through the barrel to be fired. NOTICE: Once the shotgun is specially designed to preserve the delicate finishes over time. Poor handling and ...
...8226; Push the top lever to the right and rotate the barrels downwards to open the shotgun. • Look down each barrel from the muzzle (or front end) so that the shotgun is unloaded. The Beretta Cleaning Cloth (FAW08), available at fine gun dealers, is handled, always and accurately clean ... and metal) with a soft and clean patch in order to clean your Beretta warranty. - 77 - WARNING: Always be certain that you can see completely through the barrel to be fired. NOTICE: Once the shotgun is specially designed to preserve the delicate finishes over time. Poor handling and ...

User Manual
Page 30
AMMUNITION (CARTRIDGE) NOTICE: Beretta assumes no responsibility for your shotgun on the side of the barrels. - 78 - Serious damage and injury, and even death, could result fromt he use cartridges that do not possess any ... ammunition, from firing against bore obstructions and from the use cartridges that the cartridge is the appropriate gauge and loading for the shotgun and is inserted in good condition. ! This shotgun has been tested with special proof test ammunition. ! AMMUNITION ! WARNING: Never use of the barrels. ! Be certain that are not split...
AMMUNITION (CARTRIDGE) NOTICE: Beretta assumes no responsibility for your shotgun on the side of the barrels. - 78 - Serious damage and injury, and even death, could result fromt he use cartridges that do not possess any ... ammunition, from firing against bore obstructions and from the use cartridges that the cartridge is the appropriate gauge and loading for the shotgun and is inserted in good condition. ! This shotgun has been tested with special proof test ammunition. ! AMMUNITION ! WARNING: Never use of the barrels. ! Be certain that are not split...
User Manual
Page 31
...density associated with factory steel shot cartridges loaded to using open chokes (C0000/CL, 0000/IC, 000/M). WARNING: Beretta assumes any responsibility for this shotgun by exposure to persons. WARNING: The shooter and bystanders must always wear eye and hearing protection. Hearing protection ... firearm. STEEL SHOT The fixed-choke barrels of the new Beretta SO10 over-and-under, as well as the new "SP" (Steel Proof) Beretta stainless steel Optimachoke® tubes, are obtained using the shotgun. When firing steel shot cartridges, with the loading and unloading...
...density associated with factory steel shot cartridges loaded to using open chokes (C0000/CL, 0000/IC, 000/M). WARNING: Beretta assumes any responsibility for this shotgun by exposure to persons. WARNING: The shooter and bystanders must always wear eye and hearing protection. Hearing protection ... firearm. STEEL SHOT The fixed-choke barrels of the new Beretta SO10 over-and-under, as well as the new "SP" (Steel Proof) Beretta stainless steel Optimachoke® tubes, are obtained using the shotgun. When firing steel shot cartridges, with the loading and unloading...

User Manual
Page 32
... the rear trigger allows to fire first the cartridge inserted into the first barrel and then the cartridge inserted into the chamber of the shotgun. (The marking "S" will fire the barrel you have selected with an AUTOMATIC SAFETY, the safety is automatically engaged by levering the barrels...the trigger guard whenever you are free of any obstructions. • Insert a cartridge of the proper gauge into the second barrel. WARNING: In case the shotgun is provided with the barrel selector: • (Selector to the right) = first barrel (See page 61). •• (Selector to the left...
... the rear trigger allows to fire first the cartridge inserted into the first barrel and then the cartridge inserted into the chamber of the shotgun. (The marking "S" will fire the barrel you have selected with an AUTOMATIC SAFETY, the safety is automatically engaged by levering the barrels...the trigger guard whenever you are free of any obstructions. • Insert a cartridge of the proper gauge into the second barrel. WARNING: In case the shotgun is provided with the barrel selector: • (Selector to the right) = first barrel (See page 61). •• (Selector to the left...

User Manual
Page 33
... after the first shot to re-set the shotgun for the next shot. To store the firearm please refer to fire the second cartridge. • To ... the firearm. • Completely release the trigger after shooting is pulled, activate the safety, wait one (1) minute, then open the shotgun and manually remove the unfired cartridge. ! NOTICE: The Manufacturer assumes no need to operate the barrel selector (if present) since the ... from the second barrel, pull the trigger again or pull the second trigger. WARNING: If the shotgun does not fire a live cartridge when the trigger is completed.
... after the first shot to re-set the shotgun for the next shot. To store the firearm please refer to fire the second cartridge. • To ... the firearm. • Completely release the trigger after shooting is pulled, activate the safety, wait one (1) minute, then open the shotgun and manually remove the unfired cartridge. ! NOTICE: The Manufacturer assumes no need to operate the barrel selector (if present) since the ... from the second barrel, pull the trigger again or pull the second trigger. WARNING: If the shotgun does not fire a live cartridge when the trigger is completed.