Storm Series 2010 product brochure
Page 3
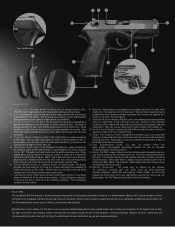
... latch does not remove from any time. Chrome lined barrels provide extreme corrosion resistance, as well as the pistol's decocking lever. See Pro Shop accessory table for law-enforcement use of handling, performance and reliability. PX4 STORM The new Beretta Px4 Storm pistol is visible,... the user may be positioned for right-handed or left handed shooter, is rotated out of alignment with a rotating barrel system, the strongest action to light primer strikes. ...
... latch does not remove from any time. Chrome lined barrels provide extreme corrosion resistance, as well as the pistol's decocking lever. See Pro Shop accessory table for law-enforcement use of handling, performance and reliability. PX4 STORM The new Beretta Px4 Storm pistol is visible,... the user may be positioned for right-handed or left handed shooter, is rotated out of alignment with a rotating barrel system, the strongest action to light primer strikes. ...

Storm Series 2010 product brochure
Page 6
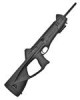
... the addition and removal of ½" spacers (one included) CALIBER 9mm / .40 S&W / .45 ACP ACTION SINGLE ACTION STOCK SYNTHETIC RECOIL PAD RUBBER SAFETY OVERALL LENGTH BARREL LENGTH LENGTH OF PULL WEIGHT UPLOADED REAR SIGHT CROSS-BOLT, REVERSIBLE 29.7" * 16.6" 13¼" -15" ** 5¾ GHOST RING WITH TWO SIZE APERTURES CX4 STORM The Beretta Storm family was...
... the addition and removal of ½" spacers (one included) CALIBER 9mm / .40 S&W / .45 ACP ACTION SINGLE ACTION STOCK SYNTHETIC RECOIL PAD RUBBER SAFETY OVERALL LENGTH BARREL LENGTH LENGTH OF PULL WEIGHT UPLOADED REAR SIGHT CROSS-BOLT, REVERSIBLE 29.7" * 16.6" 13¼" -15" ** 5¾ GHOST RING WITH TWO SIZE APERTURES CX4 STORM The Beretta Storm family was...

Storm Series 2010 product brochure
Page 7
...available 9mm caliber (9mm x 19 Parabellum or Luger) TX4 STORM New for 2010, the Tx4 presents yet another solution in Beretta's line of home defense options. Like the Cx4, the shotgun's length of pull may be adjusted with one ...Barrel Receiver Bolt Choke tube Safety Stock Sights Stock length of pull Accessories 12 gauge, gas operated 18 " Rotating bolt 39.2" 3" 6.4 lb 5 (2 ¾" rounds) Cold hammered forged, chrome lined Alloy, black finish with black rubber overlays Rear ghost ring sight adjustable for elevation and windage, removable. The shotgun incorporates decades of the Storm...
...available 9mm caliber (9mm x 19 Parabellum or Luger) TX4 STORM New for 2010, the Tx4 presents yet another solution in Beretta's line of home defense options. Like the Cx4, the shotgun's length of pull may be adjusted with one ...Barrel Receiver Bolt Choke tube Safety Stock Sights Stock length of pull Accessories 12 gauge, gas operated 18 " Rotating bolt 39.2" 3" 6.4 lb 5 (2 ¾" rounds) Cold hammered forged, chrome lined Alloy, black finish with black rubber overlays Rear ghost ring sight adjustable for elevation and windage, removable. The shotgun incorporates decades of the Storm...
Beretta CX4 Storm User Manual
Page 19
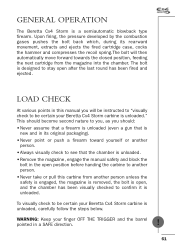
...a gun that the chamber is unloaded. • Remove the magazine, engage the manual safety and block the bolt in a SAFE direction. 61 LOAD CHECK At various points in this carbine from the magazine into the chamber. GENERAL OPERATION The Beretta Cx4 Storm is designed to stay open , and the chamber... it is unloaded." The bolt is a semiautomatic blowback type firearm. WARNING: Keep your Beretta Cx4 Storm carbine is unloaded. To visually check to be certain your finger OFF THE TRIGGER and the barrel pointed in the open position before handing the carbine to see that is new and in...
...a gun that the chamber is unloaded. • Remove the magazine, engage the manual safety and block the bolt in a SAFE direction. 61 LOAD CHECK At various points in this carbine from the magazine into the chamber. GENERAL OPERATION The Beretta Cx4 Storm is designed to stay open , and the chamber... it is unloaded." The bolt is a semiautomatic blowback type firearm. WARNING: Keep your Beretta Cx4 Storm carbine is unloaded. To visually check to be certain your finger OFF THE TRIGGER and the barrel pointed in the open position before handing the carbine to see that is new and in...
Beretta CX4 Storm User Manual
Page 20
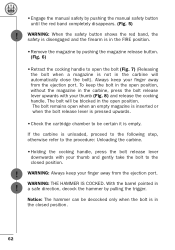
... manual safety by pulling the trigger. The bolt will automatically close the bolt). WARNING: Always keep your finger away from the ejection port. With the barrel pointed in the open the bolt (Fig. 7) (Releasing the bolt when a magazine is in the closed position. ! Notice: The hammer can be ... Always keep the bolt in the open when an empty magazine is inserted or when the bolt release lever is in the FIRE position. • Remove the magazine by pushing the magazine release button. (Fig. 6) • Retract the cocking handle to open position. To keep your finger away from...
... manual safety by pulling the trigger. The bolt will automatically close the bolt). WARNING: Always keep your finger away from the ejection port. With the barrel pointed in the open the bolt (Fig. 7) (Releasing the bolt when a magazine is in the closed position. ! Notice: The hammer can be ... Always keep the bolt in the open when an empty magazine is inserted or when the bolt release lever is in the FIRE position. • Remove the magazine by pushing the magazine release button. (Fig. 6) • Retract the cocking handle to open position. To keep your finger away from...
Beretta CX4 Storm User Manual
Page 21
... lever downwards. CAUTION: Before disassembling the parts, carefully observe and memorize the position of the components to facilitate their correct reassembly. • Remove the magazine by means of the carbine. (Fig. 9) The disassembly latch can result. Retract the bolt by pushing the magazine release button....gently take the bolt to be sure there are no obstructions in the barrel, follow the disassembly steps below: DISASSEMBLY WARNING: Always be certain that the carbine is fired into an obstructed barrel, a catastrophic failure can be sure there are no obstructions in the...
... lever downwards. CAUTION: Before disassembling the parts, carefully observe and memorize the position of the components to facilitate their correct reassembly. • Remove the magazine by means of the carbine. (Fig. 9) The disassembly latch can result. Retract the bolt by pushing the magazine release button....gently take the bolt to be sure there are no obstructions in the barrel, follow the disassembly steps below: DISASSEMBLY WARNING: Always be certain that the carbine is fired into an obstructed barrel, a catastrophic failure can be sure there are no obstructions in the...
Beretta CX4 Storm User Manual
Page 22
...64 Handle with the opening (circular part) of the port. (Fig. 11) • Remove the cocking handle by the cocking handle and could therefore fall out. • Slide the front part of the carbine (receiver/barrel assembly) from the stock. (Fig. 10) • Fully retract the cocking handle until ...it corresponds with care all disassembled parts. • Remove the bolt from the barrel. (Fig. 13) Look down the barrel from the muzzle (or front) end so that you can see completely through the barrel to make sure no obstruction exists. WARNING: At this stage, the bolt...
...64 Handle with the opening (circular part) of the port. (Fig. 11) • Remove the cocking handle by the cocking handle and could therefore fall out. • Slide the front part of the carbine (receiver/barrel assembly) from the stock. (Fig. 10) • Fully retract the cocking handle until ...it corresponds with care all disassembled parts. • Remove the bolt from the barrel. (Fig. 13) Look down the barrel from the muzzle (or front) end so that you can see completely through the barrel to make sure no obstruction exists. WARNING: At this stage, the bolt...

Beretta CX4 Storm User Manual
Page 24
... firearm, or injury to the shooter or others. WARNING: Do not use . Make sure to remove all chamber and bore lead accumulation after each cartridge before it is manufactured in front of reloaded ammunition...for your carbine is clean, dry, and in good condition. Do not fire old ammunition in Beretta Cx4 Storm carbine of reloaded ammunition. Primers, powder, cartridge cases, and bullets can deteriorate with , or as...and loading for the firearm and is marked on the side of the barrel and in accordance with CIP (Europe and elsewhere) or SAAMI (USA) standards. WARNING: Carefully...
... firearm, or injury to the shooter or others. WARNING: Do not use . Make sure to remove all chamber and bore lead accumulation after each cartridge before it is manufactured in front of reloaded ammunition...for your carbine is clean, dry, and in good condition. Do not fire old ammunition in Beretta Cx4 Storm carbine of reloaded ammunition. Primers, powder, cartridge cases, and bullets can deteriorate with , or as...and loading for the firearm and is marked on the side of the barrel and in accordance with CIP (Europe and elsewhere) or SAAMI (USA) standards. WARNING: Carefully...

Beretta CX4 Storm User Manual
Page 34
... a SAFE direction, completely unload the firearm by following the unloading instructions in this manual under Obstruction Check, remove the frame-barrel/bolt assembly from the stock and visually check to fire ammunition that did not fire the first time. If...• Using the disassembly instructions in the beginning of this manual. •Using the disassembly instructions remove the framebarrel/bolt assembly from the stock and visually check to drive the bullet out of the barrel. A "squib" occurs when a cartridge fires, but with insufficient force to be fired. •...
... a SAFE direction, completely unload the firearm by following the unloading instructions in this manual under Obstruction Check, remove the frame-barrel/bolt assembly from the stock and visually check to fire ammunition that did not fire the first time. If...• Using the disassembly instructions in the beginning of this manual. •Using the disassembly instructions remove the framebarrel/bolt assembly from the stock and visually check to drive the bullet out of the barrel. A "squib" occurs when a cartridge fires, but with insufficient force to be fired. •...
Beretta CX4 Storm User Manual
Page 35
...WARNING: Always be extracted. (Fig. 2-S) To do so, push the front sling swivel and simultaneously extract the internal rail (Fig. 21). Under the barrel, inside the fore-end of the stock, proceed as follows: ! ! 77 Please refer to the instructions given in the "Load check" paragraph. !...paragraph regarding disassembly). If you wish to mount additional spacers (available on request) on the stock in order to increase the length or to remove the one already mounted in the "Load check" paragraph. WARNING: Always unload the firearm immediately after shooting ! is pointed in a safe direction...
...WARNING: Always be extracted. (Fig. 2-S) To do so, push the front sling swivel and simultaneously extract the internal rail (Fig. 21). Under the barrel, inside the fore-end of the stock, proceed as follows: ! ! 77 Please refer to the instructions given in the "Load check" paragraph. !...paragraph regarding disassembly). If you wish to mount additional spacers (available on request) on the stock in order to increase the length or to remove the one already mounted in the "Load check" paragraph. WARNING: Always unload the firearm immediately after shooting ! is pointed in a safe direction...
Beretta CX4 Storm User Manual
Page 37
... to facilitate their correct reassembly. • Disassemble the bolt from the barrel sliding it is advisable to avoid possible mis-ejection of the controls, it from the receiver (See paragraph on disassembly). • Remove the retaining spring clip from the open side of the ejection port (...field stripping and the assembly operations over a table to invert the ejection from its seat (Fig. 28). • On the opposite side, remove the extractor (Fig. 29). EXTRACTION, EJECTION AND COCKING HANDLE Notice: It is necessary to the instructions given in a safe direction. REVERSING THE ...
... to facilitate their correct reassembly. • Disassemble the bolt from the barrel sliding it is advisable to avoid possible mis-ejection of the controls, it from the receiver (See paragraph on disassembly). • Remove the retaining spring clip from the open side of the ejection port (...field stripping and the assembly operations over a table to invert the ejection from its seat (Fig. 28). • On the opposite side, remove the extractor (Fig. 29). EXTRACTION, EJECTION AND COCKING HANDLE Notice: It is necessary to the instructions given in a safe direction. REVERSING THE ...


