
Beretta BU Nano User Manual
Page 5
... Operation • Field Stripping • Re-Assembly • Barrel Obstruction Check • Replacing the Magazine Release Button • Reversing the Magazine Release Button • Grip Frame Removal • Grip Frame/Chassis Assembly Maintenance & Storage • Maintenance & Storage • Addendum TROUBLESHOOTING Diagram & Parts list 6 -11 12-13 12 13 14-19 14-15...
... Operation • Field Stripping • Re-Assembly • Barrel Obstruction Check • Replacing the Magazine Release Button • Reversing the Magazine Release Button • Grip Frame Removal • Grip Frame/Chassis Assembly Maintenance & Storage • Maintenance & Storage • Addendum TROUBLESHOOTING Diagram & Parts list 6 -11 12-13 12 13 14-19 14-15...
Beretta BU Nano User Manual
Page 15
... whenever you do not intend to shoot. Pull back the slide and release it into the magazine. Completely push the loaded magazine into the pistol grip to insure magazine catch engagement. 1. To replace a round which has been chambered from the pistol by depressing the magazine release button. Keep your finger away... from the frame. The slide will automatically pick up a cartridge from the trigger. MANUALLY LOADING FROM MAGAZINE Completely push the loaded magazine into the pistol grip to insure magazine catch engagement. Insert one more cartridge into the chamber 2.
... whenever you do not intend to shoot. Pull back the slide and release it into the magazine. Completely push the loaded magazine into the pistol grip to insure magazine catch engagement. 1. To replace a round which has been chambered from the pistol by depressing the magazine release button. Keep your finger away... from the frame. The slide will automatically pick up a cartridge from the trigger. MANUALLY LOADING FROM MAGAZINE Completely push the loaded magazine into the pistol grip to insure magazine catch engagement. Insert one more cartridge into the chamber 2.
Beretta BU Nano User Manual
Page 20
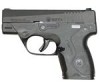
... snag free design makes it easy to disassembly. The Nano's sights are user adjustable with replaceable grip frames and is the ultimate evolution of the micro compact carry pistol. SAFETY FEATURES Striker Deactivation Button Beretta Nano pistols have a unique feature that allows the user to... disassemble and maintain. The light, durable, frame employs modern thermoplastic technology through the use make the Beretta Nano the ideal firearm for concealed carry. DESCRIPTION The Beretta Nano is simple to adjust their sights without the assistance of a gunsmith. To accommodate right or left-...
... snag free design makes it easy to disassembly. The Nano's sights are user adjustable with replaceable grip frames and is the ultimate evolution of the micro compact carry pistol. SAFETY FEATURES Striker Deactivation Button Beretta Nano pistols have a unique feature that allows the user to... disassemble and maintain. The light, durable, frame employs modern thermoplastic technology through the use make the Beretta Nano the ideal firearm for concealed carry. DESCRIPTION The Beretta Nano is simple to adjust their sights without the assistance of a gunsmith. To accommodate right or left-...
Beretta BU Nano User Manual
Page 24
... empty magazine, pull back slightly on shooter preference (pages 34-37). ERGONOMIC AND MODULAR FEATURES Technopolymer grip frame By using corrosion-resistant fiberglass reinforced technopolymer, Beretta has developed a light and technically advanced pistol with an ergonomic shape. The upper rear part of this... pistol is contoured to snugly fit and protect the shooter's hand. Both the front and the rear grip surfaces feature a comfortable...
... empty magazine, pull back slightly on shooter preference (pages 34-37). ERGONOMIC AND MODULAR FEATURES Technopolymer grip frame By using corrosion-resistant fiberglass reinforced technopolymer, Beretta has developed a light and technically advanced pistol with an ergonomic shape. The upper rear part of this... pistol is contoured to snugly fit and protect the shooter's hand. Both the front and the rear grip surfaces feature a comfortable...
Beretta BU Nano User Manual
Page 25
...Improper assembly of parts is designed for quick and simple field stripping and to avoid unintentional disassembly. SPECIFICATIONS AND TECHNICAL DATA Model: Nano Caliber: 9x19 (Parabellum or Luger), 9x21 IMI or .40 S&W Magazine Capacity: 6 rounds Rifling Pitch: 15.75 in/ 400..., short recoil system Locking System: Cam operated, tilt-barrel, locked breech Sights: Removable front and rear sights Frame/Chassis: Stainless steel Grip Frame: Fiberglass reinforced technopolymer Slide: Steel with a black Nitride finish Barrel: Steel with a black Nitride finish Action: Striker Fired Safety:...
...Improper assembly of parts is designed for quick and simple field stripping and to avoid unintentional disassembly. SPECIFICATIONS AND TECHNICAL DATA Model: Nano Caliber: 9x19 (Parabellum or Luger), 9x21 IMI or .40 S&W Magazine Capacity: 6 rounds Rifling Pitch: 15.75 in/ 400..., short recoil system Locking System: Cam operated, tilt-barrel, locked breech Sights: Removable front and rear sights Frame/Chassis: Stainless steel Grip Frame: Fiberglass reinforced technopolymer Slide: Steel with a black Nitride finish Barrel: Steel with a black Nitride finish Action: Striker Fired Safety:...
Beretta BU Nano User Manual
Page 36
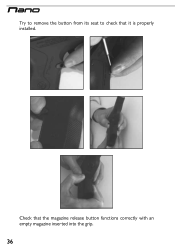
Try to remove the button from its seat to check that the magazine release button functions correctly with an empty magazine inserted into the grip. 36 Check that it is properly installed.
Try to remove the button from its seat to check that the magazine release button functions correctly with an empty magazine inserted into the grip. 36 Check that it is properly installed.
Beretta BU Nano User Manual
Page 37
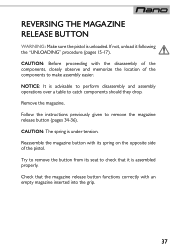
... seat to make assembly easier. Check that it following the "UNLOADING" procedure (pages 15-17). CAUTION: Before proceeding with an empty magazine inserted into the grip. 37 If not, unload it is advisable to perform disassembly and assembly operations over a table to remove the magazine release button (pages 34-36). Follow...
... seat to make assembly easier. Check that it following the "UNLOADING" procedure (pages 15-17). CAUTION: Before proceeding with an empty magazine inserted into the grip. 37 If not, unload it is advisable to perform disassembly and assembly operations over a table to remove the magazine release button (pages 34-36). Follow...
Beretta BU Nano User Manual
Page 38
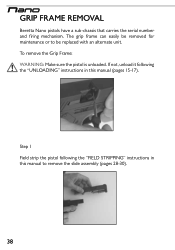
Step 1 Field strip the pistol following the "UNLOADING" instructions in this manual (pages 15-17). If not, unload it following the "FIELD STRIPPING" instructions in this manual to be removed for maintenance or to remove the slide assembly (pages 28-30). 38 The grip frame can easily be replaced with an alternate unit. GRIP FRAME REMOVAL Beretta Nano pistols have a sub-chassis that carries the serial number and firing mechanism. To remove the Grip Frame: WARNING: Make sure the pistol is unloaded.
Step 1 Field strip the pistol following the "UNLOADING" instructions in this manual (pages 15-17). If not, unload it following the "FIELD STRIPPING" instructions in this manual to be removed for maintenance or to remove the slide assembly (pages 28-30). 38 The grip frame can easily be replaced with an alternate unit. GRIP FRAME REMOVAL Beretta Nano pistols have a sub-chassis that carries the serial number and firing mechanism. To remove the Grip Frame: WARNING: Make sure the pistol is unloaded.
Beretta BU Nano User Manual
Page 40
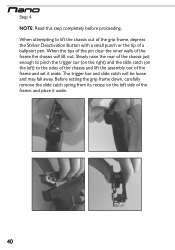
... chassis just enough to pinch the trigger bar (on the right) and the slide catch (on the left ) to lift the chassis out of the grip frame, depress the Striker Deactivation Button with a small punch or the tip of the frame the chassis will be loose and may fall away. Before... setting the grip frame down, carefully remove the slide catch spring from its recess on the left side of the frame and set it aside. 40 Step 4 NOTE...
... chassis just enough to pinch the trigger bar (on the right) and the slide catch (on the left ) to lift the chassis out of the grip frame, depress the Striker Deactivation Button with a small punch or the tip of the frame the chassis will be loose and may fall away. Before... setting the grip frame down, carefully remove the slide catch spring from its recess on the left side of the frame and set it aside. 40 Step 4 NOTE...
Beretta BU Nano User Manual
Page 43
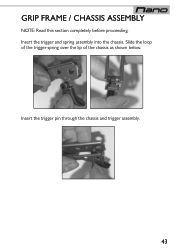
Insert the trigger pin through the chassis and trigger assembly. 43 Insert the trigger and spring assembly into the chassis. Slide the loop of the trigger spring over the lip of the chassis as shown below. GRIP FRAME / CHASSIS ASSEMBLY NOTE: Read this section completely before proceeding.
Insert the trigger pin through the chassis and trigger assembly. 43 Insert the trigger and spring assembly into the chassis. Slide the loop of the trigger spring over the lip of the chassis as shown below. GRIP FRAME / CHASSIS ASSEMBLY NOTE: Read this section completely before proceeding.
Beretta BU Nano User Manual
Page 48
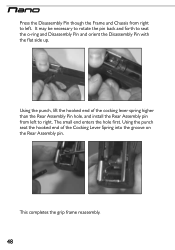
The small end enters the hole first. Using the punch seat the hooked end of the cocking lever spring higher than the Rear Assembly Pin hole, and install the Rear Assembly pin from right to left to seat the o-ring and Disassembly Pin and orient the Disassembly Pin with the flat side up. This completes the grip frame reassembly. 48 It may be necessary to rotate the pin back and forth to right. Using the punch, lift the hooked end of the Cocking Lever Spring into the groove on the Rear Assembly pin. Press the Disassembly Pin though the Frame and Chassis from left .
The small end enters the hole first. Using the punch seat the hooked end of the cocking lever spring higher than the Rear Assembly Pin hole, and install the Rear Assembly pin from right to left to seat the o-ring and Disassembly Pin and orient the Disassembly Pin with the flat side up. This completes the grip frame reassembly. 48 It may be necessary to rotate the pin back and forth to right. Using the punch, lift the hooked end of the Cocking Lever Spring into the groove on the Rear Assembly pin. Press the Disassembly Pin though the Frame and Chassis from left .