Beretta Owner Manual A300 Outlander
Page 15
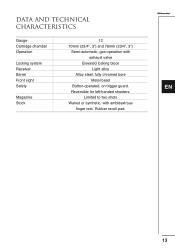
Magazine Limited to two shots Stock Walnut or synthetic, with exhaust valve Locking system Elevated locking block Receiver Light alloy Barrel Alloy steel, fully chromed bore Front sight Metal bead Safety Button-operated, on trigger guard. DATA AND TECHNICAL CHARACTERISTICS Gauge 12 Cartridge chamber 70mm (23/4", 3") and 76mm (23/4", 3") Operation Semi-automatic, gas operation with ambidextrous finger rest. Reversible for left-handed shooters. EN 13 Rubber recoil pad.
Magazine Limited to two shots Stock Walnut or synthetic, with exhaust valve Locking system Elevated locking block Receiver Light alloy Barrel Alloy steel, fully chromed bore Front sight Metal bead Safety Button-operated, on trigger guard. DATA AND TECHNICAL CHARACTERISTICS Gauge 12 Cartridge chamber 70mm (23/4", 3") and 76mm (23/4", 3") Operation Semi-automatic, gas operation with ambidextrous finger rest. Reversible for left-handed shooters. EN 13 Rubber recoil pad.

Beretta Owner Manual A300 Outlander
Page 18
... the front cap of the fore-end all the way into the receiver until it stops. • Slide the fore-end into place over the gas cylinder / the valve assembly and magazine tube (Fig. 11). WARNING: The safety can only be engaged with firearms cannot gain access to decock the hammer.... EN • Push it all the way (Fig. 12). • Keep your fingers away from the ejection port, press the breech bolt release button and gently guide the breech bolt to lock (Fig. 13...
... the front cap of the fore-end all the way into the receiver until it stops. • Slide the fore-end into place over the gas cylinder / the valve assembly and magazine tube (Fig. 11). WARNING: The safety can only be engaged with firearms cannot gain access to decock the hammer.... EN • Push it all the way (Fig. 12). • Keep your fingers away from the ejection port, press the breech bolt release button and gently guide the breech bolt to lock (Fig. 13...
Beretta Owner Manual A300 Outlander
Page 32
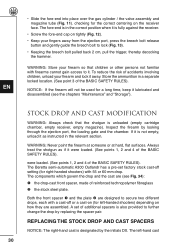
...drop and the cast are assembled. EN • Slide the fore-end into place over the gas cylinder / the valve assembly and magazine tube (Fig. 11). The fore-end is fully ...against the receiver. • Screw the fore-end cap on tightly (Fig. 12). • Keep your fingers away from the ejection port, press the breech bolt release button and...correct position when it were loaded. (See points 1, 2 and 4 of the BASIC SAFETY RULES). The Beretta semi-automatic A300 Outlandr has a pre-set of reinforced technopolymer fibreglass the stock steel plate. were loaded. (See...
...drop and the cast are assembled. EN • Slide the fore-end into place over the gas cylinder / the valve assembly and magazine tube (Fig. 11). The fore-end is fully ...against the receiver. • Screw the fore-end cap on tightly (Fig. 12). • Keep your fingers away from the ejection port, press the breech bolt release button and...correct position when it were loaded. (See points 1, 2 and 4 of the BASIC SAFETY RULES). The Beretta semi-automatic A300 Outlandr has a pre-set of reinforced technopolymer fibreglass the stock steel plate. were loaded. (See...
