User Manual
Page 3
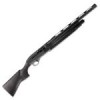
... misuse or neglect of the shotgun which have been caused through not abiding by the manufacturer) to load more cartridges into your Beretta shotgun than local legislation permits. NOTICE: As the interchangeable barrel of the barrel/s. WARNING: Do not attempt to any product malfunction...this manual. EN 3 THE FOLLOWING SAFETY RULES ARE AN IMPORTANT REMINDER THAT FIREARM SAFETY IS YOUR RESPONSIBILITY. Beretta will not be necessary, when referring to the gun, to fire. ALWAYS KEEP THIS MANUAL WITH YOUR FIREARM. INCLUDE IT WITH THE FIREARM WHEN IT CHANGES OWNERSHIP...
... misuse or neglect of the shotgun which have been caused through not abiding by the manufacturer) to load more cartridges into your Beretta shotgun than local legislation permits. NOTICE: As the interchangeable barrel of the barrel/s. WARNING: Do not attempt to any product malfunction...this manual. EN 3 THE FOLLOWING SAFETY RULES ARE AN IMPORTANT REMINDER THAT FIREARM SAFETY IS YOUR RESPONSIBILITY. Beretta will not be necessary, when referring to the gun, to fire. ALWAYS KEEP THIS MANUAL WITH YOUR FIREARM. INCLUDE IT WITH THE FIREARM WHEN IT CHANGES OWNERSHIP...
User Manual
Page 5
... use or misuse of the firearm in the product manual. STORE YOUR FIREARM SO THAT CHILDREN CANNOT GAIN ACCESS TO IT. Firearm storage in a steel gun safe may not prevent use and safety procedures. 6. Shooting at the surface of water or at a rock or other hard surface increases the chance of...
... use or misuse of the firearm in the product manual. STORE YOUR FIREARM SO THAT CHILDREN CANNOT GAIN ACCESS TO IT. Firearm storage in a steel gun safe may not prevent use and safety procedures. 6. Shooting at the surface of water or at a rock or other hard surface increases the chance of...

User Manual
Page 6
... the particular firearm. ALWAYS WEAR PROTECTIVE GLASSES AND EARPLUGS WHEN SHOOTING. Noise-reducing earplugs or headphones will blow back and injure a shooter who is firing a gun is open before climbing a fence or jumping over a ditch or other defects in the ammunition that can be sustained in such circumstances can be severe...
... the particular firearm. ALWAYS WEAR PROTECTIVE GLASSES AND EARPLUGS WHEN SHOOTING. Noise-reducing earplugs or headphones will blow back and injure a shooter who is firing a gun is open before climbing a fence or jumping over a ditch or other defects in the ammunition that can be sustained in such circumstances can be severe...
User Manual
Page 14
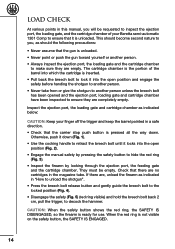
... port, the loading gate, and the cartridge chamber of the barrel into which the cartridge is unloaded. • Never point or push the gun toward yourself or another person unless the breech bolt has been opened and the ejection port, loading gate and cartridge chamber have been inspected to... the red ring is ready for use. Inspect the ejection port, the loading gate and cartridge chamber as indicated below: CAUTION: Keep your Beretta semi-automatic 1301 Comp to ensure that the carrier stop push button is unloaded. Otherwise, push it down . EN LOAD CHECK At various points in this ...
... port, the loading gate, and the cartridge chamber of the barrel into which the cartridge is unloaded. • Never point or push the gun toward yourself or another person unless the breech bolt has been opened and the ejection port, loading gate and cartridge chamber have been inspected to... the red ring is ready for use. Inspect the ejection port, the loading gate and cartridge chamber as indicated below: CAUTION: Keep your Beretta semi-automatic 1301 Comp to ensure that the carrier stop push button is unloaded. Otherwise, push it down . EN LOAD CHECK At various points in this ...
User Manual
Page 23
... 22). If it manually. • Remove the wrench from the muzzle and do not replace the choke with the shotgun loaded even with Beretta Gun Oil. Forcefully tighten it is ready for use. WARNING: Never look directly through the ejection port, the loading gate and the chamber. Inspect... housing thoroughly using, if necessary, a brush swab soaked with the safety engaged. Use the Beretta wrench provided to installing it is cocked by looking through the barrel from the muzzle of Beretta Gun Oil on the safety button, the SAFETY IS ENGAGED. • Unscrew the choke tube, in...
... 22). If it manually. • Remove the wrench from the muzzle and do not replace the choke with the shotgun loaded even with Beretta Gun Oil. Forcefully tighten it is ready for use. WARNING: Never look directly through the ejection port, the loading gate and the chamber. Inspect... housing thoroughly using, if necessary, a brush swab soaked with the safety engaged. Use the Beretta wrench provided to installing it is cocked by looking through the barrel from the muzzle of Beretta Gun Oil on the safety button, the SAFETY IS ENGAGED. • Unscrew the choke tube, in...
User Manual
Page 25
... as instructed in the relevant section. Inspect the firearm by looking through the barrel. • Lightly lubricate the barrel with a soft clean cloth soaked with Beretta Gun Oil. • Check the barrel. WARNING: Always check that the hammer is most likely to bystanders. NOTICE: For Routine Maintenance, simply disassemble it were loaded...
... as instructed in the relevant section. Inspect the firearm by looking through the barrel. • Lightly lubricate the barrel with a soft clean cloth soaked with Beretta Gun Oil. • Check the barrel. WARNING: Always check that the hammer is most likely to bystanders. NOTICE: For Routine Maintenance, simply disassemble it were loaded...

User Manual
Page 26
• Ensure that the piston glides freely on the magazine tube. • To clean the walls of the gas cylinder, spray the walls with Beretta Gun Oil and clean thoroughly with a bronze brush. • After removing any combustion residue, clean the inside of the gas cylinder with a clean cloth. If necessary, contact a competent gunsmith. EXHAUST VALVE ASSEMBLY NOTICE: NEVER DISASSEMBLE the exhaust valve assembly. NOTICE: The components specified above must not be lubricated. EN 26
• Ensure that the piston glides freely on the magazine tube. • To clean the walls of the gas cylinder, spray the walls with Beretta Gun Oil and clean thoroughly with a bronze brush. • After removing any combustion residue, clean the inside of the gas cylinder with a clean cloth. If necessary, contact a competent gunsmith. EXHAUST VALVE ASSEMBLY NOTICE: NEVER DISASSEMBLE the exhaust valve assembly. NOTICE: The components specified above must not be lubricated. EN 26
User Manual
Page 27
BREECH BOLT ASSEMBLY (Breech bolt, operating rods with sleeve, recoil spring, and piston stop). • Spray the parts and clean with Beretta Gun Oil. • Thoroughly dry with a soft cloth. • Lightly lubricate all the metal components and the trigger plate retaining pin. Do not alter ... Authorised Distributor. 27 CAUTION: Do not attempt to carry out repairs to the operating mechanism should be performed by the Manufacturer or by Beretta. RECEIVER • Proceed as indicated for the breech bolt. SPECIAL MAINTENANCE Depending on the conditions of the hunting season...
BREECH BOLT ASSEMBLY (Breech bolt, operating rods with sleeve, recoil spring, and piston stop). • Spray the parts and clean with Beretta Gun Oil. • Thoroughly dry with a soft cloth. • Lightly lubricate all the metal components and the trigger plate retaining pin. Do not alter ... Authorised Distributor. 27 CAUTION: Do not attempt to carry out repairs to the operating mechanism should be performed by the Manufacturer or by Beretta. RECEIVER • Proceed as indicated for the breech bolt. SPECIAL MAINTENANCE Depending on the conditions of the hunting season...


