

User Guide
Page 2
...the unit case. ¾ The projection lamp is strongly recommended that you read this manual for pointing out items on purchasing the DLP projector! General Safety Information ¾ Do not open the Main menu." For servicing, contact qualified service personnel. ¾ Follow all warnings...These safety and usage instructions will ensure that you enjoy many years of safe use of hazardous situations. Caution: Alerts you of the projector. Important: It is extremely bright by design. Aside from the projection lamp, there are used on the unit. - The following ...
...the unit case. ¾ The projection lamp is strongly recommended that you read this manual for pointing out items on purchasing the DLP projector! General Safety Information ¾ Do not open the Main menu." For servicing, contact qualified service personnel. ¾ Follow all warnings...These safety and usage instructions will ensure that you enjoy many years of safe use of hazardous situations. Caution: Alerts you of the projector. Important: It is extremely bright by design. Aside from the projection lamp, there are used on the unit. - The following ...
User Guide
Page 3
...Before replacing the lamp: ¾ Unplug the power cord. ¾ Allow the lamp to cool for about one hour. Refer to Cleaning the Projector on page 32. ¾ Allow the lamp to Replacing the Projection Lamp on page 29 for clear and safe instructions for a prolonged period. Regulatory... Warnings Before installing and using the projector, read the regulatory notices in use the supplied power cord. ¾ Do not place anything on page 42. - iii - Replacing the ...
...Before replacing the lamp: ¾ Unplug the power cord. ¾ Allow the lamp to cool for about one hour. Refer to Cleaning the Projector on page 32. ¾ Allow the lamp to Replacing the Projection Lamp on page 29 for clear and safe instructions for a prolonged period. Regulatory... Warnings Before installing and using the projector, read the regulatory notices in use the supplied power cord. ¾ Do not place anything on page 42. - iii - Replacing the ...

User Guide
Page 4
... brightness rating allows for presentations in daylight or in lit rooms Supports resolutions up to SXGA at 16.7 million colors to install and operate the DLP projector.
... brightness rating allows for presentations in daylight or in lit rooms Supports resolutions up to SXGA at 16.7 million colors to install and operate the DLP projector.

User Guide
Page 5
... AND OPERATION...9 INSERTING THE REMOTE CONTROL BATTERIES ...9 CONNECTING INPUT DEVICES ...10 STARTING AND SHUTTING DOWN THE PROJECTOR...11 SETTING AN ACCESS PASSWORD (SECURITY LOCK) ...12 ADJUSTING THE PROJECTOR LEVEL ...13 ADJUSTING THE ZOOM, FOCUS AND KEYSTONE ...14 ADJUSTING THE VOLUME ...14 ON-SCREEN DISPLAY ...26 TOOL MENU ...27 STATUS MENU ...28 MAINTENANCE AND SECURITY...29 REPLACING THE PROJECTION LAMP...29 Resetting the Lamp...32 CLEANING THE PROJECTOR...32 Cleaning the Lens ...33 Cleaning the Case ...33 USING THE KENSINGTON® LOCK ...33 TROUBLESHOOTING ...34 COMMON PROBLEMS AND ...
... AND OPERATION...9 INSERTING THE REMOTE CONTROL BATTERIES ...9 CONNECTING INPUT DEVICES ...10 STARTING AND SHUTTING DOWN THE PROJECTOR...11 SETTING AN ACCESS PASSWORD (SECURITY LOCK) ...12 ADJUSTING THE PROJECTOR LEVEL ...13 ADJUSTING THE ZOOM, FOCUS AND KEYSTONE ...14 ADJUSTING THE VOLUME ...14 ON-SCREEN DISPLAY ...26 TOOL MENU ...27 STATUS MENU ...28 MAINTENANCE AND SECURITY...29 REPLACING THE PROJECTION LAMP...29 Resetting the Lamp...32 CLEANING THE PROJECTOR...32 Cleaning the Lens ...33 Cleaning the Case ...33 USING THE KENSINGTON® LOCK ...33 TROUBLESHOOTING ...34 COMMON PROBLEMS AND ...

User Guide
Page 6
vi - UUsseerr''ss MMaannuuaall Projection distance and size table (0.7 inches)...39 TIMING MODE TABLE ...40 PROJECTOR DIMENSIONS ...41 REGULATORY COMPLIANCE ...42 FCC WARNING...42 CANADA ...42 EN 55022 WARNING ...42 SAFETY CERTIFICATIONS...42 - DDLLPP PPrroojjeeccttoorr --
vi - UUsseerr''ss MMaannuuaall Projection distance and size table (0.7 inches)...39 TIMING MODE TABLE ...40 PROJECTOR DIMENSIONS ...41 REGULATORY COMPLIANCE ...42 FCC WARNING...42 CANADA ...42 EN 55022 WARNING ...42 SAFETY CERTIFICATIONS...42 - DDLLPP PPrroojjeeccttoorr --
User Guide
Page 7
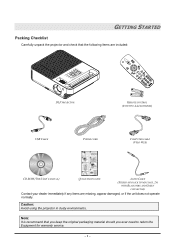
... original packaging material should you ever need to return the Equipment for warranty service. - 1 - Caution: Avoid using the projector in dusty environments. Note: It is recommend that the following items are included: DLP PROJECTOR REMOTE CONTROL (WITH TWO AAA BATTERIES) USB CABLE POWER CORD COMPUTER CABLE (VGA-VGA) CD-ROM (THIS USER'S MANUAL...
... original packaging material should you ever need to return the Equipment for warranty service. - 1 - Caution: Avoid using the projector in dusty environments. Note: It is recommend that the following items are included: DLP PROJECTOR REMOTE CONTROL (WITH TWO AAA BATTERIES) USB CABLE POWER CORD COMPUTER CABLE (VGA-VGA) CD-ROM (THIS USER'S MANUAL...
User Guide
Page 8
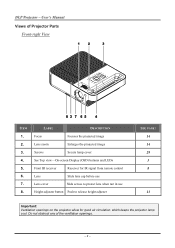
Do not obstruct any of Projector Parts Front-right View ITEM 1. 2. 3. 4. 5. 6. 7. 8. DDLLPP PPrroojjeeccttoorr -- LABEL DESCRIPTION Focus Focuses the projected image Lens zoom Enlarges the projected image Screws Secure lamp cover See ... protect lens when not in use Height-adjuster button Push to release height adjuster SEE PAGE: 14 14 29 3 8 13 Important: Ventilation openings on the projector allow for good air circulation, which keeps the projector lamp cool. UUsseerr''ss MMaannuuaall Views of the ventilation openings. - 2 -
Do not obstruct any of Projector Parts Front-right View ITEM 1. 2. 3. 4. 5. 6. 7. 8. DDLLPP PPrroojjeeccttoorr -- LABEL DESCRIPTION Focus Focuses the projected image Lens zoom Enlarges the projected image Screws Secure lamp cover See ... protect lens when not in use Height-adjuster button Push to release height adjuster SEE PAGE: 14 14 29 3 8 13 Important: Ventilation openings on the projector allow for good air circulation, which keeps the projector lamp cool. UUsseerr''ss MMaannuuaall Views of the ventilation openings. - 2 -
User Guide
Page 9
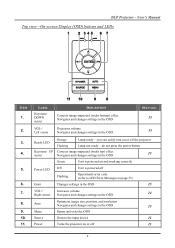
... cursor Decreases volume Navigates and changes settings in the OSD 15 Ready LED Orange Flashing Lamp ready-you can safely turn on or off the projector Lamp not ready-do not press the power button Keystone/ UP Corrects image-trapezoid (wider top) effect cursor Navigates and changes settings in the OSD..., and resolution Navigates and changes settings in the OSD 15 Menu Opens and exits the OSD Source Detects the input device 11 Power Turns the projector on or off 11 - 3 -
... cursor Decreases volume Navigates and changes settings in the OSD 15 Ready LED Orange Flashing Lamp ready-you can safely turn on or off the projector Lamp not ready-do not press the power button Keystone/ UP Corrects image-trapezoid (wider top) effect cursor Navigates and changes settings in the OSD..., and resolution Navigates and changes settings in the OSD 15 Menu Opens and exits the OSD Source Detects the input device 11 Power Turns the projector on or off 11 - 3 -
User Guide
Page 11
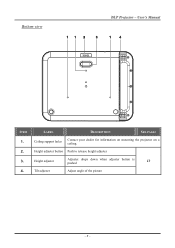
Bottom view DDLLPP PPrroojjeeccttoorr -- LABEL DESCRIPTION SEE PAGE: Ceiling support holes Contact your dealer for information on mounting the projector on a ceiling. Height adjuster button Push to release height adjuster Height adjuster Adjuster drops down when adjuster button is pushed 13 Tilt adjuster Adjust angle of the picture - 5 - UUsseerr''ss MMaannuuaall ITEM 1. 2. 3. 4.
Bottom view DDLLPP PPrroojjeeccttoorr -- LABEL DESCRIPTION SEE PAGE: Ceiling support holes Contact your dealer for information on mounting the projector on a ceiling. Height adjuster button Push to release height adjuster Height adjuster Adjuster drops down when adjuster button is pushed 13 Tilt adjuster Adjust angle of the picture - 5 - UUsseerr''ss MMaannuuaall ITEM 1. 2. 3. 4.
User Guide
Page 12
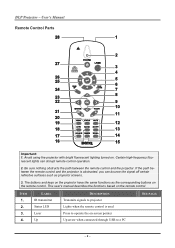
... corresponding buttons on the remote control. ITEM 1. 2. 3. 4. LABEL IR transmitter Status LED Laser Up DESCRIPTION Transmits signals to projector Lights when the remote control is obstructed, you can disrupt remote control operation. 2. If the path between the remote control and the...turned on the remote control. Be sure nothing obstructs the path between the remote control and the projector is used Press to operate the on the projector have the same functions as projector screens. 3. DDLLPP PPrroojjeeccttoorr -- The buttons and keys on -screen pointer Up arrow when connected ...
... corresponding buttons on the remote control. ITEM 1. 2. 3. 4. LABEL IR transmitter Status LED Laser Up DESCRIPTION Transmits signals to projector Lights when the remote control is obstructed, you can disrupt remote control operation. 2. If the path between the remote control and the...turned on the remote control. Be sure nothing obstructs the path between the remote control and the projector is used Press to operate the on the projector have the same functions as projector screens. 3. DDLLPP PPrroojjeeccttoorr -- The buttons and keys on -screen pointer Up arrow when connected ...
User Guide
Page 13
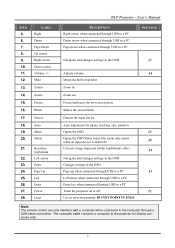
...connected through USB to a PC Enter key when connected through a USB cable connection. The computer cable connects a computer to a PC Turns the projector on or off 11 Use as on-screen pointer. DDLLPP PPrroojjeeccttoorr -- LABEL Right Down Page Down Up cursor Right cursor Down cursor Volume +/Mute Zoom...Blank Source Auto Menu Status 21. Note: The remote control can only interface with a computer when connected to the computer through USB to the projector for phase, tracking, size, position Opens the OSD 15 Opens the OSD Status menu (the menu only opens when an input device is ...
...connected through USB to a PC Enter key when connected through a USB cable connection. The computer cable connects a computer to a PC Turns the projector on or off 11 Use as on-screen pointer. DDLLPP PPrroojjeeccttoorr -- LABEL Right Down Page Down Up cursor Right cursor Down cursor Volume +/Mute Zoom...Blank Source Auto Menu Status 21. Note: The remote control can only interface with a computer when connected to the computer through USB to the projector for phase, tracking, size, position Opens the OSD 15 Opens the OSD Status menu (the menu only opens when an input device is ...
User Guide
Page 14
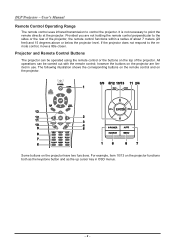
... following illustration shows the corresponding buttons on the remote control and on the projector have two functions. Provided you are limited in OSD menus. - 8 - however the buttons on the projector functions both as the keystone button and as the up cursor key in use. UUsseerr''...ss MMaannuuaall Remote Control Operating Range The remote control uses infrared transmission to the remote control, move a little closer. Projector and Remote Control Buttons The projector can be operated using the remote control or the buttons on the top of about 7 meters (23 feet) and 15...
... following illustration shows the corresponding buttons on the remote control and on the projector have two functions. Provided you are limited in OSD menus. - 8 - however the buttons on the projector functions both as the keystone button and as the up cursor key in use. UUsseerr''...ss MMaannuuaall Remote Control Operating Range The remote control uses infrared transmission to the remote control, move a little closer. Projector and Remote Control Buttons The projector can be operated using the remote control or the buttons on the top of about 7 meters (23 feet) and 15...
User Guide
Page 15
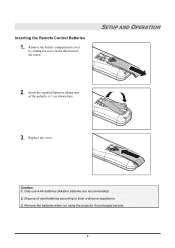
Remove the battery compartment cover by sliding the cover in the direction of used batteries according to local ordinance regulations. 3. Inserting the Remote Control Batteries 1. Only use AAA batteries (Alkaline batteries are recommended). 2. Caution: 1. Dispose of the arrow. Remove the batteries when not using the projector for prolonged periods. - 9 - Replace the cover. Insert the supplied batteries taking note of the polarity (+/-) as shown here. 3. SETUP AND OPERATION 2.
Remove the battery compartment cover by sliding the cover in the direction of used batteries according to local ordinance regulations. 3. Inserting the Remote Control Batteries 1. Only use AAA batteries (Alkaline batteries are recommended). 2. Caution: 1. Dispose of the arrow. Remove the batteries when not using the projector for prolonged periods. - 9 - Replace the cover. Insert the supplied batteries taking note of the polarity (+/-) as shown here. 3. SETUP AND OPERATION 2.
User Guide
Page 16
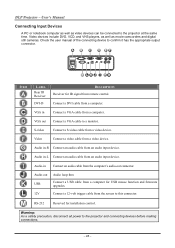
... video cable from a video device. Video devices include DVD, VCD, and VHS players, as well as video devices can be connected to the projector at the same time. Audio in Connect a VGA cable from a computer for installation control. Audio-out USB Audio loop-thru Connect a USB cable...audio cable from an audio input device. Connect a DVI cable from remote control. Check the user manual of the connecting device to the projector and connecting devices before making connections. - 10 - RS-232 Reserved for USB mouse function and firmware upgrades. 12V Connect a 12-...
... video cable from a video device. Video devices include DVD, VCD, and VHS players, as well as video devices can be connected to the projector at the same time. Audio in Connect a VGA cable from a computer for installation control. Audio-out USB Audio loop-thru Connect a USB cable...audio cable from an audio input device. Connect a DVI cable from remote control. Check the user manual of the connecting device to the projector and connecting devices before making connections. - 10 - RS-232 Reserved for USB mouse function and firmware upgrades. 12V Connect a 12-...

User Guide
Page 17
... on page 12 if Security Lock is a PC, press the appropriate keys on the computer keyboard to switch the display output to the projector. (Check the user manual of the PC to determine the appropriate Fn key combination to switch among devices. (DVD and HDTV are detected... button. Caution: Do not unplug the power cord until the Ready LED stops flashing, indicating the projector has cooled down the Projector 1. Starting and Shutting down . - 11 - To turn on the projector light. Ensure the Ready LED is connected, press the Source button repeatedly to change display output.) ...
... on page 12 if Security Lock is a PC, press the appropriate keys on the computer keyboard to switch the display output to the projector. (Check the user manual of the PC to determine the appropriate Fn key combination to switch among devices. (DVD and HDTV are detected... button. Caution: Do not unplug the power cord until the Ready LED stops flashing, indicating the projector has cooled down the Projector 1. Starting and Shutting down . - 11 - To turn on the projector light. Ensure the Ready LED is connected, press the Source button repeatedly to change display output.) ...
User Guide
Page 18
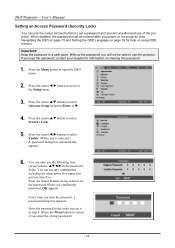
...on using OSD menus). DDLLPP PPrroojjeeccttoorr -- You can use any order to set it at step 6. (Press the Menu button to use of the projector. Press the cursor buttons in the order you enter the wrong password.) - 12 - Without the password, you confirm the password, OK appears. ... than five. Important: Keep the password in the password fields. Press the cursor ST button to set a password and prevent unauthorized use the projector. UUsseerr''ss MMaannuuaall Setting an Access Password (Security Lock) You can only use the cursor (arrow) buttons to select Advance Setup and press ...
...on using OSD menus). DDLLPP PPrroojjeeccttoorr -- You can use any order to set it at step 6. (Press the Menu button to use of the projector. Press the cursor buttons in the order you enter the wrong password.) - 12 - Without the password, you confirm the password, OK appears. ... than five. Important: Keep the password in the password fields. Press the cursor ST button to set a password and prevent unauthorized use the projector. UUsseerr''ss MMaannuuaall Setting an Access Password (Security Lock) You can only use the cursor (arrow) buttons to select Advance Setup and press ...
User Guide
Page 19
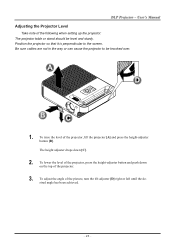
...-adjuster button and push down [C]. 2. To adjust the angle of the projector, lift the projector [A] and press the height-adjuster button [B]. Be sure cables are not in the way or can cause the projector to the screen. DDLLPP PPrroojjeeccttoorr -- The height adjuster drops down on the... top of the following when setting up the projector: The projector table or stand should be knocked over. 1. UUsseerr''ss MMaannuuaall Adjusting...
...-adjuster button and push down [C]. 2. To adjust the angle of the projector, lift the projector [A] and press the height-adjuster button [B]. Be sure cables are not in the way or can cause the projector to the screen. DDLLPP PPrroojjeeccttoorr -- The height adjuster drops down on the... top of the following when setting up the projector: The projector table or stand should be knocked over. 1. UUsseerr''ss MMaannuuaall Adjusting...
User Guide
Page 20
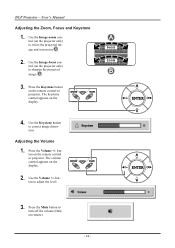
Use the Volume +/- button to correct image distortion. Use the Image-zoom control (on the remote control or projector. Use the Keystone button to adjust the level. 3. button on the projector only) to sharpen the projected image A . 3. Press the Keystone button on the display. 4. The keystone control appears on... the Image-focus control (on remote). - 14 - Press the Mute button to turn off the volume (Only on the projector only) to resize the projected image and screen size B . 2. DDLLPP PPrroojjeeccttoorr -- Press the Volume +/- The volume control appears on the display. 2....
Use the Volume +/- button to correct image distortion. Use the Image-zoom control (on the remote control or projector. Use the Keystone button to adjust the level. 3. button on the projector only) to sharpen the projected image A . 3. Press the Keystone button on the display. 4. The keystone control appears on... the Image-focus control (on remote). - 14 - Press the Mute button to turn off the volume (Only on the projector only) to resize the projected image and screen size B . 2. DDLLPP PPrroojjeeccttoorr -- Press the Volume +/- The volume control appears on the display. 2....
User Guide
Page 21
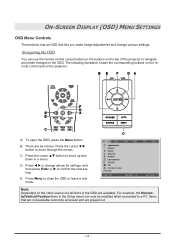
... change values for settings, and then press Enter or X to confirm the new setting. ON-SCREEN DISPLAY (OSD) MENU SETTINGS OSD Menu Controls The projector has an OSD that are not available cannot be modified when connected to close the OSD or leave a submenu. A. Press W X to change various... settings. Press the cursor W X button to move through the menus. Press Menu to a PC. C. Note: Depending on the projector. Items that lets you make changes to the OSD. Press the cursor ST button to move up and down in the OSD are grayed out...
... change values for settings, and then press Enter or X to confirm the new setting. ON-SCREEN DISPLAY (OSD) MENU SETTINGS OSD Menu Controls The projector has an OSD that are not available cannot be modified when connected to close the OSD or leave a submenu. A. Press W X to change various... settings. Press the cursor W X button to move through the menus. Press Menu to a PC. C. Note: Depending on the projector. Items that lets you make changes to the OSD. Press the cursor ST button to move up and down in the OSD are grayed out...
User Guide
Page 22
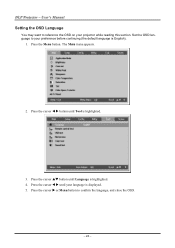
Press the Menu button. Press the cursor X or Menu button to your preference before continuing (the default language is displayed. 5. Set the OSD language to confirm the language, and close the OSD. - 16 - Press the cursor W X button until Tool is highlighted. 4. Press the cursor ST button until your projector while reading this section. The Main menu appears. 2. Press the cursor W X until Language is highlighted. 3. DDLLPP PPrroojjeeccttoorr -- UUsseerr''ss MMaannuuaall Setting the OSD Language You may want to reference the OSD on your language is English). 1.
Press the Menu button. Press the cursor X or Menu button to your preference before continuing (the default language is displayed. 5. Set the OSD language to confirm the language, and close the OSD. - 16 - Press the cursor W X button until Tool is highlighted. 4. Press the cursor ST button until your projector while reading this section. The Main menu appears. 2. Press the cursor W X until Language is highlighted. 3. DDLLPP PPrroojjeeccttoorr -- UUsseerr''ss MMaannuuaall Setting the OSD Language You may want to reference the OSD on your language is English). 1.


