
User Manual
Page 2
... Front/upper side 11 Rear side ...11 Under view ...11 Controls and functions 12 Projector ...12 Remote control 14 Positioning your projector 16 Choosing a location 16 Obtaining a preferred projected image size 17 How to determine the position of the projector for a given screen size ... 18 How to determine the recommended screen size for...
... Front/upper side 11 Rear side ...11 Under view ...11 Controls and functions 12 Projector ...12 Remote control 14 Positioning your projector 16 Choosing a location 16 Obtaining a preferred projected image size 17 How to determine the position of the projector for a given screen size ... 18 How to determine the recommended screen size for...
User Manual
Page 3
...control keys 38 Freezing the image 38 Utilizing FAQ function 39 Operating in a high altitude environment 39 Personalizing the projector menu display 40 Shutting down the projector 40 Menu operation 41 Menu system 41 Using the menus 44 Display menu 45 Picture menu 46 Source menu ... menu 47 System setup: Advanced menu 48 Information menu 50 Maintenance 51 Care of the projector 51 Cleaning the lens 51 Cleaning the projector case 51 Storing the projector 51 Transporting the projector 51 Lamp information 52 Calculation of lamp hour 52 Warning message 52 Replacing the lamp 53...
...control keys 38 Freezing the image 38 Utilizing FAQ function 39 Operating in a high altitude environment 39 Personalizing the projector menu display 40 Shutting down the projector 40 Menu operation 41 Menu system 41 Using the menus 44 Display menu 45 Picture menu 46 Source menu ... menu 47 System setup: Advanced menu 48 Information menu 50 Maintenance 51 Care of the projector 51 Cleaning the lens 51 Cleaning the projector case 51 Storing the projector 51 Transporting the projector 51 Lamp information 52 Calculation of lamp hour 52 Warning message 52 Replacing the lamp 53...

User Manual
Page 4
Specifications 59 Projector specifications 59 Dimensions 60 Timing chart 61 Warranty and Copyright information 62 Regulation statements 63 4 Table of contents
Specifications 59 Projector specifications 59 Dimensions 60 Timing chart 61 Warranty and Copyright information 62 Regulation statements 63 4 Table of contents

User Manual
Page 5
... between 100 to 240 volts AC, but could cause the objects to become heated and deformed or even cause a fire. This projector is 2. Safety Instructions 1. Save it for safety of information technology equipment. The intense light beam may fluctuate or cut out,...voltage may damage your projector. Always open the lens shutter or remove the lens cap when the projector lamp is recommended that you connect your projector through a power stabilizer, surge protector or uninterruptible power supply (UPS). 3. Important safety instructions Your BenQ projector is designed and ...
... between 100 to 240 volts AC, but could cause the objects to become heated and deformed or even cause a fire. This projector is 2. Safety Instructions 1. Save it for safety of information technology equipment. The intense light beam may fluctuate or cut out,...voltage may damage your projector. Always open the lens shutter or remove the lens cap when the projector lamp is recommended that you connect your projector through a power stabilizer, surge protector or uninterruptible power supply (UPS). 3. Important safety instructions Your BenQ projector is designed and ...

User Manual
Page 6
The product may cause death if you ever undo or remove any electronic components unless the projector is the lamp which may fall, sustaining serious damage. 11. Do not operate lamps beyond the rated life could cause them to... removing the lamp assembly for approximately 45 minutes prior to suitably qualified professional service personnel. 9. Safety Instructions (Continued) 7. Allow the projector to cool for replacement. 10. projector. Do not attempt to break on an unstable cart, stand, or table. Under no circumstances should you should come into contact with...
The product may cause death if you ever undo or remove any electronic components unless the projector is the lamp which may fall, sustaining serious damage. 11. Do not operate lamps beyond the rated life could cause them to... removing the lamp assembly for approximately 45 minutes prior to suitably qualified professional service personnel. 9. Safety Instructions (Continued) 7. Allow the projector to cool for replacement. 10. projector. Do not attempt to break on an unstable cart, stand, or table. Under no circumstances should you should come into contact with...
User Manual
Page 7
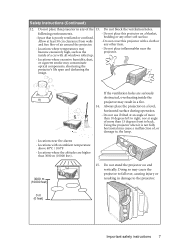
... (Continued) 12. Allow at angle of air around the projector. - Locations where the altitudes are seriously obstructed, overheating inside of , or damage to the projector. 0 m (0 feet) Important safety instructions 7 Do not cover this projector in damage to , the lamp. - Locations where temperatures may...at an angle of more than 10 degrees left to back. Using the projector when it is poorly ventilated or confined. Doing so may contaminate optical components, shortening the projector's life span and darkening the image. Do not place inflammables near fire alarms...
... (Continued) 12. Allow at angle of air around the projector. - Locations where the altitudes are seriously obstructed, overheating inside of , or damage to the projector. 0 m (0 feet) Important safety instructions 7 Do not cover this projector in damage to , the lamp. - Locations where temperatures may...at an angle of more than 10 degrees left to back. Using the projector when it is poorly ventilated or confined. Doing so may contaminate optical components, shortening the projector's life span and darkening the image. Do not place inflammables near fire alarms...
User Manual
Page 8
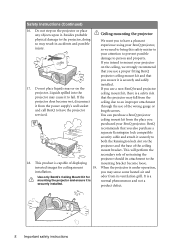
... need to bring this safety matter to your attention to prevent possible damage to the 18. You can purchase a BenQ projector ceiling mount kit from its attachment to person and property. This will perform the secondary role of the wrong gauge or and ... purchase a separate Kensington lock compatible security cable and attach it securely to have a pleasant experience using your BenQ projector. inverted images for mounting the projector and ensure it to the projector, doing so may cause it is securely and safely installed. 17. It is under operation, installation. Safety...
... need to bring this safety matter to your attention to prevent possible damage to the 18. You can purchase a BenQ projector ceiling mount kit from its attachment to person and property. This will perform the secondary role of the wrong gauge or and ... purchase a separate Kensington lock compatible security cable and attach it securely to have a pleasant experience using your BenQ projector. inverted images for mounting the projector and ensure it to the projector, doing so may cause it is securely and safely installed. 17. It is under operation, installation. Safety...
User Manual
Page 9
...on the ambient lighting conditions, selected input source contrast/brightness settings, and is normal and expected behavior. Introduction 9 The projector offers the following features. • Wall color correction allowing projection on surfaces of several predefined colors • Quick auto... and ease of the projected image will decline over time and may vary within the lamp manufacturers specifications. Introduction Projector features The projector integrates high-performance optical engine projection and a user-friendly design to provide high quality video image • Component...
...on the ambient lighting conditions, selected input source contrast/brightness settings, and is normal and expected behavior. Introduction 9 The projector offers the following features. • Wall color correction allowing projection on surfaces of several predefined colors • Quick auto... and ease of the projected image will decline over time and may vary within the lamp manufacturers specifications. Introduction Projector features The projector integrates high-performance optical engine projection and a user-friendly design to provide high quality video image • Component...
User Manual
Page 10
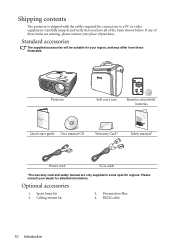
Projector Soft carry case Remote control with the cables required for detailed information. RS232 cable 10 Introduction Carefully unpack and verify that you have all of ... Plus 4. Spare lamp kit 2. Standard accessories The supplied accessories will be suitable for your dealer for connection to a PC or video equipment. Shipping contents The projector is shipped with batteries Quick start guide User manual CD Warranty Card* Safety manual* Power cord VGA cable *The warranty card and safety manual are...
Projector Soft carry case Remote control with the cables required for detailed information. RS232 cable 10 Introduction Carefully unpack and verify that you have all of ... Plus 4. Spare lamp kit 2. Standard accessories The supplied accessories will be suitable for your dealer for connection to a PC or video equipment. Shipping contents The projector is shipped with batteries Quick start guide User manual CD Warranty Card* Safety manual* Power cord VGA cable *The warranty card and safety manual are...
User Manual
Page 12
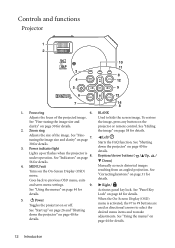
... the menus" on page 38 for Activates panel key lock. Lock" on page 40 for details. See "Start up or flashes when the projector is activated, the #7 to #9 buttons are used as directional arrows to select the desired menu items and to make adjustments. See "Using the...off. Keystone/Arrow buttons ( / Up, / 56 for details. See "Correcting keystone" on page 44 for details. 5. Down) 4. II Power Toggles the projector on page 7. Focus ring 6. BLANK Adjusts the focus of the image. Adjusts the size of the projected image. and saves menu settings. 9. When the On...
... the menus" on page 38 for Activates panel key lock. Lock" on page 40 for details. See "Start up or flashes when the projector is activated, the #7 to #9 buttons are used as directional arrows to select the desired menu items and to make adjustments. See "Using the...off. Keystone/Arrow buttons ( / Up, / 56 for details. See "Correcting keystone" on page 44 for details. 5. Down) 4. II Power Toggles the projector on page 7. Focus ring 6. BLANK Adjusts the focus of the image. Adjusts the size of the projected image. and saves menu settings. 9. When the On...
User Manual
Page 13
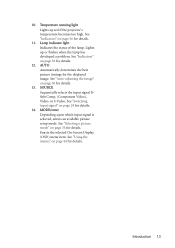
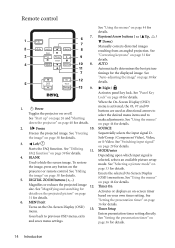
Lights up red if the projector's temperature becomes too high. See "Switching input signal" on page 56 for details. 14. Introduction 13 See "Indicators" on page 29 for details. 11. AUTO ...
Lights up red if the projector's temperature becomes too high. See "Switching input signal" on page 56 for details. 14. Introduction 13 See "Indicators" on page 29 for details. 11. AUTO ...
User Manual
Page 14
...signal" on page 44 for details. See "Using the menus" on or off. II Power Toggles the projector on page 44 for details. 5. See "Start up" on page 26 and "Shutting down the projector" on page 38 for details. See "Utilizing 11. See "Hiding the image" on page 40 for ...31 for details. Freeze 10. To restore the image, press any button on page 30 for details. 6. See "Auto-adjusting the image" on the projector or remote control. See "Setting the presentation timer" on page 33 for details. When the On-Screen Display (OSD) menu is selected, selects an available...
...signal" on page 44 for details. See "Using the menus" on or off. II Power Toggles the projector on page 44 for details. 5. See "Start up" on page 26 and "Shutting down the projector" on page 38 for details. See "Utilizing 11. See "Hiding the image" on page 40 for ...31 for details. Freeze 10. To restore the image, press any button on page 30 for details. 6. See "Auto-adjusting the image" on the projector or remote control. See "Setting the presentation timer" on page 33 for details. When the On-Screen Display (OSD) menu is selected, selects an available...
User Manual
Page 15
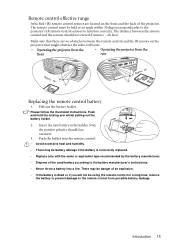
... may be battery damage if the battery is dead or if you will not be held at an angle within 30 degrees perpendicular to the projector's IR remote control sensors to the remote control from the front rear Approx. 15° Approx. 15° Replacing the remote control battery 1..... Make sure that might obstruct the infra-red beam. • Operating the projector from the • Operating the projector from possible battery leakage. The distance between the remote control and the IR sensors on the projector that there are located on the front and the back of the used battery ...
... may be battery damage if the battery is dead or if you will not be held at an angle within 30 degrees perpendicular to the projector's IR remote control sensors to the remote control from the front rear Approx. 15° Approx. 15° Replacing the remote control battery 1..... Make sure that might obstruct the infra-red beam. • Operating the projector from the • Operating the projector from possible battery leakage. The distance between the remote control and the IR sensors on the projector that there are located on the front and the back of the used battery ...
User Manual
Page 16
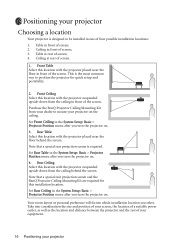
... near the floor in front of screen; 2. Purchase the BenQ Projector Ceiling Mounting Kit from your projector on . 3. Note that a special rear projection screen and the BenQ Projector Ceiling Mounting Kit are required for quick setup and portability. 2. Take into consideration the size and position of your screen, the location of a suitable power ...
... near the floor in front of screen; 2. Purchase the BenQ Projector Ceiling Mounting Kit from your projector on . 3. Note that a special rear projection screen and the BenQ Projector Ceiling Mounting Kit are required for quick setup and portability. 2. Take into consideration the size and position of your screen, the location of a suitable power ...
User Manual
Page 17
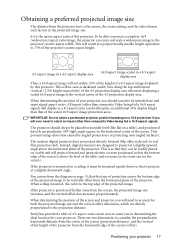
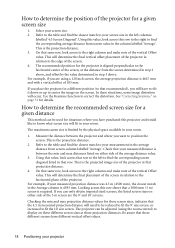
...require an additional 33% display height than composite Video being fed a 16:9 aspect signal). When determining the position of the screen and projector, you will need to select an input (other than composite Video being fed a 16:9 aspect signal) will display in a 4:3 ... positioned directly perpendicular (90° right-angle square) to project at a slightly downward angle. BenQ has provided a table of this projector. To be mounted upside-down so that of the projector. When determining the position of a 4:3 aspect image displayed by angled projections (or projecting onto...
...require an additional 33% display height than composite Video being fed a 16:9 aspect signal). When determining the position of the screen and projector, you will need to select an input (other than composite Video being fed a 16:9 aspect signal) will display in a 4:3 ... positioned directly perpendicular (90° right-angle square) to project at a slightly downward angle. BenQ has provided a table of this projector. To be mounted upside-down so that of the projector. When determining the position of a 4:3 aspect image displayed by angled projections (or projecting onto...
User Manual
Page 18
... by the physical space available in your screen size in the column labelled 'Average'. Looking across that same row, look across this projector and would like to find the corresponding average distance from screen column labelled 'Average'. Select your measured projection distance was 4.5 m (...4500 mm), the closest match in your projector On that row to the left columns labelled '4:3 Screen Diagonal'. In these screen sizes, indicates that your measurement in the average ...
... by the physical space available in your screen size in the column labelled 'Average'. Looking across that same row, look across this projector and would like to find the corresponding average distance from screen column labelled 'Average'. Select your measured projection distance was 4.5 m (...4500 mm), the closest match in your projector On that row to the left columns labelled '4:3 Screen Diagonal'. In these screen sizes, indicates that your measurement in the average ...
User Manual
Page 19
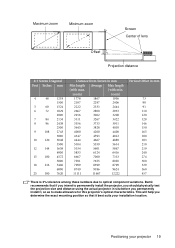
... should physically test the projection size and distance using the actual projector in situ before you permanently install it best suits your projector 19 BenQ recommends that it , so as to make allowance for this projector's optical characteristics. Maximum zoom Minimum zoom Screen Center of lens Offset Projection distance 4:3 Screen Diagonal Feet Inches mm...
... should physically test the projection size and distance using the actual projector in situ before you permanently install it best suits your projector 19 BenQ recommends that it , so as to make allowance for this projector's optical characteristics. Maximum zoom Minimum zoom Screen Center of lens Offset Projection distance 4:3 Screen Diagonal Feet Inches mm...
User Manual
Page 20
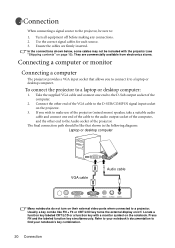
... contents" on the notebook. Ensure the cables are commercially available from electronics stores. Connecting a computer or monitor Connecting a computer The projector provides a VGA input socket that shown in the following diagram: Laptop or desktop computer VGA cable Audio cable Many notebooks do not ...final connection path should be like FN + F3 or CRT/LCD key turns the external display on the projector. 3. Usually a key combo like that allows you wish to make use of the projector (mixed mono) speaker, take a suitable audio cable and connect one end to the Audio socket of ...
... contents" on the notebook. Ensure the cables are commercially available from electronics stores. Connecting a computer or monitor Connecting a computer The projector provides a VGA input socket that shown in the following diagram: Laptop or desktop computer VGA cable Audio cable Many notebooks do not ...final connection path should be like FN + F3 or CRT/LCD key turns the external display on the projector. 3. Usually a key combo like that allows you wish to make use of the projector (mixed mono) speaker, take a suitable audio cable and connect one end to the Audio socket of ...
User Manual
Page 21
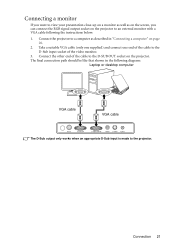
... to the D-Sub input socket of the cable to a computer as on the screen, you can connect the RGB signal output socket on the projector to an external monitor with a VGA cable following diagram: Laptop or desktop computer VGA cable VGA cable The D-Sub output only works when an ...appropriate D-Sub input is made to the projector. Connection 21 Connecting a monitor If you want to view your presentation close-up on a monitor as well as described in the following the instructions...
... to the D-Sub input socket of the cable to a computer as on the screen, you can connect the RGB signal output socket on the projector to an external monitor with a VGA cable following diagram: Laptop or desktop computer VGA cable VGA cable The D-Sub output only works when an ...appropriate D-Sub input is made to the projector. Connection 21 Connecting a monitor If you want to view your presentation close-up on a monitor as well as described in the following the instructions...
User Manual
Page 22
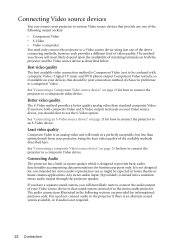
...theatre or home cinema applications. Any stereo audio input (if provided), is designed to a component video device. You need only connect the projector to a Video source device using just one of the following sections are provided for stereo audio reproduction use the S-Video option. Least .... 22 Connection It is not designed for, nor intended for informational purposes only. See "Connecting a Component Video source device" on your projector, being the least video quality of to that provide any one of the above connecting methods, however each provides a different level of choice...
...theatre or home cinema applications. Any stereo audio input (if provided), is designed to a component video device. You need only connect the projector to a Video source device using just one of the following sections are provided for stereo audio reproduction use the S-Video option. Least .... 22 Connection It is not designed for, nor intended for informational purposes only. See "Connecting a Component Video source device" on your projector, being the least video quality of to that provide any one of the above connecting methods, however each provides a different level of choice...


