

User Manual
Page 1
MP515 ST/MP525 ST Digital Projector User Manual Welcome
MP515 ST/MP525 ST Digital Projector User Manual Welcome
User Manual
Page 9
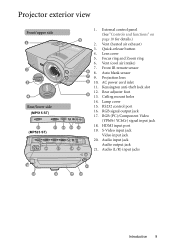
Projector exterior view Front/upper side 1 2 PUSH 3 4 Rear/lower side (MP515 ST) 15 (MP525 ST) 17 18 15 16 17 5 6 7 8 9 19 21 19 20 11 1. Rear adjuster foot 13. HDMI input port 19. Audio (L/R) input jacks 10 13 12 3 14 ...
Projector exterior view Front/upper side 1 2 PUSH 3 4 Rear/lower side (MP515 ST) 15 (MP525 ST) 17 18 15 16 17 5 6 7 8 9 19 21 19 20 11 1. Rear adjuster foot 13. HDMI input port 19. Audio (L/R) input jacks 10 13 12 3 14 ...
User Manual
Page 18
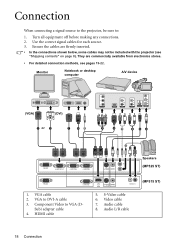
Component Video to DVI-A cable 3. Connection When connecting a signal source to the projector, be included with the projector (see pages 19-22. They are firmly inserted. • In the connections shown below, some... cables may not be sure to: 1. S-Video cable 6. VGA to VGA (D- Video cable 7. Monitor Notebook or desktop computer A/V device (VGA) (DVI) 1 or 2 1 47 3 4 7 8 56 7 1. VGA cable 2. Sub) adapter cable 4. Audio L/R cable Speakers (MP525 ST) (MP515 ST...
Component Video to DVI-A cable 3. Connection When connecting a signal source to the projector, be included with the projector (see pages 19-22. They are firmly inserted. • In the connections shown below, some... cables may not be sure to: 1. S-Video cable 6. VGA to VGA (D- Video cable 7. Monitor Notebook or desktop computer A/V device (VGA) (DVI) 1 or 2 1 47 3 4 7 8 56 7 1. VGA cable 2. Sub) adapter cable 4. Audio L/R cable Speakers (MP525 ST) (MP515 ST...
User Manual
Page 19
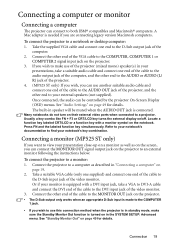
... a DVI input jack, take a suitable audio cable and connect one end of the cable to a monitor: 1. Connecting a monitor (MP525 ST only) If you can use of the projector (mixed mono) speaker(s) in your notebook's key combination. See "Audio Settings" on their external video ports when connected to both IBM&#...another suitable audio cable and connect one end of the cable to the audio output jack of the computer, and the other end of the projector. 4. (MP525 ST only) If you wish, you want to the DVI input jack of the video monitor. 3. Take a suitable VGA cable (only one supplied...
... a DVI input jack, take a suitable audio cable and connect one end of the cable to a monitor: 1. Connecting a monitor (MP525 ST only) If you can use of the projector (mixed mono) speaker(s) in your notebook's key combination. See "Audio Settings" on their external video ports when connected to both IBM&#...another suitable audio cable and connect one end of the cable to the audio output jack of the computer, and the other end of the projector. 4. (MP525 ST only) If you wish, you want to the DVI input jack of the video monitor. 3. Take a suitable VGA cable (only one supplied...
User Manual
Page 20
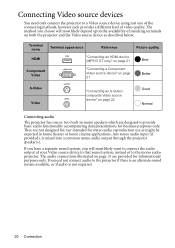
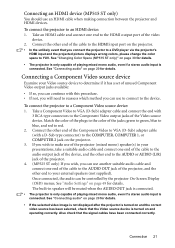
...presentations for informational purposes only. Any stereo audio input (if provided), is not required. 20 Connection You need only connect the projector to a Video source device using just one of the connecting methods, however each provides a different level of matching terminals on...intended for stereo audio reproduction use as described below: Terminal name Terminal appearance Reference Picture quality HDMI "Connecting an HDMI device (MP515 ST only)" on page 21 Best Component Video "Connecting a Component Video source device" on page 21 Better S-Video Video "Connecting an...
...presentations for informational purposes only. Any stereo audio input (if provided), is not required. 20 Connection You need only connect the projector to a Video source device using just one of the connecting methods, however each provides a different level of matching terminals on...intended for stereo audio reproduction use as described below: Terminal name Terminal appearance Reference Picture quality HDMI "Connecting an HDMI device (MP515 ST only)" on page 21 Best Component Video "Connecting a Component Video source device" on page 21 Better S-Video Video "Connecting an...
User Manual
Page 21
... and connect one end to the HDMI output port of the Video source device. See "Changing Color Space (MP515 ST only)" on and operating correctly. If you wish to make use of the projector (mixed mono) speaker(s) in speaker will need to reassess which method you can use an HDMI cable when... connect one end of the cable to the audio output jack of the device, and the other end of the projector. 4. (MP525 ST only) If you wish, you will be controlled by the projector On-Screen Display (OSD) menus. Match the color of the plugs to the color of unused Component Video output jacks...
... and connect one end to the HDMI output port of the Video source device. See "Changing Color Space (MP515 ST only)" on and operating correctly. If you wish to make use of the projector (mixed mono) speaker(s) in speaker will need to reassess which method you can use an HDMI cable when... connect one end of the cable to the audio output jack of the device, and the other end of the projector. 4. (MP525 ST only) If you wish, you will be controlled by the projector On-Screen Display (OSD) menus. Match the color of the plugs to the color of unused Component Video output jacks...
User Manual
Page 22
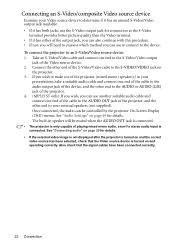
...audio" on page 20 for details. • If the selected video image is not displayed after the projector is turned on page 49 for details. Connecting an S-Video/composite Video source device Examine your Video ...S-Video terminal provides better picture quality than the Video terminal. • If it has either of the projector, and the other end to your presentations, take a suitable audio cable and connect one end of the... end to the AUDIO or AUDIO (L/R) jack of the projector. 4. (MP525 ST only) If you wish, you will be controlled by the projector On-Screen Display (OSD) menus.
...audio" on page 20 for details. • If the selected video image is not displayed after the projector is turned on page 49 for details. Connecting an S-Video/composite Video source device Examine your Video ...S-Video terminal provides better picture quality than the Video terminal. • If it has either of the projector, and the other end to your presentations, take a suitable audio cable and connect one end of the... end to the AUDIO or AUDIO (L/R) jack of the projector. 4. (MP525 ST only) If you wish, you will be controlled by the projector On-Screen Display (OSD) menus.
User Manual
Page 30
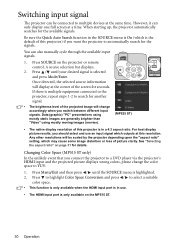
... are generally brighter than "Video" using mostly moving images (movies). (MP525 ST) • The native display resolution of this projector is in the SOURCE menu is On (which is only available on the MP515 ST. 30 Operation Press to highlight Color Space Conversion and press / to ...your desired signal is multiple equipment connected to the projector, repeat steps 1-2 to automatically search for the signals. Changing Color Space (MP515 ST only) In the unlikely event that you connect the projector to a DVD player via the projector's HDMI input and the projected picture displays wrong ...
... are generally brighter than "Video" using mostly moving images (movies). (MP525 ST) • The native display resolution of this projector is in the SOURCE menu is On (which is only available on the MP515 ST. 30 Operation Press to highlight Color Space Conversion and press / to ...your desired signal is multiple equipment connected to the projector, repeat steps 1-2 to automatically search for the signals. Changing Color Space (MP515 ST only) In the unlikely event that you connect the projector to a DVD player via the projector's HDMI input and the projected picture displays wrong ...
User Manual
Page 43
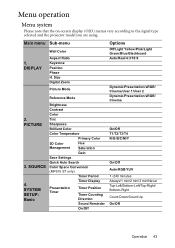
... Contrast Color Tint Sharpness Brilliant Color Color Temperature Primary Color 3D Color Management Hue Saturation Gain Save Settings Quick Auto Search Color Space Conversion (MP515 ST only) Timer Period Timer Display Presentation Timer Timer Position Timer Counting Direction Sound Reminder On/Off Options Off/Light Yellow/Pink/Light Green/Blue/Blackboard.../Off Operation 43 Menu operation Menu system Please note that the on-screen display (OSD) menus vary according to the signal type selected and the projector model you are using.
... Contrast Color Tint Sharpness Brilliant Color Color Temperature Primary Color 3D Color Management Hue Saturation Gain Save Settings Quick Auto Search Color Space Conversion (MP515 ST only) Timer Period Timer Display Presentation Timer Timer Position Timer Counting Direction Sound Reminder On/Off Options Off/Light Yellow/Pink/Light Green/Blue/Blackboard.../Off Operation 43 Menu operation Menu system Please note that the on-screen display (OSD) menus vary according to the signal type selected and the projector model you are using.
User Manual
Page 44
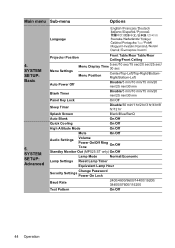
SYSTEM SETUP: Advanced Projector Position Front Table/Rear Table/Rear Ceiling/Front Ceiling Menu Settings Menu Display Time 5 ...On/Off Sleep Timer Disable/30 min/1 hr/2 hr/3 hr/4 hr/8 hr/12 hr Splash Screen Black/Blue/BenQ Auto Blank On/Off Quick Cooling On/Off High Altitude Mode On/Off Mute On/Off Audio Settings Volume Power On.../Off Ring Tone On/Off Standby Monitor Out (MP525 ST only) On/Off Lamp Mode Normal/Economic Lamp Settings Reset Lamp Timer Equivalent Lamp Hour Change Password Security Settings ...
SYSTEM SETUP: Advanced Projector Position Front Table/Rear Table/Rear Ceiling/Front Ceiling Menu Settings Menu Display Time 5 ...On/Off Sleep Timer Disable/30 min/1 hr/2 hr/3 hr/4 hr/8 hr/12 hr Splash Screen Black/Blue/BenQ Auto Blank On/Off Quick Cooling On/Off High Altitude Mode On/Off Mute On/Off Audio Settings Volume Power On.../Off Ring Tone On/Off Standby Monitor Out (MP525 ST only) On/Off Lamp Mode Normal/Economic Lamp Settings Reset Lamp Timer Equivalent Lamp Hour Change Password Security Settings ...
User Manual
Page 49
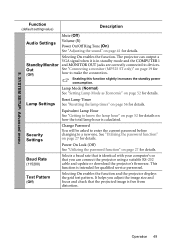
... the projector's firmware. Reset Lamp Timer Lamp Settings See "Resetting the lamp timer" on page 56 for details. See "Utilizing the password function" on page 19 for details. It helps you can output a VGA signal when it is free from distortion. 5. Out See "Connecting a monitor (MP525 ST only)"... how to devices. Equivalent Lamp Hour See "Getting to a new one. Test Pattern (Off) Selecting On enables the function and the projector displays the grid test pattern. Security Settings Change Password You will be asked to enter the current password before changing to know the lamp hour...
... the projector's firmware. Reset Lamp Timer Lamp Settings See "Resetting the lamp timer" on page 56 for details. See "Utilizing the password function" on page 19 for details. It helps you can output a VGA signal when it is free from distortion. 5. Out See "Connecting a monitor (MP525 ST only)"... how to devices. Equivalent Lamp Hour See "Getting to a new one. Test Pattern (Off) Selecting On enables the function and the projector displays the grid test pattern. Security Settings Change Password You will be asked to enter the current password before changing to know the lamp hour...


