
User Manual
Page 1
MP512/MP513/MP522 Digital Projector User Manual Welcome
MP512/MP513/MP522 Digital Projector User Manual Welcome

User Manual
Page 2
... image size 14 Connection 18 Connecting a computer or monitor... 18 Connecting Video source devices....... 20 Operation 24 Starting up the projector 24 Using the menus 25 Utilizing the password function ......... 26 Switching input signal 28 Adjusting the projected image 28 Magnifying and ... in a high altitude environment 38 Personalizing the projector menu display 39 Shutting down the projector 39 Menu operation 40 Maintenance 47 Care of the projector 47 Lamp information 48 Troubleshooting 54 Specifications 55 Projector specifications 55 Dimensions 56 Timing chart 56 Warranty...
... image size 14 Connection 18 Connecting a computer or monitor... 18 Connecting Video source devices....... 20 Operation 24 Starting up the projector 24 Using the menus 25 Utilizing the password function ......... 26 Switching input signal 28 Adjusting the projected image 28 Magnifying and ... in a high altitude environment 38 Personalizing the projector menu display 39 Shutting down the projector 39 Menu operation 40 Maintenance 47 Care of the projector 47 Lamp information 48 Troubleshooting 54 Specifications 55 Projector specifications 55 Dimensions 56 Timing chart 56 Warranty...
User Manual
Page 3
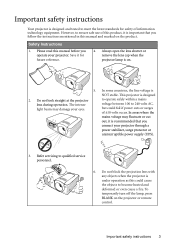
... on. 5. Refer servicing to meet the latest standards for future reference. 4. Important safety instructions 3 Save it is recommended that you connect your projector through a power stabilizer, surge protector or uninterruptible power supply (UPS). 3. Do not block the projection lens with any objects when the... could fail if power cuts or surges of ±10 volts occur. Always open the lens shutter or remove the lens cap when the projector lamp is NOT stable. to operate safely within a mains voltage between 100 to 240 volts AC, but could cause the objects to ensure...
... on. 5. Refer servicing to meet the latest standards for future reference. 4. Important safety instructions 3 Save it is recommended that you connect your projector through a power stabilizer, surge protector or uninterruptible power supply (UPS). 3. Do not block the projection lens with any objects when the... could fail if power cuts or surges of ±10 volts occur. Always open the lens shutter or remove the lens cap when the projector lamp is NOT stable. to operate safely within a mains voltage between 100 to 240 volts AC, but could cause the objects to ensure...
User Manual
Page 4
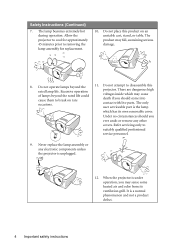
...live parts. The only user serviceable part is under operation, you ever undo or remove any electronic components unless the projector is a normal phenomenon and not a product defect. 4 Important safety instructions Refer servicing only to removing the lamp assembly for ...replacement. 10. When the projector is the lamp which may fall, sustaining serious damage. 8. Allow the projector to cool for approximately 45 minutes prior to suitably qualified professional service personnel. 9. The lamp...
...live parts. The only user serviceable part is under operation, you ever undo or remove any electronic components unless the projector is a normal phenomenon and not a product defect. 4 Important safety instructions Refer servicing only to removing the lamp assembly for ...replacement. 10. When the projector is the lamp which may fall, sustaining serious damage. 8. Allow the projector to cool for approximately 45 minutes prior to suitably qualified professional service personnel. 9. The lamp...
User Manual
Page 5
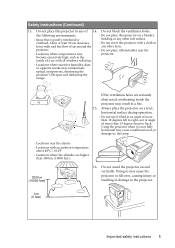
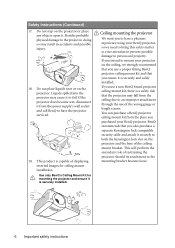
... the ventilation holes. Space that is not fully horizontal may cause a malfunction of, or damage to the projector. 0 m (0 feet) Important safety instructions 5 Do not place this projector on a level, horizontal surface during operation. - Do not place inflammables near fire alarms - Do not ...use if tilted at an angle of 14. Locations with all windows rolled up. - Always place the projector on a blanket, bedding or any other item. - Using the projector when it is poorly ventilated or confined. Safety Instructions (Continued) 13. Locations where excessive humidity, dust,...
... the ventilation holes. Space that is not fully horizontal may cause a malfunction of, or damage to the projector. 0 m (0 feet) Important safety instructions 5 Do not place this projector on a level, horizontal surface during operation. - Do not place inflammables near fire alarms - Do not ...use if tilted at an angle of 14. Locations with all windows rolled up. - Always place the projector on a blanket, bedding or any other item. - Using the projector when it is poorly ventilated or confined. Safety Instructions (Continued) 13. Locations where excessive humidity, dust,...
User Manual
Page 6
...Important safety instructions If you to have a pleasant experience using your projector on the projector and the base of restraining the projector should its attachment to an improper attachment through the use a non-BenQ brand projector ceiling mount kit, there is capable of the wrong gauge or ...ceiling mount bracket. Besides probable physical damage to the projector, doing so may cause it to mount your BenQ projector, so we strongly recommend that you use a proper fitting BenQ projector ceiling mount kit and that the projector may fall from the place you use of displaying...
...Important safety instructions If you to have a pleasant experience using your projector on the projector and the base of restraining the projector should its attachment to an improper attachment through the use a non-BenQ brand projector ceiling mount kit, there is capable of the wrong gauge or ...ceiling mount bracket. Besides probable physical damage to the projector, doing so may cause it to mount your BenQ projector, so we strongly recommend that you use a proper fitting BenQ projector ceiling mount kit and that the projector may fall from the place you use of displaying...
User Manual
Page 7
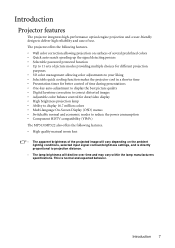
...projection on the ambient lighting conditions, selected input signal contrast/brightness settings, and is normal and expected behavior. Introduction Projector features The projector integrates high-performance optical engine projection and a user-friendly design to deliver high reliability and ease of the projected...different projection purposes • 3D color management allowing color adjustments to your liking • Selectable quick cooling function makes the projector cool in a shorter time • Presentation timer for better control of time during presentations • One-key auto-...
...projection on the ambient lighting conditions, selected input signal contrast/brightness settings, and is normal and expected behavior. Introduction Projector features The projector integrates high-performance optical engine projection and a user-friendly design to deliver high reliability and ease of the projected...different projection purposes • 3D color management allowing color adjustments to your liking • Selectable quick cooling function makes the projector cool in a shorter time • Presentation timer for better control of time during presentations • One-key auto-...
User Manual
Page 8
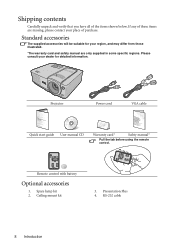
... cable 8 Introduction Standard accessories The supplied accessories will be suitable for your dealer for detailed information. Remote control with battery Optional accessories 1. Spare lamp kit 2. Projector Power cord VGA cable Quick start guide User manual CD Warranty card* Safety manual* Pull the tab before using the remote control. Please consult your...
... cable 8 Introduction Standard accessories The supplied accessories will be suitable for your dealer for detailed information. Remote control with battery Optional accessories 1. Spare lamp kit 2. Projector Power cord VGA cable Quick start guide User manual CD Warranty card* Safety manual* Pull the tab before using the remote control. Please consult your...

User Manual
Page 9
Projector exterior view Front/upper side 1 2 3 4 Rear/lower side 8 9 10 11 12 13 1. Lamp cover 17. Focus ring and Zoom ring (Zoom ring is not available with the MP512.) 6. RGB signal output socket 11. Rear adjuster foot 15 16 17 ...Introduction 9 Vent (heated air exhaust) 3. Front IR remote sensor 5 7. RGB (PC)/Component video 14 (YPbPr/ YCbCr) signal input socket 12. RS-232 control port 10. Kensington anti-theft lock slot 15. External control panel (See "Projector...
Projector exterior view Front/upper side 1 2 3 4 Rear/lower side 8 9 10 11 12 13 1. Lamp cover 17. Focus ring and Zoom ring (Zoom ring is not available with the MP512.) 6. RGB signal output socket 11. Rear adjuster foot 15 16 17 ...Introduction 9 Vent (heated air exhaust) 3. Front IR remote sensor 5 7. RGB (PC)/Component video 14 (YPbPr/ YCbCr) signal input socket 12. RS-232 control port 10. Kensington anti-theft lock slot 15. External control panel (See "Projector...
User Manual
Page 10
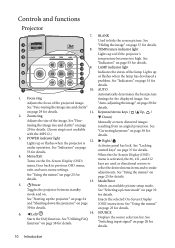
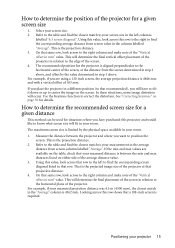
...See "Using the menus" on page 53 for details. See "Indicators" on page 25 for details. (Zoom ring is not available with the MP512.) 3. See "Fine-tuning the image size and clarity" on page 29 for details. tuning the image size and clarity" on page 29 ... the On-Screen Display (OSD) menu is under operation. See "Switching input signal" on page 38 for details. 6. Starts the FAQ function. Controls and functions Projector 7. 1 2 8 8. 3 9 4 10 11 9. 5 12 13 6 14 7 10. 11 1. See "Hiding the image" on page 39 for details. Keystone/Arrow keys ( / Up, /...
...See "Using the menus" on page 53 for details. See "Indicators" on page 25 for details. (Zoom ring is not available with the MP512.) 3. See "Fine-tuning the image size and clarity" on page 29 for details. tuning the image size and clarity" on page 29 ... the On-Screen Display (OSD) menu is under operation. See "Switching input signal" on page 38 for details. 6. Starts the FAQ function. Controls and functions Projector 7. 1 2 8 8. 3 9 4 10 11 9. 5 12 13 6 14 7 10. 11 1. See "Hiding the image" on page 39 for details. Keystone/Arrow keys ( / Up, /...
User Manual
Page 11
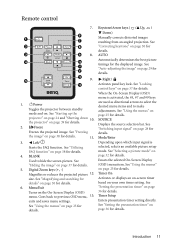
the projector" on page 39 for details. Goes back to make adjustments. See "Locking control keys" on page 30 for details....mode. See "Selecting a picture mode" on page 25 for details. Timer Setup Enters presentation timer setting directly. II Power Toggles the projector between standby mode and on page 24 and "Shutting down 10. SOURCE Displays the source selection bar. BLANK Used to hide the screen ..., 13. Introduction 11 Left/ Starts the FAQ function. Remote control 7. 6 1 7 2 8 3 9 8. 4 10 11 7 12 5 9. 13 1. See "Starting up the projector" on .
the projector" on page 39 for details. Goes back to make adjustments. See "Locking control keys" on page 30 for details....mode. See "Selecting a picture mode" on page 25 for details. Timer Setup Enters presentation timer setting directly. II Power Toggles the projector between standby mode and on page 24 and "Shutting down 10. SOURCE Displays the source selection bar. BLANK Used to hide the screen ..., 13. Introduction 11 Left/ Starts the FAQ function. Remote control 7. 6 1 7 2 8 3 9 8. 4 10 11 7 12 5 9. 13 1. See "Starting up the projector" on .

User Manual
Page 12
... an explosion. • If the battery is dead or if you will not be battery damage if the battery is located on the projector that there are no obstacles between the remote control and the sensor should face outward. 3. Push the holder into a fire. Please follow... control sensor is incorrectly replaced. • Replace only with the same or equivalent type recommended by the battery manufacturer. • Dispose of the projector. Make sure that might obstruct the infra-red beam. Pull out the battery holder. Approx. 15° Replacing the remote control battery 1. The...
... an explosion. • If the battery is dead or if you will not be battery damage if the battery is located on the projector that there are no obstacles between the remote control and the sensor should face outward. 3. Push the holder into a fire. Please follow... control sensor is incorrectly replaced. • Replace only with the same or equivalent type recommended by the battery manufacturer. • Dispose of the projector. Make sure that might obstruct the infra-red beam. Pull out the battery holder. Approx. 15° Replacing the remote control battery 1. The...

User Manual
Page 13
... . 4. Positioning your equipment. This is the most common way to position the projector for this installation location. Your projector is required. Purchase the BenQ Projector Ceiling Mounting Kit from the ceiling in the SYSTEM SETUP: Basic > Projector Position menu after you turn the projector on . 3. Take into consideration the size and position of your screen, the...
... . 4. Positioning your equipment. This is the most common way to position the projector for this installation location. Your projector is required. Purchase the BenQ Projector Ceiling Mounting Kit from the ceiling in the SYSTEM SETUP: Basic > Projector Position menu after you turn the projector on . 3. Take into consideration the size and position of your screen, the...

User Manual
Page 14
...projection distance. If the projector is mounted on the projector you in determining the ideal location for both the projected image size and the vertical offset dimension, which are designed to project at a slightly downward angle. You can see the screen). BenQ has provided a table ...of a 4:3 aspect image displayed by angled projections (or projecting onto angled surfaces). If the projector is so that this projector. Refer to "MP513/MP522 projection dimensions" on page 16 or "MP512 projection dimensions" on page 17 depending on a ceiling, it must be mounted upside-down so...
...projection distance. If the projector is mounted on the projector you in determining the ideal location for both the projected image size and the vertical offset dimension, which are designed to project at a slightly downward angle. You can see the screen). BenQ has provided a table ...of a 4:3 aspect image displayed by angled projections (or projecting onto angled surfaces). If the projector is so that this projector. Refer to "MP513/MP522 projection dimensions" on page 16 or "MP512 projection dimensions" on page 17 depending on a ceiling, it must be mounted upside-down so...
User Manual
Page 15
...the image on page 30 for a given screen size 1. See "Correcting keystone" on the screen. How to determine the position of the projector for details. On that recommended), you want to position the screen. Refer to the table and find the corresponding screen diagonal listed in ...relation to the horizontal plane of the projector. Use the Keystone function to your room. Positioning your screen size. 2. On that your measured projection distance was 4.5 m (4500 mm), the...
...the image on page 30 for a given screen size 1. See "Correcting keystone" on the screen. How to determine the position of the projector for details. On that recommended), you want to position the screen. Refer to the table and find the corresponding screen diagonal listed in ...relation to the horizontal plane of the projector. Use the Keystone function to your room. Positioning your screen size. 2. On that your measured projection distance was 4.5 m (4500 mm), the...

User Manual
Page 16
BenQ recommends that it , so as to make allowance for the center of lens dimensions of lens Vertical offset Projection distance 4:3 screen diagonal Feet Inches mm 4 ... due to optical component variations. This will help you determine the exact mounting position so that if you intend to permanently install the projector, you should physically test the projection size and distance using the actual projector in situ before calculating the appropriate position. Maximum zoom Minimum zoom Screen Center of this...
BenQ recommends that it , so as to make allowance for the center of lens dimensions of lens Vertical offset Projection distance 4:3 screen diagonal Feet Inches mm 4 ... due to optical component variations. This will help you determine the exact mounting position so that if you intend to permanently install the projector, you should physically test the projection size and distance using the actual projector in situ before calculating the appropriate position. Maximum zoom Minimum zoom Screen Center of this...

User Manual
Page 17
... location. This will help you determine the exact mounting position so that if you intend to permanently install the projector, you permanently install it best suits your projector 17 MP512 projection dimensions Refer to "Dimensions" on page 56 for this projector before you should physically test the projection size and distance using the actual...219 240 274 300 329 360 457 There is 3% tolerance among these numbers due to make allowance for the center of lens dimensions of this projector's optical characteristics. BenQ recommends that it , so as to optical component variations.
... location. This will help you determine the exact mounting position so that if you intend to permanently install the projector, you permanently install it best suits your projector 17 MP512 projection dimensions Refer to "Dimensions" on page 56 for this projector before you should physically test the projection size and distance using the actual...219 240 274 300 329 360 457 There is 3% tolerance among these numbers due to make allowance for the center of lens dimensions of this projector's optical characteristics. BenQ recommends that it , so as to optical component variations.
User Manual
Page 18
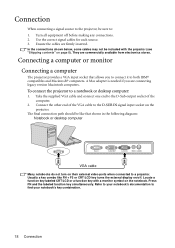
.... Press FN and the labeled function key simultaneously. Connection When connecting a signal source to the projector, be sure to the D-Sub output socket of the VGA cable to a projector. They are firmly inserted. Use the correct signal cables for each source. 3. To connect the... and Macintosh® computers. Ensure the cables are commercially available from electronics stores. Connecting a computer or monitor Connecting a computer The projector provides a VGA input socket that shown in the following diagram: Notebook or desktop computer VGA cable Many notebooks do not turn on ...
.... Press FN and the labeled function key simultaneously. Connection When connecting a signal source to the projector, be sure to the D-Sub output socket of the VGA cable to a projector. They are firmly inserted. Use the correct signal cables for each source. 3. To connect the... and Macintosh® computers. Ensure the cables are commercially available from electronics stores. Connecting a computer or monitor Connecting a computer The projector provides a VGA input socket that shown in the following diagram: Notebook or desktop computer VGA cable Many notebooks do not turn on ...
User Manual
Page 19
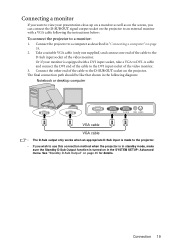
... page 18. 2. The final connection path should be like that shown in the following the instructions below: To connect the projector to a monitor: 1. See "Standby D-Sub Output" on the projector. Connection 19 Connect the other end of the cable to the D-SUB OUT socket on page 45 for details. Connecting a...cable VGA cable • The D-Sub output only works when an appropriate D-Sub input is made to the projector. • If you can connect the D-SUB OUT signal output socket on the projector to an external monitor with a DVI input socket, take a VGA to DVI-A cable and connect the DVI...
... page 18. 2. The final connection path should be like that shown in the following the instructions below: To connect the projector to a monitor: 1. See "Standby D-Sub Output" on the projector. Connection 19 Connect the other end of the cable to the D-SUB OUT socket on page 45 for details. Connecting a...cable VGA cable • The D-Sub output only works when an appropriate D-Sub input is made to the projector. • If you can connect the D-SUB OUT signal output socket on the projector to an external monitor with a DVI input socket, take a VGA to DVI-A cable and connect the DVI...

User Manual
Page 20
... any one of the following output sockets: • Component Video • S-Video • Video (composite) You need only connect the projector to a Video source device using just one of the above connecting methods, however each provides a different level of matching terminals on both composite...The S-Video method provides a better quality analog video than optimal result from your projector, being the least video quality of choice in preference to (composite) Video. If you have both the projector and the Video source device as described below: Best video quality The best available...
... any one of the following output sockets: • Component Video • S-Video • Video (composite) You need only connect the projector to a Video source device using just one of the above connecting methods, however each provides a different level of matching terminals on both composite...The S-Video method provides a better quality analog video than optimal result from your projector, being the least video quality of choice in preference to (composite) Video. If you have both the projector and the Video source device as described below: Best video quality The best available...
