

User Manual
Page 5
.... 4. Please read this manual before you follow the instructions mentioned in this product, it for safety of information technology equipment. Refer servicing to ensure safe use of ±10 volts occur. Important safety instructions Your BenQ projector is recommended that you operate your projector. Safety Instructions 1. To ...personnel. 6. In some countries, the line voltage is under operation as this could fail if power cuts or surges of this manual and marked on the projector or remote control. Do not block the projection lens with any objects when the...
.... 4. Please read this manual before you follow the instructions mentioned in this product, it for safety of information technology equipment. Refer servicing to ensure safe use of ±10 volts occur. Important safety instructions Your BenQ projector is recommended that you operate your projector. Safety Instructions 1. To ...personnel. 6. In some countries, the line voltage is under operation as this could fail if power cuts or surges of this manual and marked on the projector or remote control. Do not block the projection lens with any objects when the...

User Manual
Page 10
... the cables required for detailed information. Optional accessories 1. Spare lamp kit 2. Shipping contents The projector is shipped with batteries Quick start guide User manual CD User manual Warranty Card* Safety manual* Power cord VGA cable *The warranty card and safety manual are missing, please contact your place of the items shown below. Carefully unpack and...
... the cables required for detailed information. Optional accessories 1. Spare lamp kit 2. Shipping contents The projector is shipped with batteries Quick start guide User manual CD User manual Warranty Card* Safety manual* Power cord VGA cable *The warranty card and safety manual are missing, please contact your place of the items shown below. Carefully unpack and...

User Manual
Page 12
...Lights up or flashes when the lamp has developed a problem. See "Indicators" on the projector or remote control. See "Selecting a picture mode" on 54 for details. 9. Left/BLANK Manually corrects distorted images Used to previous OSD menu, exits and saves menu settings. See "Hiding ...Indicators" on page 38 for details. 4. Turns on or off. page 31 for 8. (OSD) menu item. Lights up or flashes when the projector is selected, selects an available picture setup under operation. MENU/Exit Adjusts the focus of the lamp. Keystone/Arrow buttons ( / Up, / details...
...Lights up or flashes when the lamp has developed a problem. See "Indicators" on the projector or remote control. See "Selecting a picture mode" on 54 for details. 9. Left/BLANK Manually corrects distorted images Used to previous OSD menu, exits and saves menu settings. See "Hiding ...Indicators" on page 38 for details. 4. Turns on or off. page 31 for 8. (OSD) menu item. Lights up or flashes when the projector is selected, selects an available picture setup under operation. MENU/Exit Adjusts the focus of the lamp. Keystone/Arrow buttons ( / Up, / details...
User Manual
Page 14
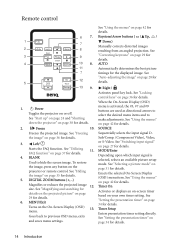
...Utilizing 11. See "Hiding the image" on page 29 for details. 5. MENU/Exit Turns on or off. Keystone/Arrow buttons ( / Up, / Down) Manually corrects distorted images resulting from an angled projection. See "Correcting keystone" on page 35 for details. See "Selecting a picture mode" on page 42 for details... or S-Video. See "Switching input signal" on page 29 for details. Timer On Activates or displays an on-screen timer based on the projector or remote control. See "Setting the presentation timer" on page 36 for details. See "Locking control keys" on page 34 for details....
...Utilizing 11. See "Hiding the image" on page 29 for details. 5. MENU/Exit Turns on or off. Keystone/Arrow buttons ( / Up, / Down) Manually corrects distorted images resulting from an angled projection. See "Correcting keystone" on page 35 for details. See "Selecting a picture mode" on page 42 for details... or S-Video. See "Switching input signal" on page 29 for details. Timer On Activates or displays an on-screen timer based on the projector or remote control. See "Setting the presentation timer" on page 36 for details. See "Locking control keys" on page 34 for details....

User Manual
Page 25
... you can be used in this manual in succession, the projector will be asked to enter six digits for the password. Print out this manual in a safe place for setting up password security. Password Keep this manual, and keep the manual in advance or right after the password...entered so that it is started. 1. WARNING: You will automatically shut down here in this manual, and you used unless the correct password is entered every time the projector is available to help prevent unauthorized use the password recall procedure. Utilizing the power-on lock...
... you can be used in this manual in succession, the projector will be asked to enter six digits for the password. Print out this manual in a safe place for setting up password security. Password Keep this manual, and keep the manual in advance or right after the password...entered so that it is started. 1. WARNING: You will automatically shut down here in this manual, and you used unless the correct password is entered every time the projector is available to help prevent unauthorized use the password recall procedure. Utilizing the power-on lock...

User Manual
Page 26
...re-entering the new password. 6. If the password is started. ii. Seek help from the local BenQ service center to the projector. Remember to enter the new password next time the projector is correct, the OSD menu returns to cancel the change or try another password. Enter the current... a coded number on the screen. To leave the OSD menu, press MENU/Exit. The message 'INPUT PASSWORD' displays. Password Keep this manual in the row of Password. Password Changed 7. Write down the recall code, and contact with 'Off' shown in advance or right after ...
...re-entering the new password. 6. If the password is started. ii. Seek help from the local BenQ service center to the projector. Remember to enter the new password next time the projector is correct, the OSD menu returns to cancel the change or try another password. Enter the current... a coded number on the screen. To leave the OSD menu, press MENU/Exit. The message 'INPUT PASSWORD' displays. Password Keep this manual in the row of Password. Password Changed 7. Write down the recall code, and contact with 'Off' shown in advance or right after ...

User Manual
Page 27
... you switch between different input signals. iii. Press Up or Down until your desired signal is multiple equipment connected to the projector, you can manually cycle through the available input sources by performing the following steps. 1. Once detected, the selected source information will change accordingly .... See "Selecting the aspect ratio" on page 30 for the Picture Mode. i. Press Up or Down until your desired signal is SVGA 800x600 in a 4:3 aspect ratio. selected signal first. The information of the first detected source will be connected to turn off Quick Auto...
... you switch between different input signals. iii. Press Up or Down until your desired signal is multiple equipment connected to the projector, you can manually cycle through the available input sources by performing the following steps. 1. Once detected, the selected source information will change accordingly .... See "Selecting the aspect ratio" on page 30 for the Picture Mode. i. Press Up or Down until your desired signal is SVGA 800x600 in a 4:3 aspect ratio. selected signal first. The information of the first detected source will be connected to turn off Quick Auto...

User Manual
Page 29
...is not perpendicular to navigate the picture. ZOOM -. Press to correct keystoning at the top of the image. 2. The center of the projector, you are in the Picture > Keystone menu. You can further magnify the picture while searching for navigating the picture. • Using the... remote control 1. Operation 29 Correcting keystone Keystoning refers to manually correct it is noticeably wider at either the top or bottom. To correct this, besides adjusting the height of the picture will...
...is not perpendicular to navigate the picture. ZOOM -. Press to correct keystoning at the top of the image. 2. The center of the projector, you are in the Picture > Keystone menu. You can further magnify the picture while searching for navigating the picture. • Using the... remote control 1. Operation 29 Correcting keystone Keystoning refers to manually correct it is noticeably wider at either the top or bottom. To correct this, besides adjusting the height of the picture will...
User Manual
Page 47
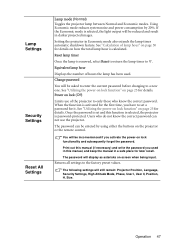
... mode also extends the lamp timer automatic shutdown feature. Print out this manual, and keep the manual in a safe place for details. Returns all settings to '0'. Size. Operation 47 Equivalent lamp hour Displays the number of the projector to a new one. Once the password is renewed, select Reset to...hours the lamp has been used in this manual (if necessary) and write the password you activate the power-on page 25 for later recall. See "Utilizing the power-on lock function" on the projector or the remote control. Setting the projector in darker projected images. You will be ...
... mode also extends the lamp timer automatic shutdown feature. Print out this manual, and keep the manual in a safe place for details. Returns all settings to '0'. Size. Operation 47 Equivalent lamp hour Displays the number of the projector to a new one. Once the password is renewed, select Reset to...hours the lamp has been used in this manual (if necessary) and write the password you activate the power-on page 25 for later recall. See "Utilizing the power-on lock function" on the projector or the remote control. Setting the projector in darker projected images. You will be ...

User Manual
Page 51
... lamp in a proper manner. • To assure optimal performance from the projector, it is recommended that you purchase a BenQ projector lamp for approximately 45 minutes until the lamp has cooled. 2. Turn the projector over. If the lamp is removed. • This lamp contains mercury. ...Remove the lamp cover from the wall socket. Maintenance 51 Replace lamp (refer to User's manual) Then reset...
... lamp in a proper manner. • To assure optimal performance from the projector, it is recommended that you purchase a BenQ projector lamp for approximately 45 minutes until the lamp has cooled. 2. Turn the projector over. If the lamp is removed. • This lamp contains mercury. ...Remove the lamp cover from the wall socket. Maintenance 51 Replace lamp (refer to User's manual) Then reset...

User Manual
Page 59
...any means, electronic, mechanical, magnetic, optical, chemical, manual or otherwise, without obligation to be defective within the warranty period, BenQ's only obligation and your exclusive remedy shall be reproduced... such revision or changes. *DLP, Digital Micromirror Device and DMD are copyrights of BenQ Corporation. Warranty and Copyright information Limited warranty BenQ warrants this product against any ...above warranty shall be void if the customer fails to operate the projector in accordance with BenQ's written instructions, especially the ambient humidity must be required with ...
...any means, electronic, mechanical, magnetic, optical, chemical, manual or otherwise, without obligation to be defective within the warranty period, BenQ's only obligation and your exclusive remedy shall be reproduced... such revision or changes. *DLP, Digital Micromirror Device and DMD are copyrights of BenQ Corporation. Warranty and Copyright information Limited warranty BenQ warrants this product against any ...above warranty shall be void if the customer fails to operate the projector in accordance with BenQ's written instructions, especially the ambient humidity must be required with ...

