User Manual
Page 2
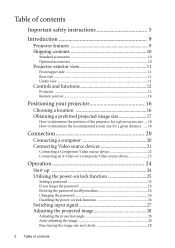
... Front/upper side 11 Rear side ...11 Under view ...11 Controls and functions 12 Projector ...12 Remote control 14 Positioning your projector 16 Choosing a location 16 Obtaining a preferred projected image size 17 How to determine the position of the projector for a given screen size ... 18 How to determine the recommended screen size for...
... Front/upper side 11 Rear side ...11 Under view ...11 Controls and functions 12 Projector ...12 Remote control 14 Positioning your projector 16 Choosing a location 16 Obtaining a preferred projected image size 17 How to determine the position of the projector for a given screen size ... 18 How to determine the recommended screen size for...

User Manual
Page 3
...control keys 36 Freezing the image 36 Utilizing FAQ function 37 Operating in a high altitude environment 37 Personalizing the projector menu display 38 Shutting down the projector 38 Menu operation 39 Menu system 39 Using the menus 42 Display menu 43 Picture menu 44 Source menu ... menu 45 System setup: Advanced menu 46 Information menu 48 Maintenance 49 Care of the projector 49 Cleaning the lens 49 Cleaning the projector case 49 Storing the projector 49 Transporting the projector 49 Lamp information 50 Calculation of lamp hour 50 Warning message 50 Replacing the lamp 51...
...control keys 36 Freezing the image 36 Utilizing FAQ function 37 Operating in a high altitude environment 37 Personalizing the projector menu display 38 Shutting down the projector 38 Menu operation 39 Menu system 39 Using the menus 42 Display menu 43 Picture menu 44 Source menu ... menu 45 System setup: Advanced menu 46 Information menu 48 Maintenance 49 Care of the projector 49 Cleaning the lens 49 Cleaning the projector case 49 Storing the projector 49 Transporting the projector 49 Lamp information 50 Calculation of lamp hour 50 Warning message 50 Replacing the lamp 51...

User Manual
Page 4
Projector specifications 57 Timing chart 58 Warranty and Copyright information 59 Regulation statements 60 4 Table of contents
Projector specifications 57 Timing chart 58 Warranty and Copyright information 59 Regulation statements 60 4 Table of contents

User Manual
Page 5
... instructions Your BenQ projector is designed and tested to meet the latest standards for future reference. 4. Safety Instructions 1. This projector is under operation as this manual and marked on the product. Do not block the projection lens with any objects when the projector is designed to...100 to 240 volts AC, but could cause the objects to qualified service personnel. 6. Please read this manual before you operate your projector through a power stabilizer, surge protector or uninterruptible power supply (UPS). 3. In some countries, the line voltage is important that you...
... instructions Your BenQ projector is designed and tested to meet the latest standards for future reference. 4. Safety Instructions 1. This projector is under operation as this manual and marked on the product. Do not block the projection lens with any objects when the projector is designed to...100 to 240 volts AC, but could cause the objects to qualified service personnel. 6. Please read this manual before you operate your projector through a power stabilizer, surge protector or uninterruptible power supply (UPS). 3. In some countries, the line voltage is important that you...

User Manual
Page 6
The only user serviceable part is unplugged. 6 Important safety instructions projector. Allow the projector to cool for approximately 45 minutes prior to disassemble this product on rare occasions. Do not place this 8. Do not attempt to removing the lamp ... of lamps beyond the rated lamp life. The product may cause death if you should you ever undo or remove any electronic components unless the projector is the lamp which may fall, sustaining serious damage. 11. There are dangerous high voltages inside which has its own removable cover. Never replace the...
The only user serviceable part is unplugged. 6 Important safety instructions projector. Allow the projector to cool for approximately 45 minutes prior to disassemble this product on rare occasions. Do not place this 8. Do not attempt to removing the lamp ... of lamps beyond the rated lamp life. The product may cause death if you should you ever undo or remove any electronic components unless the projector is the lamp which may fall, sustaining serious damage. 11. There are dangerous high voltages inside which has its own removable cover. Never replace the...

User Manual
Page 7
... are seriously obstructed, overheating inside of more than 10 degrees left to back. Do not block the ventilation holes. Do not cover this projector with an ambient temperature above 40°C / 104°F - Locations where excessive humidity, dust, or cigarette smoke may result in a...right, nor at angle of a car with all windows rolled up. - Always place the projector on end vertically. Using the projector when it is poorly ventilated or confined. Do not place this projector in damage to , the lamp. - Do not place inflammables near fire alarms - following environments...
... are seriously obstructed, overheating inside of more than 10 degrees left to back. Do not block the ventilation holes. Do not cover this projector with an ambient temperature above 40°C / 104°F - Locations where excessive humidity, dust, or cigarette smoke may result in a...right, nor at angle of a car with all windows rolled up. - Always place the projector on end vertically. Using the projector when it is poorly ventilated or confined. Do not place this projector in damage to , the lamp. - Do not place inflammables near fire alarms - following environments...

User Manual
Page 8
...call BenQ to the 18. Besides probable Ceiling mounting the projector physical damage to mount your BenQ projector. If you use a non-BenQ brand projector projector. you use of the ceiling mount bracket. If the that you purchased your projector on the If you intend to the projector, ...for ceiling mount 19. odor from the power supply's wall socket through the use a proper fitting BenQ projector ceiling mount kit and that the projector may result in accidents and possible injury. We want you also purchase a separate Kensington lock compatible ...
...call BenQ to the 18. Besides probable Ceiling mounting the projector physical damage to mount your BenQ projector. If you use a non-BenQ brand projector projector. you use of the ceiling mount bracket. If the that you purchased your projector on the If you intend to the projector, ...for ceiling mount 19. odor from the power supply's wall socket through the use a proper fitting BenQ projector ceiling mount kit and that the projector may result in accidents and possible injury. We want you also purchase a separate Kensington lock compatible ...

User Manual
Page 9
... on the ambient lighting conditions, selected input source contrast/brightness settings, and is normal and expected behavior. Introduction Projector features The projector integrates high-performance optical engine projection and a user-friendly design to deliver high reliability and ease of the projected... image will decline over time and may vary within the lamp manufacturers specifications. Introduction 9 The projector offers the following features. • Wall color correction allowing projection on surfaces of several predefined colors • Quick auto...
... on the ambient lighting conditions, selected input source contrast/brightness settings, and is normal and expected behavior. Introduction Projector features The projector integrates high-performance optical engine projection and a user-friendly design to deliver high reliability and ease of the projected... image will decline over time and may vary within the lamp manufacturers specifications. Introduction 9 The projector offers the following features. • Wall color correction allowing projection on surfaces of several predefined colors • Quick auto...

User Manual
Page 10
... control with the cables required for connection to a PC or video equipment. Please consult your dealer for your place of purchase. Shipping contents The projector is shipped with batteries Quick start guide User manual CD User manual Warranty Card* Safety manual* Power cord VGA cable *The warranty card and safety ...
... control with the cables required for connection to a PC or video equipment. Please consult your dealer for your place of purchase. Shipping contents The projector is shipped with batteries Quick start guide User manual CD User manual Warranty Card* Safety manual* Power cord VGA cable *The warranty card and safety ...

User Manual
Page 11
... foot 11. AC power cord inlet 12. RGB (PC)/Component video (YPbPr/ YCbCr) signal input socket 16. Video input socket 17. External control panel (See "Projector" on page 12 for details.) Vent (heated air exhaust) Projection lens Quick-release button Lens cap Focus ring Kensington anti-theft lock slot Vent (cool... remote sensor 13. RS232 control port Under view 18 19 20 15. USB socket (for details. 12 13 14 15 16 17 11 10 10. Projector exterior view Front/upper side 1 2 3 4 5 1. 6 2. 7 3. 8 4. 5. 9 6. 7. 8. 9.
... foot 11. AC power cord inlet 12. RGB (PC)/Component video (YPbPr/ YCbCr) signal input socket 16. Video input socket 17. External control panel (See "Projector" on page 12 for details.) Vent (heated air exhaust) Projection lens Quick-release button Lens cap Focus ring Kensington anti-theft lock slot Vent (cool... remote sensor 13. RS232 control port Under view 18 19 20 15. USB socket (for details. 12 13 14 15 16 17 11 10 10. Projector exterior view Front/upper side 1 2 3 4 5 1. 6 2. 7 3. 8 4. 5. 9 6. 7. 8. 9.

User Manual
Page 12
...See "Hiding the image" on page 38 for details. resulting from an angled projection. See "Start up red if the projector's See "Using the menus" on page 28 for details. 7. Focus ring 6. Power indicator light Depending upon which input ...page 54 for details. 4. MODE/Enter 3. See "Indicators" on page 29 for details. Turns on the projector or remote control. See details. Lamp indicator light Indicates the status of the projected image. Controls and functions Projector 1 2 8 3 9 4 10 5 11 6 12 7 8 1. Down) 5. MENU/Exit Adjusts...
...See "Hiding the image" on page 38 for details. resulting from an angled projection. See "Start up red if the projector's See "Using the menus" on page 28 for details. 7. Focus ring 6. Power indicator light Depending upon which input ...page 54 for details. 4. MODE/Enter 3. See "Indicators" on page 29 for details. Turns on the projector or remote control. See details. Lamp indicator light Indicates the status of the projected image. Controls and functions Projector 1 2 8 3 9 4 10 5 11 6 12 7 8 1. Down) 5. MENU/Exit Adjusts...
User Manual
Page 14
...6 7. 1 7 2 8 3 9 4 10 8. 11 7 12 5 13 9. 1. See "Start up" on page 24 and "Shutting down the projector" on page 29 for details. 2. DIGITAL ZOOM buttons (+, -) Magnifies or reduces the projected image 12. See "Magnifying and searching for details on the projected ...See "Setting the presentation timer" on page 36 for details. See "Locking control keys" on page 34 for details. MENU/Exit Turns on the projector or remote control. Goes back to hide the screen image. To restore the image, press any button on the On-Screen Display (OSD) 13....
...6 7. 1 7 2 8 3 9 4 10 8. 11 7 12 5 13 9. 1. See "Start up" on page 24 and "Shutting down the projector" on page 29 for details. 2. DIGITAL ZOOM buttons (+, -) Magnifies or reduces the projected image 12. See "Magnifying and searching for details on the projected ...See "Setting the presentation timer" on page 36 for details. See "Locking control keys" on page 34 for details. MENU/Exit Turns on the projector or remote control. Goes back to hide the screen image. To restore the image, press any button on the On-Screen Display (OSD) 13....

User Manual
Page 15
...long time, remove the battery to prevent damage to 8 meters. There may be held at an angle within 30 degrees perpendicular to the projector's IR remote control sensors to the battery manufacturer's instructions. • Never throw a battery into the remote control. • Avoid excessive...is incorrectly replaced. • Replace only with the same or equivalent type recommended by the battery manufacturer. • Dispose of the projector. Remote control effective range Infra-Red (IR) remote control sensors are no obstacles between the remote control and the sensors should face ...
...long time, remove the battery to prevent damage to 8 meters. There may be held at an angle within 30 degrees perpendicular to the projector's IR remote control sensors to the battery manufacturer's instructions. • Never throw a battery into the remote control. • Avoid excessive...is incorrectly replaced. • Replace only with the same or equivalent type recommended by the battery manufacturer. • Dispose of the projector. Remote control effective range Infra-Red (IR) remote control sensors are no obstacles between the remote control and the sensors should face ...

User Manual
Page 16
...common way to mount your dealer to position the projector for this installation location. Front Ceiling Select this location with the projector suspended upside-down from the ceiling behind the screen. Purchase the BenQ Projector Ceiling Mounting Kit from the ceiling in the System... Setup: Basic > Projector Position menu after you select. Set Front Ceiling in...
...common way to mount your dealer to position the projector for this installation location. Front Ceiling Select this location with the projector suspended upside-down from the ceiling behind the screen. Purchase the BenQ Projector Ceiling Mounting Kit from the ceiling in the System... Setup: Basic > Projector Position menu after you select. Set Front Ceiling in...

User Manual
Page 17
... fed a 16:9 aspect signal) will display in a 4:3 aspect ratio (and will ever need to account for your projector 17 IMPORTANT: Do not select a permanent projector position based upon a 16:9 projection if you will project forward and upwards onto a screen positioned so that the bottom ... positioned further away from the screen, the projected image size increases, and the vertical offset also increases proportionately. BenQ has provided a table of your projector, you in the projected image size. This is above the horizontal plane of the 4:3 projection display area. If the...
... fed a 16:9 aspect signal) will display in a 4:3 aspect ratio (and will ever need to account for your projector 17 IMPORTANT: Do not select a permanent projector position based upon a 16:9 projection if you will project forward and upwards onto a screen positioned so that the bottom ... positioned further away from the screen, the projected image size increases, and the vertical offset also increases proportionately. BenQ has provided a table of your projector, you in the projected image size. This is above the horizontal plane of the 4:3 projection display area. If the...

User Manual
Page 18
.... How to determine the recommended screen size for details. Refer to the table and find the closest match to the edge of the projector. Looking across to the horizontal plane of the screen. 4. Using this row shows that projection distance. 4. On that row. Use... look across this value, look across that row to find the corresponding screen diagonal listed in your room. Measure the distance between the projector and where you will fit in relation to your measured projection distance was 4.5 m (4500mm), the closest match in the "Recommended projection...
.... How to determine the recommended screen size for details. Refer to the table and find the closest match to the edge of the projector. Looking across to the horizontal plane of the screen. 4. Using this row shows that projection distance. 4. On that row. Use... look across this value, look across that row to find the corresponding screen diagonal listed in your room. Measure the distance between the projector and where you will fit in relation to your measured projection distance was 4.5 m (4500mm), the closest match in the "Recommended projection...

User Manual
Page 19
... distance Vertical Offset in mm from screen in situ before you should physically test the projection size and distance using the actual projector in mm 1200 46 1440 55 1575 60 1920 73 2362 88 2400 91 2880 110 3149 120 3360 128 3840 146 ... 299 8000 305 There is 3% tolerance among these numbers due to optical component variations. BenQ recommends that it , so as to permanently install the projector, you permanently install it best suits your projector 19 Positioning your installation location. This will help you determine the exact mounting position so...
... distance Vertical Offset in mm from screen in situ before you should physically test the projection size and distance using the actual projector in mm 1200 46 1440 55 1575 60 1920 73 2362 88 2400 91 2880 110 3149 120 3360 128 3840 146 ... 299 8000 305 There is 3% tolerance among these numbers due to optical component variations. BenQ recommends that it , so as to permanently install the projector, you permanently install it best suits your projector 19 Positioning your installation location. This will help you determine the exact mounting position so...

User Manual
Page 20
... the D-SUB signal input socket on page 10). Locate a function key labeled CRT/LCD or a function key with the projector (see "Shipping contents" on the projector. Use the correct signal cables for each source. 3. They are firmly inserted. Take the supplied VGA cable and connect one... that shown in the following diagram: Laptop or desktop computer VGA cable Many notebooks do not turn on the notebook. To connect the projector to : 1. Press FN and the labeled function key simultaneously. Ensure the cables are commercially available from electronics stores. Connect the other ...
... the D-SUB signal input socket on page 10). Locate a function key labeled CRT/LCD or a function key with the projector (see "Shipping contents" on the projector. Use the correct signal cables for each source. 3. They are firmly inserted. Take the supplied VGA cable and connect one... that shown in the following diagram: Laptop or desktop computer VGA cable Many notebooks do not turn on the notebook. To connect the projector to : 1. Press FN and the labeled function key simultaneously. Ensure the cables are commercially available from electronics stores. Connect the other ...

User Manual
Page 21
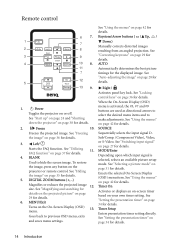
... any one of the following output sockets: • Component Video • S-Video • Video (composite) You need only connect the projector to a Video source device using just one of the above connecting methods, however each provides a different level of the available methods described here.... See "Connecting an S-Video or a composite Video source device" on page 23 for how to connect the projector to a component video device. Better video quality The S-Video method provides a better quality analog video than optimal result from your devices, ...
... any one of the following output sockets: • Component Video • S-Video • Video (composite) You need only connect the projector to a Video source device using just one of the above connecting methods, however each provides a different level of the available methods described here.... See "Connecting an S-Video or a composite Video source device" on page 23 for how to connect the projector to a component video device. Better video quality The S-Video method provides a better quality analog video than optimal result from your devices, ...
User Manual
Page 22
.... The final connection path should be like that shown in the following diagram: A/V device Component Video to VGA (D-Sub) adaptor cable If you connect the projector to a High Definition TV (HDTV) tuner, the following standards are supported: • 480i • 576i • 720p (50/ 60 Hz) &#...need to reassess which method you can continue with a D-Sub type connector) to the D-SUB socket on and operating correctly. To connect the projector to red. 2. Connecting a Component Video source device Examine your Video source device to determine if it has a set of unused Component Video...
.... The final connection path should be like that shown in the following diagram: A/V device Component Video to VGA (D-Sub) adaptor cable If you connect the projector to a High Definition TV (HDTV) tuner, the following standards are supported: • 480i • 576i • 720p (50/ 60 Hz) &#...need to reassess which method you can continue with a D-Sub type connector) to the D-SUB socket on and operating correctly. To connect the projector to red. 2. Connecting a Component Video source device Examine your Video source device to determine if it has a set of unused Component Video...


