
User Manual
Page 1
LCD Monitor User Manual GL950A / GL950AM G950A / G950AM GL951A / GL951AM / G951A G955A GL2250 / GL2250M / GL2250HM / GL2250TM G2250 / G2250HM G2255A / G2255 G2251M / G2251TM GL2450 / GL2450M / GL2450HM G2450 / G2450HM GL2750HM / G2750 / G2750HM
LCD Monitor User Manual GL950A / GL950AM G950A / G950AM GL951A / GL951AM / G951A G955A GL2250 / GL2250M / GL2250HM / GL2250TM G2250 / G2250HM G2255A / G2255 G2251M / G2251TM GL2450 / GL2450M / GL2450HM G2450 / G2450HM GL2750HM / G2750 / G2750HM

User Manual
Page 2
...equipment from the type of any kind into any person of BenQ Corporation. Further, BenQ Corporation reserves the right to H03VV-F or H05VV-F, 2G or 3G, 0.75mm2 must not be used. Always unplug your monitor. Copyright Copyright 2011 by any means, electronic, mechanical, magnetic..., optical, chemical, manual or otherwise, without obligation of BenQ Corporation to the contents hereof and specifically disclaims any warranties, merchantability or ...
...equipment from the type of any kind into any person of BenQ Corporation. Further, BenQ Corporation reserves the right to H03VV-F or H05VV-F, 2G or 3G, 0.75mm2 must not be used. Always unplug your monitor. Copyright Copyright 2011 by any means, electronic, mechanical, magnetic..., optical, chemical, manual or otherwise, without obligation of BenQ Corporation to the contents hereof and specifically disclaims any warranties, merchantability or ...

User Manual
Page 4
...Getting to know your monitor 7 Front view ...7 Back view ...7 How to assemble your monitor hardware 9 How to detach the base ...13 Using the monitor wall mounting kit 14 Getting the most from your BenQ monitor 15 How to install the monitor on a new computer 16 How to upgrade the monitor on an existing ...computer 18 How to install on Windows 7 system 19 How to install on Windows Vista systems 20 Picture optimization ...21 How to adjust your monitor 22 The control...
...Getting to know your monitor 7 Front view ...7 Back view ...7 How to assemble your monitor hardware 9 How to detach the base ...13 Using the monitor wall mounting kit 14 Getting the most from your BenQ monitor 15 How to install the monitor on a new computer 16 How to upgrade the monitor on an existing ...computer 18 How to install on Windows 7 system 19 How to install on Windows Vista systems 20 Picture optimization ...21 How to adjust your monitor 22 The control...
User Manual
Page 5
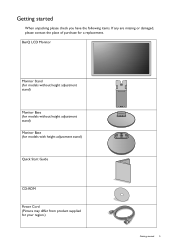
BenQ LCD Monitor Monitor Stand (for models without height adjustment stand) Monitor Base (for models without height adjustment stand) Monitor Base (for models with height adjustment stand) Quick Start Guide CD-ROM Power Cord (Picture may differ from product supplied for your region.) Getting started When unpacking please check you have the following items. If any are missing or damaged, please contact the place of purchase for a replacement. Getting started 5
BenQ LCD Monitor Monitor Stand (for models without height adjustment stand) Monitor Base (for models without height adjustment stand) Monitor Base (for models with height adjustment stand) Quick Start Guide CD-ROM Power Cord (Picture may differ from product supplied for your region.) Getting started When unpacking please check you have the following items. If any are missing or damaged, please contact the place of purchase for a replacement. Getting started 5
User Manual
Page 6
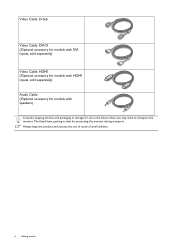
Video Cable: D-Sub Video Cable: DVI-D (Optional accessory for models with DVI inputs, sold separately) Video Cable: HDMI (Optional accessory for models with HDMI inputs, sold separately) Audio Cable (Optional accessory for models with speakers) Consider keeping the box and packaging in storage for protecting the monitor during transport. Always keep the product and accessories out of reach of small children. 6 Getting started The fitted foam packing is ideal for use in the future when you may need to transport the monitor.
Video Cable: D-Sub Video Cable: DVI-D (Optional accessory for models with DVI inputs, sold separately) Video Cable: HDMI (Optional accessory for models with HDMI inputs, sold separately) Audio Cable (Optional accessory for models with speakers) Consider keeping the box and packaging in storage for protecting the monitor during transport. Always keep the product and accessories out of reach of small children. 6 Getting started The fitted foam packing is ideal for use in the future when you may need to transport the monitor.
User Manual
Page 7
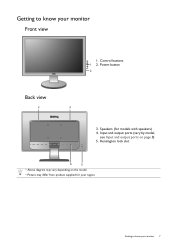
Control buttons 1 2. Speakers (for your region. Getting to know your monitor 7 Power button 2 Back view 3 3 3. Kensington lock slot 4 5 • Above diagram may vary depending on page 8) 5. Input and output ports (vary by model, see Input and output ports on the model. • Picture may differ from product supplied for models with speakers) 4. Getting to know your monitor Front view 1.
Control buttons 1 2. Speakers (for your region. Getting to know your monitor 7 Power button 2 Back view 3 3 3. Kensington lock slot 4 5 • Above diagram may vary depending on page 8) 5. Input and output ports (vary by model, see Input and output ports on the model. • Picture may differ from product supplied for models with speakers) 4. Getting to know your monitor Front view 1.

User Manual
Page 8
Audio Line In 1 23 4 5 6 Models with analog-only inputs and speakers 6. DVI-D socket 1 23 56 Models with dual inputs and speakers 3. Models with analog-only inputs 1 6 8 Getting to know your purchased model. AC power input jack 2. D-Sub socket 1 23 6 Models with dual inputs 1 56 Models with HDMI inputs 1. Input and output ports Available input and output ports may vary depending on your monitor HDMI socket 5. Headphone jack 4.
Audio Line In 1 23 4 5 6 Models with analog-only inputs and speakers 6. DVI-D socket 1 23 56 Models with dual inputs and speakers 3. Models with analog-only inputs 1 6 8 Getting to know your purchased model. AC power input jack 2. D-Sub socket 1 23 6 Models with dual inputs 1 56 Models with HDMI inputs 1. Input and output ports Available input and output ports may vary depending on your monitor HDMI socket 5. Headphone jack 4.
User Manual
Page 9
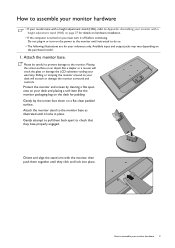
... for padding. Gently attempt to pull them together until instructed to assemble your monitor hardware 9 Available input and output jacks may vary depending on a flat clean padded surface. Attach the monitor base. Protect the monitor and screen by clearing a flat open area on page 37 for your reference... only. Attach the monitor stand to check that they click and lock into place. Gently lay the ...
... for padding. Gently attempt to pull them together until instructed to assemble your monitor hardware 9 Available input and output jacks may vary depending on a flat clean padded surface. Attach the monitor base. Protect the monitor and screen by clearing a flat open area on page 37 for your reference... only. Attach the monitor stand to check that they click and lock into place. Gently lay the ...

User Manual
Page 10
If the screen size is 27 inches, follow the illustrations on the right to assemble your monitor hardware Gently attempt to pull them back apart to check that they have properly engaged. 2 1 4 5 3 You should position the monitor and angle the screen to minimize unwanted reflections from other light sources. -5O~ +15O 10 How to attach the monitor stand and the base.
If the screen size is 27 inches, follow the illustrations on the right to assemble your monitor hardware Gently attempt to pull them back apart to check that they have properly engaged. 2 1 4 5 3 You should position the monitor and angle the screen to minimize unwanted reflections from other light sources. -5O~ +15O 10 How to attach the monitor stand and the base.
User Manual
Page 11
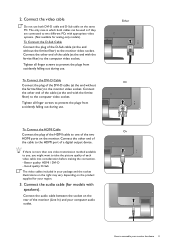
... plug of the D-Sub cable (at the end with the ferrite filter) to the computer video socket. Connect the other end of the monitor (Line In) and your monitor hardware 11 Good quality: D-Sub The video cables included in which both DVI-D cable and D-Sub cable on the rear of the cable... more than one of the two HDMI ports on the product supplied for analog-only models). If there is if they are connected to the monitor video socket. Tighten all finger screws to assemble your computer audio outlet. Connect the audio cable between the socket on the same PC. Connect the...
... plug of the D-Sub cable (at the end with the ferrite filter) to the computer video socket. Connect the other end of the monitor (Line In) and your monitor hardware 11 Good quality: D-Sub The video cables included in which both DVI-D cable and D-Sub cable on the rear of the cable... more than one of the two HDMI ports on the product supplied for analog-only models). If there is if they are connected to the monitor video socket. Tighten all finger screws to assemble your computer audio outlet. Connect the audio cable between the socket on the same PC. Connect the...
User Manual
Page 12
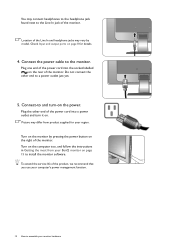
Plug one end of the power cord into the socket labelled on the rear of the power cord into a power outlet and turn -on the monitor by model. Turn on the power. Connect-to and turn it on the computer too, and follow the instructions in Getting the most from product ... the power cable to install the monitor software. Location of the Line In and headphone jacks may vary by pressing the power button on the right of the product, we recommend that you use your computer's power management function. 12 How to assemble your BenQ monitor on page 8 for your region. Do not...
Plug one end of the power cord into the socket labelled on the rear of the power cord into a power outlet and turn -on the monitor by model. Turn on the power. Connect-to and turn it on the computer too, and follow the instructions in Getting the most from product ... the power cable to install the monitor software. Location of the Line In and headphone jacks may vary by pressing the power button on the right of the product, we recommend that you use your computer's power management function. 12 How to assemble your BenQ monitor on page 8 for your region. Do not...
User Manual
Page 13
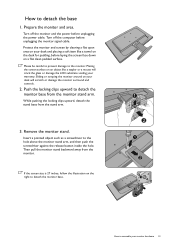
...Turn off the computer before laying the screen face down on the desk for padding, before unplugging the monitor signal cable. Then pull the monitor stand backward away from the monitor. Remove the monitor stand. If the screen size is 27 inches, follow the illustration on your desk will crack the glass... or damage the LCD substrate voiding your monitor hardware 13 Please be careful to prevent damage to detach the base 1. Placing the screen surface on an object like a towel on a ...
...Turn off the computer before laying the screen face down on the desk for padding, before unplugging the monitor signal cable. Then pull the monitor stand backward away from the monitor. Remove the monitor stand. If the screen size is 27 inches, follow the illustration on your desk will crack the glass... or damage the LCD substrate voiding your monitor hardware 13 Please be careful to prevent damage to detach the base 1. Placing the screen surface on an object like a towel on a ...
User Manual
Page 14
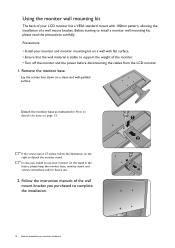
...surface. Remove the monitor base. Detach the monitor base as instructed in the future, please keep the monitor base, monitor stand, and screws somewhere safe for future use your monitor and monitor mounting kit on page 13. Using the monitor wall mounting kit The back of your monitor hardware Lay the ... the installation of a wall mount bracket. In case you purchased to complete the installation. 1 2 1 2 14 How to assemble your LCD monitor has a VESA standard mount with flat surface. • Ensure that the wall material is 27 inches, follow the illustration on the right to install...
...surface. Remove the monitor base. Detach the monitor base as instructed in the future, please keep the monitor base, monitor stand, and screws somewhere safe for future use your monitor and monitor mounting kit on page 13. Using the monitor wall mounting kit The back of your monitor hardware Lay the ... the installation of a wall mount bracket. In case you purchased to complete the installation. 1 2 1 2 14 How to assemble your LCD monitor has a VESA standard mount with flat surface. • Ensure that the wall material is 27 inches, follow the illustration on the right to install...
User Manual
Page 15
... wizard. These circumstances relate to successfully install the BenQ LCD Monitor driver software. Getting the most from your BenQ monitor To gain the most from your new BenQ LCD monitor, you should install the custom BenQ LCD Monitor driver software as a member of the Administrators group in order to select a monitor model. The circumstances under which has security access...
... wizard. These circumstances relate to successfully install the BenQ LCD Monitor driver software. Getting the most from your BenQ monitor To gain the most from your new BenQ LCD monitor, you should install the custom BenQ LCD Monitor driver software as a member of the Administrators group in order to select a monitor model. The circumstances under which has security access...
User Manual
Page 16
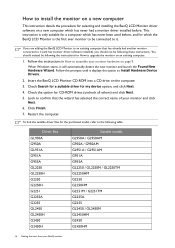
... details the procedure for selecting and installing the BenQ LCD Monitor driver software on a new computer which has never had another monitor connected to it (and has monitor driver software installed), you are adding the BenQ LCD Monitor to an existing computer that the wizard has ... models GL950A / GL950AM G950A / G950AM GL951A / GL951AM G951A G955A GL2250 / GL2250M / GL2250TM GL2250HM G2250 G2250HM G2251M / G2251TM G2255A G2255 GL2450 / GL2450M GL2450HM G2450 G2450HM 16 Getting the most from your BenQ monitor When Windows starts, it displays the option to it. This instruction...
... details the procedure for selecting and installing the BenQ LCD Monitor driver software on a new computer which has never had another monitor connected to it (and has monitor driver software installed), you are adding the BenQ LCD Monitor to an existing computer that the wizard has ... models GL950A / GL950AM G950A / G950AM GL951A / GL951AM G951A G955A GL2250 / GL2250M / GL2250TM GL2250HM G2250 G2250HM G2251M / G2251TM G2255A G2255 GL2450 / GL2450M GL2450HM G2450 G2450HM 16 Getting the most from your BenQ monitor When Windows starts, it displays the option to it. This instruction...

User Manual
Page 17
Driver files GL2750H G2750 G2750H GL2750HM G2750 G2750HM Suitable models Getting the most from your BenQ monitor 17
Driver files GL2750H G2750 G2750H GL2750HM G2750 G2750HM Suitable models Getting the most from your BenQ monitor 17
User Manual
Page 18
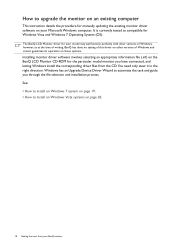
... and letting Windows install the corresponding driver files from your BenQ monitor Windows has an Upgrade Device Driver Wizard to upgrade the monitor on an existing computer This instruction details the procedure for manually updating the existing monitor driver software on your model may well function perfectly with other.... See: • How to install on Windows 7 system on page 19. • How to install on Windows Vista systems on the BenQ LCD Monitor CD-ROM for Windows Vista and Windows 7 Operating System (OS). You need only steer it in the right direction. It is currently tested...
... and letting Windows install the corresponding driver files from your BenQ monitor Windows has an Upgrade Device Driver Wizard to upgrade the monitor on an existing computer This instruction details the procedure for manually updating the existing monitor driver software on your model may well function perfectly with other.... See: • How to install on Windows 7 system on page 19. • How to install on Windows Vista systems on the BenQ LCD Monitor CD-ROM for Windows Vista and Windows 7 Operating System (OS). You need only steer it in the right direction. It is currently tested...

User Manual
Page 19
...Browse my computer for the CD-ROM drive). it may differ from the menu. Click Close. Click Generic PnP Monitor, and then the Properties button. 5. Insert the BenQ LCD Monitor CD-ROM into a CD drive on Windows 7 system 1. The drive letter for your CD drive may be prompted... driver update is the drive letter designator for driver software. 8. Go to restart your monitor from provided driver list, and click Next. Open Display Properties. Click Browse and navigate to your BenQ monitor 19 Click the Driver tab and the Update Driver button. 6. Select Properties from your ...
...Browse my computer for the CD-ROM drive). it may differ from the menu. Click Close. Click Generic PnP Monitor, and then the Properties button. 5. Insert the BenQ LCD Monitor CD-ROM into a CD drive on Windows 7 system 1. The drive letter for your CD drive may be prompted... driver update is the drive letter designator for driver software. 8. Go to restart your monitor from provided driver list, and click Next. Open Display Properties. Click Browse and navigate to your BenQ monitor 19 Click the Driver tab and the Update Driver button. 6. Select Properties from your ...

User Manual
Page 20
...driver update is the drive letter designator for driver software. 8. Click Continue in the prompted User Account Control window. 5. Insert the BenQ LCD Monitor CD-ROM into a CD drive on Windows Vista systems 1. In the Update Driver Software window, select the option Browse my computer for... the CD-ROM drive). Click Browse and navigate to restart your BenQ monitor Click Close. it may differ from the popup menu. Click the Monitor tab and the Properties button. 4. Click the Driver tab and the Update Driver button. 6.
...driver update is the drive letter designator for driver software. 8. Click Continue in the prompted User Account Control window. 5. Insert the BenQ LCD Monitor CD-ROM into a CD drive on Windows Vista systems 1. In the Update Driver Software window, select the option Browse my computer for... the CD-ROM drive). Click Browse and navigate to restart your BenQ monitor Click Close. it may differ from the popup menu. Click the Monitor tab and the Properties button. 4. Click the Driver tab and the Update Driver button. 6.
User Manual
Page 21
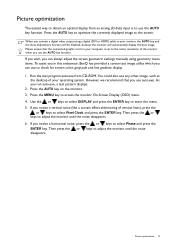
..., a test pattern displays. 2. However, we recommend that the connected graphic card on the monitor. 3. If you connect a digital video output using geometry menu items. To assist you in this endeavour, BenQ has provided a screen test image utility which you notice a horizontal noise, press the or... keys to adjust the monitor until the noise disappears. 6. When you notice a vertical noise (like a curtain effect-shimmering of your monitor, the AUTO key and the ...
..., a test pattern displays. 2. However, we recommend that the connected graphic card on the monitor. 3. If you connect a digital video output using geometry menu items. To assist you in this endeavour, BenQ has provided a screen test image utility which you notice a horizontal noise, press the or... keys to adjust the monitor until the noise disappears. 6. When you notice a vertical noise (like a curtain effect-shimmering of your monitor, the AUTO key and the ...


