
User Manual
Page 2
ii Disclaimer BENQ Corporation makes no representations or warranties, either expressed or implied, with a lint-free, non-abrasive cloth. Always unplug your monitor from the AC supply. • The power supply cord serves as a power disconnect device for pluggable equipment. Avoid using any liquid, aerosol...socket outlet should be installed near or over a radiator or heat source, or in a built-in any form or by BENQ Corporation. Clean the LCD monitor surface with respect to dangerous voltages or other accident such as opening or removing covers may be placed near the equipment and ...
ii Disclaimer BENQ Corporation makes no representations or warranties, either expressed or implied, with a lint-free, non-abrasive cloth. Always unplug your monitor from the AC supply. • The power supply cord serves as a power disconnect device for pluggable equipment. Avoid using any liquid, aerosol...socket outlet should be installed near or over a radiator or heat source, or in a built-in any form or by BENQ Corporation. Clean the LCD monitor surface with respect to dangerous voltages or other accident such as opening or removing covers may be placed near the equipment and ...

User Manual
Page 3
i Table of contents Getting started ...5 Getting to know your Monitor ...6 Front View ...6 Back View (1) ...6 Back View (2): Locations of plugs & sockets 7 How to install your monitor hardware 8 How to install your monitor's software 10 Choosing the best picture resolution 37 How to choose the right Refresh Rate 39 How ...to set the Picture Optimization 41 How to adjust your Monitor ...42 A Look at the Control Panel ...42 Hot Key Mode ...42 Main Menu Mode ...43 Troubleshooting ...50 Frequently Asked Questions (...
i Table of contents Getting started ...5 Getting to know your Monitor ...6 Front View ...6 Back View (1) ...6 Back View (2): Locations of plugs & sockets 7 How to install your monitor hardware 8 How to install your monitor's software 10 Choosing the best picture resolution 37 How to choose the right Refresh Rate 39 How ...to set the Picture Optimization 41 How to adjust your Monitor ...42 A Look at the Control Panel ...42 Hot Key Mode ...42 Main Menu Mode ...43 Troubleshooting ...50 Frequently Asked Questions (...
User Manual
Page 5
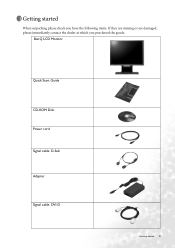
BenQ LCD Monitor Quick Start Guide CD-ROM Disk Power cord Signal cable: D-Sub Adapter Signal cable: DVI-D Getting started When unpacking please check you have the following items. If they are missing or are damaged, please immediately contact the dealer at which you purchased the goods. 1 Getting started 5
BenQ LCD Monitor Quick Start Guide CD-ROM Disk Power cord Signal cable: D-Sub Adapter Signal cable: DVI-D Getting started When unpacking please check you have the following items. If they are missing or are damaged, please immediately contact the dealer at which you purchased the goods. 1 Getting started 5
User Manual
Page 7
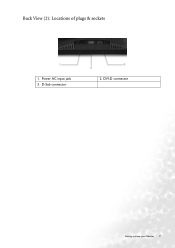
Power AC input jack 3. D-Sub connector 2. DVI-D connector Getting to know your Monitor 7 Back View (2): Locations of plugs & sockets 1.
Power AC input jack 3. D-Sub connector 2. DVI-D connector Getting to know your Monitor 7 Back View (2): Locations of plugs & sockets 1.
User Manual
Page 8
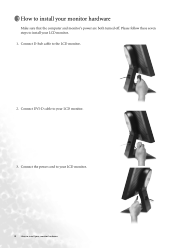
Please follow these seven steps to install your LCD monitor. 3. Connect DVI-D cable to your LCD monitor. 1. Connect the power cord to your LCD monitor. 8 How to install your monitor hardware Make sure that the computer and monitor's power are both turned off. 3 How to install your monitor hardware Connect D-Sub cable to the LCD monitor. 2.
Please follow these seven steps to install your LCD monitor. 3. Connect DVI-D cable to your LCD monitor. 1. Connect the power cord to your LCD monitor. 8 How to install your monitor hardware Make sure that the computer and monitor's power are both turned off. 3 How to install your monitor hardware Connect D-Sub cable to the LCD monitor. 2.
User Manual
Page 9
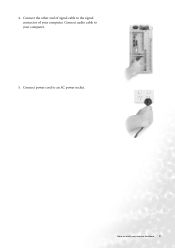
How to an AC power socket. Connect power cord to install your monitor hardware 9 4. Connect audio cable to the signal connector of signal cable to your computer. Connect the other end of your computer. 5.
How to an AC power socket. Connect power cord to install your monitor hardware 9 4. Connect audio cable to the signal connector of signal cable to your computer. Connect the other end of your computer. 5.
User Manual
Page 10
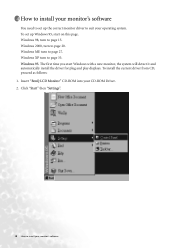
... page 20. Click "Start" then "Settings". 10 How to suit your operating system. Windows 95. Insert "BenQ LCD Monitor" CD-ROM into your CD-ROM Driver. 2. To set up Windows 95, start Windows with a new monitor, the system will detect it and automatically install the driver for plug and play displays. To install..., proceed as follows: 1. Windows ME turn to page 27. Windows XP turn to page 33. Windows 98, turn to page 15. 4 How to install your monitor's software You need to set up the correct...
... page 20. Click "Start" then "Settings". 10 How to suit your operating system. Windows 95. Insert "BenQ LCD Monitor" CD-ROM into your CD-ROM Driver. 2. To set up Windows 95, start Windows with a new monitor, the system will detect it and automatically install the driver for plug and play displays. To install..., proceed as follows: 1. Windows ME turn to page 27. Windows XP turn to page 33. Windows 98, turn to page 15. 4 How to install your monitor's software You need to set up the correct...
User Manual
Page 11
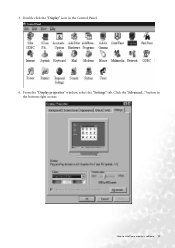
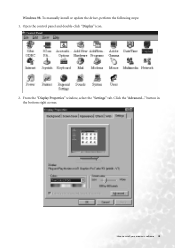
Click the "Advanced..." From the "Display properties" window, select the "Settings" tab. button in the Control Panel. 4. How to install your monitor's software 11 Double click the "Display" icon in the bottom right corner. 3.
Click the "Advanced..." From the "Display properties" window, select the "Settings" tab. button in the Control Panel. 4. How to install your monitor's software 11 Double click the "Display" icon in the bottom right corner. 3.
User Manual
Page 12
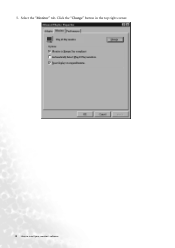
Select the "Monitor" tab. Click the "Change" button in the top right corner. 12 How to install your monitor's software 5.
Select the "Monitor" tab. Click the "Change" button in the top right corner. 12 How to install your monitor's software 5.
User Manual
Page 13
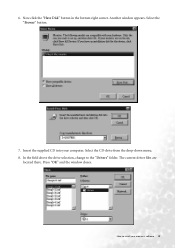
Insert the supplied CD into your monitor's software 13 Select the "Browse" button. 7. In the field above the drive selection, change to install your computer. 6. The current driver files are located there. How to the "Drivers" folder. Press "OK" and the window closes. Select the CD-drive from the drop-down menu. 8. Now click the "Have Disk" button in the bottom right corner. Another window appears.
Insert the supplied CD into your monitor's software 13 Select the "Browse" button. 7. In the field above the drive selection, change to install your computer. 6. The current driver files are located there. How to the "Drivers" folder. Press "OK" and the window closes. Select the CD-drive from the drop-down menu. 8. Now click the "Have Disk" button in the bottom right corner. Another window appears.

User Manual
Page 14
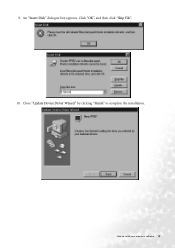
Select "FP951" from the list and press "OK" again. 10. Close this window by clicking "OK" and confirm the following messages with "Yes". Click "OK" and "Yes" again. You can close "Display Properties". 14 How to "Advanced Display Properties". The installation is now completed. Now you will be given a list of compatible devices. 9. By pressing "OK" again in the next window you are back to install your monitor's software
Select "FP951" from the list and press "OK" again. 10. Close this window by clicking "OK" and confirm the following messages with "Yes". Click "OK" and "Yes" again. You can close "Display Properties". 14 How to "Advanced Display Properties". The installation is now completed. Now you will be given a list of compatible devices. 9. By pressing "OK" again in the next window you are back to install your monitor's software
User Manual
Page 15
How to install your monitor's software 15 Windows 98. button in the bottom right corner. Open the control panel and double-click "Display" icon. 2. To manually install or update the driver, perform the following steps: 1. From the "Display Properties" window, select the "Settings" tab. Click the "Advanced..."
How to install your monitor's software 15 Windows 98. button in the bottom right corner. Open the control panel and double-click "Display" icon. 2. To manually install or update the driver, perform the following steps: 1. From the "Display Properties" window, select the "Settings" tab. Click the "Advanced..."
User Manual
Page 16
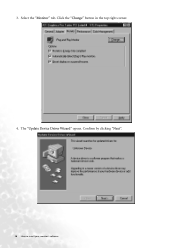
Click the "Change" button in the top right corner. 4. The "Update Device Driver Wizard" opens. Confirm by clicking "Next". 16 How to install your monitor's software Select the "Monitor" tab. 3.
Click the "Change" button in the top right corner. 4. The "Update Device Driver Wizard" opens. Confirm by clicking "Next". 16 How to install your monitor's software Select the "Monitor" tab. 3.

User Manual
Page 17
Another window appears. Select "Display a list of all drivers in the bottom right corner. Select the "Browse" button. How to install your monitor's software 17 5. Now click the "Have Disk" button in a specific location, so you can select the driver you want." and press "Next". 6.
Another window appears. Select "Display a list of all drivers in the bottom right corner. Select the "Browse" button. How to install your monitor's software 17 5. Now click the "Have Disk" button in a specific location, so you can select the driver you want." and press "Next". 6.
User Manual
Page 18
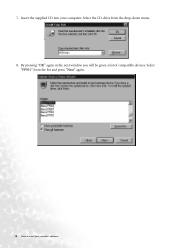
7. By pressing "OK" again in the next window you will be given a list of compatible devices. Select "FP951" from the drop-down menu. 8. Select the CD-drive from the list and press "Next" again. 18 How to install your computer. Insert the supplied CD into your monitor's software
7. By pressing "OK" again in the next window you will be given a list of compatible devices. Select "FP951" from the drop-down menu. 8. Select the CD-drive from the list and press "Next" again. 18 How to install your computer. Insert the supplied CD into your monitor's software
User Manual
Page 19
9. Close "Update Device Driver Wizard" by clicking "Finish" to install your monitor's software 19 Click "OK", and then click "Skip File". 10. How to complete the installation. An "Insert Disk" dialogue box appears.
9. Close "Update Device Driver Wizard" by clicking "Finish" to install your monitor's software 19 Click "OK", and then click "Skip File". 10. How to complete the installation. An "Insert Disk" dialogue box appears.
User Manual
Page 20
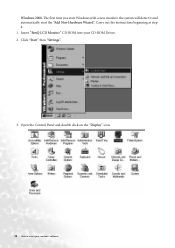
The first time you start Windows with a new monitor, the system will detect it and automatically start the "Add New Hardware Wizard". Click "Start" then "Settings". 3. Open the Control Panel and double click on the "Display" icon. 20 How to install your CD-ROM Driver. 2. Carry out the instructions beginning at step 4. 1. Windows 2000. Insert "BenQ LCD Monitor" CD-ROM into your monitor's software
The first time you start Windows with a new monitor, the system will detect it and automatically start the "Add New Hardware Wizard". Click "Start" then "Settings". 3. Open the Control Panel and double click on the "Display" icon. 20 How to install your CD-ROM Driver. 2. Carry out the instructions beginning at step 4. 1. Windows 2000. Insert "BenQ LCD Monitor" CD-ROM into your monitor's software
User Manual
Page 21
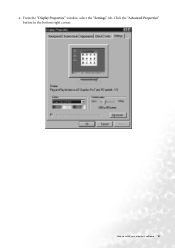
Click the "Advanced Properties" button in the bottom right corner. From the "Display Properties" window, select the "Settings" tab. 4. How to install your monitor's software 21
Click the "Advanced Properties" button in the bottom right corner. From the "Display Properties" window, select the "Settings" tab. 4. How to install your monitor's software 21

User Manual
Page 22
5. Select "Monitor" then click "Properties". 22 How to install your monitor's software
5. Select "Monitor" then click "Properties". 22 How to install your monitor's software

User Manual
Page 23
6. Then click "Next". Select "Driver" tab then click "Update Driver". 7. How to install your monitor's software 23 The "Upgrade Device Driver Wizard" will pop up.
6. Then click "Next". Select "Driver" tab then click "Update Driver". 7. How to install your monitor's software 23 The "Upgrade Device Driver Wizard" will pop up.

