

User Manual
Page 3
...your monitor 6 Front view ...6 Back view ...6 Assembling your monitor hardware 7 How to detach the stand base 10 Getting the most from your BenQ monitor 11 How to install the monitor on a new computer 12 How to upgrade the monitor on an existing computer 13 How to install ...How to adjust your monitor 17 The control panel (1): models with speakers 17 The control panel (2): non-speaker models 18 On Screen Display (OSD) menu structure 19 Hot key mode (1): models with speakers 21 Hot key mode (2): non-speaker models 22 Main menu mode ...23 Troubleshooting ...34 Frequently asked questions...
...your monitor 6 Front view ...6 Back view ...6 Assembling your monitor hardware 7 How to detach the stand base 10 Getting the most from your BenQ monitor 11 How to install the monitor on a new computer 12 How to upgrade the monitor on an existing computer 13 How to install ...How to adjust your monitor 17 The control panel (1): models with speakers 17 The control panel (2): non-speaker models 18 On Screen Display (OSD) menu structure 19 Hot key mode (1): models with speakers 21 Hot key mode (2): non-speaker models 22 Main menu mode ...23 Troubleshooting ...34 Frequently asked questions...
User Manual
Page 5
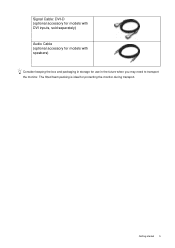
The fitted foam packing is ideal for use in storage for protecting the monitor during transport. Getting started 5 Signal Cable: DVI-D (optional accessory for models with DVI inputs, sold separately) Audio Cable (optional accessory for models with speakers) Consider keeping the box and packaging in the future when you may need to transport the monitor.
The fitted foam packing is ideal for use in storage for protecting the monitor during transport. Getting started 5 Signal Cable: DVI-D (optional accessory for models with DVI inputs, sold separately) Audio Cable (optional accessory for models with speakers) Consider keeping the box and packaging in the future when you may need to transport the monitor.

User Manual
Page 6
2. Back view Audio cable socket Models without speakers do not have the earphone socket. D-Sub input socket 6 Getting to know your monitor Front view Earphone socket Models without speakers do not have the audio cable socket. AC power input jack DVI-D input socket Analog-only models do not have the DVI-D input socket. Getting to know your monitor
2. Back view Audio cable socket Models without speakers do not have the earphone socket. D-Sub input socket 6 Getting to know your monitor Front view Earphone socket Models without speakers do not have the audio cable socket. AC power input jack DVI-D input socket Analog-only models do not have the DVI-D input socket. Getting to know your monitor

User Manual
Page 17
...that setting, and will disappear after a few seconds of no key activity. t /Volume key: For Up/Increase adjustment. See Hot key mode (1): models with speakers 1. The key is also the hot key for Mode. 6. 6. How to adjust your monitor 17 "MENU" key: Activate OSD main menu and return to ...adjust your monitor The control panel (1): models with speakers on or off. 2. How to the previous menu or exit OSD. 4. "ENTER" key: Enter sub menus and select items. For models with DVI inputs,...
...that setting, and will disappear after a few seconds of no key activity. t /Volume key: For Up/Increase adjustment. See Hot key mode (1): models with speakers 1. The key is also the hot key for Mode. 6. 6. How to adjust your monitor 17 "MENU" key: Activate OSD main menu and return to ...adjust your monitor The control panel (1): models with speakers on or off. 2. How to the previous menu or exit OSD. 4. "ENTER" key: Enter sub menus and select items. For models with DVI inputs,...

User Manual
Page 18
"AUTO": Adjust vertical position, phase, horizontal position and pixel clock automatically. 3. u /Mode key: For Down/Decrease adjustment. See Hot key mode (2): non-speaker models on or off. 2. The control panel (2): non-speaker models 1. The key is the hot key for Mode. 6. "Power": Turn the power on page 22. 18 How to the previous...
"AUTO": Adjust vertical position, phase, horizontal position and pixel clock automatically. 3. u /Mode key: For Down/Decrease adjustment. See Hot key mode (2): non-speaker models on or off. 2. The control panel (2): non-speaker models 1. The key is the hot key for Mode. 6. "Power": Turn the power on page 22. 18 How to the previous...
User Manual
Page 19
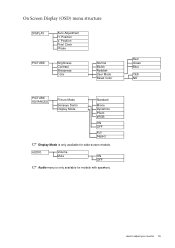
On Screen Display (OSD) menu structure DISPLAY Auto Adjustment H. Red Green Blue YES NO How to adjust your monitor 19 AUDIO Volume Mute ON OFF Audio menu is only available for models with speakers. Position Pixel Clock Phase PICTURE Brightness Contrast Sharpness Color Normal Bluish Reddish User Mode Reset Color PICTURE ADVANCED Picture Mode Senseye Demo Display Mode Standard Movie Dynamics Photo sRGB ON OFF Full Aspect Display Mode is only available for wide-screen models. Position V.
On Screen Display (OSD) menu structure DISPLAY Auto Adjustment H. Red Green Blue YES NO How to adjust your monitor 19 AUDIO Volume Mute ON OFF Audio menu is only available for models with speakers. Position Pixel Clock Phase PICTURE Brightness Contrast Sharpness Color Normal Bluish Reddish User Mode Reset Color PICTURE ADVANCED Picture Mode Senseye Demo Display Mode Standard Movie Dynamics Photo sRGB ON OFF Full Aspect Display Mode is only available for wide-screen models. Position V.

User Manual
Page 21
... the menu isn't currently displaying on-screen. See also Picture Mode on page 31. The setting will take effect immediately. Hot key mode (1): models with speakers The monitor keys perform as hotkeys to provide direct access to adjust your monitor.
... the menu isn't currently displaying on-screen. See also Picture Mode on page 31. The setting will take effect immediately. Hot key mode (1): models with speakers The monitor keys perform as hotkeys to provide direct access to adjust your monitor.

User Manual
Page 22
... immediately. See also Input on page 31. 22 How to particular functions whenever the menu isn't currently displaying on page 28. Hot key mode (2): non-speaker models The monitor keys perform as hotkeys to provide direct access to adjust your monitor. Further press the the t or u keys, then the ENTER key...
... immediately. See also Input on page 31. 22 How to particular functions whenever the menu isn't currently displaying on page 28. Hot key mode (2): non-speaker models The monitor keys perform as hotkeys to provide direct access to adjust your monitor. Further press the the t or u keys, then the ENTER key...
User Manual
Page 23
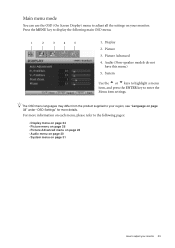
... may differ from the product supplied to your region, see "Language on page 31 How to the following main OSD menu. 1 2 3 4 5 1. Picture Advanced 4. Audio (Non-speaker models do not have this menu) 5. Picture 3. System Use the t or u keys to highlight a menu item, and press the ENTER key to adjust all the...
... may differ from the product supplied to your region, see "Language on page 31 How to the following main OSD menu. 1 2 3 4 5 1. Picture Advanced 4. Audio (Non-speaker models do not have this menu) 5. Picture 3. System Use the t or u keys to highlight a menu item, and press the ENTER key to adjust all the...

User Manual
Page 30
... t or u keys to decrease the volume. Press the MENU key to make adjustments or selections. 5. Audio menu Audio menu is only available for models with speakers. 1. Item Volume Mute Function Adjusts the level of volume. Press the t or ukeys to display the main menu. 2. Mutes the audio input. Range 0 to 100...
... t or u keys to decrease the volume. Press the MENU key to make adjustments or selections. 5. Audio menu Audio menu is only available for models with speakers. 1. Item Volume Mute Function Adjusts the level of volume. Press the t or ukeys to display the main menu. 2. Mutes the audio input. Range 0 to 100...