

User Guide
Page 1
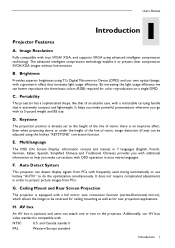
Features (1) High brightness (2) High resolution (3) Compact size, light weight for future reference. After reading this manual, keep it for portability (4) RGB input terminal (5) RS232 Communication (6) Mouse emulation (7) Complies with VESA DDC1/2B specifications Outline This DLP™ Technology Projector can display various computer signals and NTSC/PAL/SECAM video signals. Digital Multimedia Projector User's Manual Thank you very much for purchasing this operating guide to ensure correct use of the device. Please read this DLP™ Technology Projector.
Features (1) High brightness (2) High resolution (3) Compact size, light weight for future reference. After reading this manual, keep it for portability (4) RGB input terminal (5) RS232 Communication (6) Mouse emulation (7) Complies with VESA DDC1/2B specifications Outline This DLP™ Technology Projector can display various computer signals and NTSC/PAL/SECAM video signals. Digital Multimedia Projector User's Manual Thank you very much for purchasing this operating guide to ensure correct use of the device. Please read this DLP™ Technology Projector.

User Guide
Page 2
... will void your warranty. 5. Please use suitable equipment for ventilation. User's Manual Copyright Copyright © 2002. Allow the projector to cool for approximately 45 minutes prior to operate for replacement. The product may cause injury if pointed directly into any language...and specifically disclaims any warranties, merchantability or fitness for future reference. 2. All rights reserved. Power is still available when the projector is on an unstable cart, stand, or table. II Copyright No part of the product. Excessive operation of these instructions ...
... will void your warranty. 5. Please use suitable equipment for ventilation. User's Manual Copyright Copyright © 2002. Allow the projector to cool for approximately 45 minutes prior to operate for replacement. The product may cause injury if pointed directly into any language...and specifically disclaims any warranties, merchantability or fitness for future reference. 2. All rights reserved. Power is still available when the projector is on an unstable cart, stand, or table. II Copyright No part of the product. Excessive operation of these instructions ...
User Guide
Page 3
......22 AV Connection Port...22 AV Control Pad ...22 Connecting the Box...23 Table of Contents Introduction ...1 Projector Features ...1 Description ...2 A. Connecting the Projector to Macintosh/Power Book 7 Operation ...8 Turn On/Off Procedure...8 A. Control Pad ...8 B. Control Page...17... D. Electrical ...21 C. FRONT ...2 B. Adjustable Feet...3 Moving the Projector ...4 Accessories...5 Connection...6 A. Standby...8 External Control ...8 A. Lamp/temperature Status LED Indicator...12 B. Mechanical...21 D. Replacing the...
......22 AV Connection Port...22 AV Control Pad ...22 Connecting the Box...23 Table of Contents Introduction ...1 Projector Features ...1 Description ...2 A. Connecting the Projector to Macintosh/Power Book 7 Operation ...8 Turn On/Off Procedure...8 A. Control Pad ...8 B. Control Page...17... D. Electrical ...21 C. FRONT ...2 B. Adjustable Feet...3 Moving the Projector ...4 Accessories...5 Connection...6 A. Standby...8 External Control ...8 A. Lamp/temperature Status LED Indicator...12 B. Mechanical...21 D. Replacing the...
User Guide
Page 5
.... Keystone The projection position is no keystone effect. G. The advanced intelligent compression technology enables it to the projector. Brightness Provides superior brightness using TI's Digital Micromirror Device (DMD) and our own optical design, with true SVGA/ XGA, and supports SXGA using the hotkey "KEYSTONE" correction function. It helps you make powerful presentations...
.... Keystone The projection position is no keystone effect. G. The advanced intelligent compression technology enables it to the projector. Brightness Provides superior brightness using TI's Digital Micromirror Device (DMD) and our own optical design, with true SVGA/ XGA, and supports SXGA using the hotkey "KEYSTONE" correction function. It helps you make powerful presentations...
User Guide
Page 7
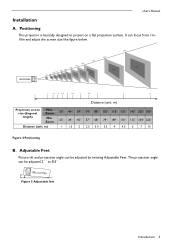
..." 59" 74" 88" 102" 116" 131" 145" 203" 300" 23" 34" 45" 57" 68" 79" 89" 101" 112" 154" 225" 1 1.5 2 2.5 3.0 3.5 4 4.5 5 7 10 Figure 4 Positioning B. Positioning This projector is basically designed to 8.5°. User's Manual Installation A. Zoom Min.
..." 59" 74" 88" 102" 116" 131" 145" 203" 300" 23" 34" 45" 57" 68" 79" 89" 101" 112" 154" 225" 1 1.5 2 2.5 3.0 3.5 4 4.5 5 7 10 Figure 4 Positioning B. Positioning This projector is basically designed to 8.5°. User's Manual Installation A. Zoom Min.

User Guide
Page 8
... surface of the cabinet. It is intended to protect the projector from external shock. User's Manual Moving the Projector Use the carrying handle when moving the projector to prevent damage to the projector. Replace the lens cover and rotate the feet fully clockwise (to the projector. This may cause damage to shorten the feet) when...
... surface of the cabinet. It is intended to protect the projector from external shock. User's Manual Moving the Projector Use the carrying handle when moving the projector to prevent damage to the projector. Replace the lens cover and rotate the feet fully clockwise (to the projector. This may cause damage to shorten the feet) when...

User Guide
Page 9
User's Manual Accessories Please check and make sure your dealer. If any pieces are missing, contact your box contains everything listed below. Please save the original box and packing materials in case you ever need to ship the unit. Projector User's Guide UGseuri'dse AAA Batteries Figure 7 Accessories Remote Control Ma c Adapter CD Manual 15 pin D-sub connector PS/ 2 Mouse a dapter ADB Mouse Adapter Serial Mouse Adapter General Cable Introduction 5
User's Manual Accessories Please check and make sure your dealer. If any pieces are missing, contact your box contains everything listed below. Please save the original box and packing materials in case you ever need to ship the unit. Projector User's Guide UGseuri'dse AAA Batteries Figure 7 Accessories Remote Control Ma c Adapter CD Manual 15 pin D-sub connector PS/ 2 Mouse a dapter ADB Mouse Adapter Serial Mouse Adapter General Cable Introduction 5

User Guide
Page 10
Connecting the Projector to Computer/Notebook Figure 8 Connection to PC Figure 9 Connection to notebook 6 Connection User's Manual 2 Connection A.
Connecting the Projector to Computer/Notebook Figure 8 Connection to PC Figure 9 Connection to notebook 6 Connection User's Manual 2 Connection A.

User Guide
Page 11
B. Connecting the Projector to Macintosh/Power Book User's Manual Figure 10 Connection to Macintosh Figure 11 Connection to Power Book Connection 7
B. Connecting the Projector to Macintosh/Power Book User's Manual Figure 10 Connection to Macintosh Figure 11 Connection to Power Book Connection 7

User Guide
Page 12
...be displayed on the screen if the horizontal frequency of the input signal exceeds the range of the projector. "SYNC IS OUT OF RANGE" message will be displayed on the screen after the projector has identified the input signal; Keystone + Keystone Remote Menu Receiver Auto Stanby/On Stanby/On Indicator ... Turn On/Off Procedure A. Standby Press the Standby/On key, the following messages will be displayed on the screen if there is blinking, the projector will continue to run for one minute. The LED will then blink orange and the lamp will shut down, but the fan will ignore the...
...be displayed on the screen if the horizontal frequency of the input signal exceeds the range of the projector. "SYNC IS OUT OF RANGE" message will be displayed on the screen after the projector has identified the input signal; Keystone + Keystone Remote Menu Receiver Auto Stanby/On Stanby/On Indicator ... Turn On/Off Procedure A. Standby Press the Standby/On key, the following messages will be displayed on the screen if there is blinking, the projector will continue to run for one minute. The LED will then blink orange and the lamp will shut down, but the fan will ignore the...

User Guide
Page 15
..., use disk pad to move Left/Right among OSD items. The remote control allows you to operate the function keys on the projector and to emulate mouse function when the projector is displayed by pressing the "+" or "-" button. When operating in the direction of batteries. Pressing this button partially magnifies a displayed picture...
..., use disk pad to move Left/Right among OSD items. The remote control allows you to operate the function keys on the projector and to emulate mouse function when the projector is displayed by pressing the "+" or "-" button. When operating in the direction of batteries. Pressing this button partially magnifies a displayed picture...

User Guide
Page 17
... new one minute and then the lamp will turn it using the same screw. • Firmly tighten the lamp screw. Caution: • Dispose of the projector may explode if improperly handled. i. Install the lamp cover and fix it using a screw. • To prevent burns, install the lamp cover and secure...Lamp is covered by scattered, broken pieces of glass, do not apply shocks to it or scratch it means the lamp and temperature inside the projector are optical parts inside of used lamps in color unevenness, etc.) iv. Turn off and disconnect the power cord from the outlet and ask...
... new one minute and then the lamp will turn it using the same screw. • Firmly tighten the lamp screw. Caution: • Dispose of the projector may explode if improperly handled. i. Install the lamp cover and fix it using a screw. • To prevent burns, install the lamp cover and secure...Lamp is covered by scattered, broken pieces of glass, do not apply shocks to it or scratch it means the lamp and temperature inside the projector are optical parts inside of used lamps in color unevenness, etc.) iv. Turn off and disconnect the power cord from the outlet and ask...

User Guide
Page 21
... box is Video or SVideo. *Tint may try to activate the H. Color (Less) (More) Tint (Red) (Green) Source is attached, the projector will be highlighted. Phase manually. Size manually to the screen. V. Image Ratio 4:3 (Normal) 16:9 (Wide) System To select the input video system... standard. There are saved when the projector is power off and adjust the H. Figure 26 Control sub-page Figure 27 Language selection Operation 17 Resize H. If flicker occurs on this page...
... box is Video or SVideo. *Tint may try to activate the H. Color (Less) (More) Tint (Red) (Green) Source is attached, the projector will be highlighted. Phase manually. Size manually to the screen. V. Image Ratio 4:3 (Normal) 16:9 (Wide) System To select the input video system... standard. There are saved when the projector is power off and adjust the H. Figure 26 Control sub-page Figure 27 Language selection Operation 17 Resize H. If flicker occurs on this page...

User Guide
Page 22
... and no signal is detected or sync is 0 (stop). Source Page This Sub-page will display on the screen. To set the time to the projector: PC, Video, S-video To set the volume level of input signal detection: (a.) PC (b.) SVideo (c.) Video. *When selecting input sources, the... projector will detect the selected input simultaneously, and the OSD menu will still exist on this page: Source, Volume, Treble, Bass, and Mute. *The priority of ...
... and no signal is detected or sync is 0 (stop). Source Page This Sub-page will display on the screen. To set the time to the projector: PC, Video, S-video To set the volume level of input signal detection: (a.) PC (b.) SVideo (c.) Video. *When selecting input sources, the... projector will detect the selected input simultaneously, and the OSD menu will still exist on this page: Source, Volume, Treble, Bass, and Mute. *The priority of ...

User Guide
Page 23
... of the picture can be magnified. Press Mute again or the volume +/- Press volume + or - If users connect the PS2 (ADB) mouse cable on the projector with the PC/Notebook (Macintosh/ Powerbook) mouse port, the disk pad will be an OSD message as shown below will appear. (The message will be...
... of the picture can be magnified. Press Mute again or the volume +/- Press volume + or - If users connect the PS2 (ADB) mouse cable on the projector with the PC/Notebook (Macintosh/ Powerbook) mouse port, the disk pad will be an OSD message as shown below will appear. (The message will be...

User Guide
Page 24
C. Wait two minutes after the projector has been turned off before turning the projector back on the control pad. Adjust the brightness and contrast. Is the vertical offset properly corrected using an excessive amount of the lens. Adjust the ... lens. 4. Adjust brightness, contrast, or saturation. Cleaning the Lens Follow these steps to improve its angle on the screen. Affix the lens cover whenever the projector is blocking the receiver on . Is the POWER indictor flashing? Reposition the unit to clean the projection lens: 1. Replace the batteries with new ones. Stand...
C. Wait two minutes after the projector has been turned off before turning the projector back on the control pad. Adjust the brightness and contrast. Is the vertical offset properly corrected using an excessive amount of the lens. Adjust the ... lens. 4. Adjust brightness, contrast, or saturation. Cleaning the Lens Follow these steps to improve its angle on the screen. Affix the lens cover whenever the projector is blocking the receiver on . Is the POWER indictor flashing? Reposition the unit to clean the projection lens: 1. Replace the batteries with new ones. Stand...

User Guide
Page 25
... VESA Macintosh VESA VESA VESA VESA VESA Specifications 21 Optical 5 Specifications DMD TM Lens Lamp Image size Projection Distance Contrast Ratio B. User's Manual A. Operational Temperature projector 10℃ to 40℃ Remote control D.
... VESA Macintosh VESA VESA VESA VESA VESA Specifications 21 Optical 5 Specifications DMD TM Lens Lamp Image size Projection Distance Contrast Ratio B. User's Manual A. Operational Temperature projector 10℃ to 40℃ Remote control D.

User Guide
Page 27
Plug in the projector. 2. Select inputs by pressing "Source" key, and select channel by the channel up or down keys. Precisely place the two chocks at the lower surface ...
Plug in the projector. 2. Select inputs by pressing "Source" key, and select channel by the channel up or down keys. Precisely place the two chocks at the lower surface ...


