

User Guide
Page 1
After reading this DLP™ Technology Projector. Outline This DLP™ Technology Projector can display various computer signals and NTSC/PAL/SECAM video signals. Features (1) High brightness (2) High resolution (3) Compact size, light weight for future reference. Digital Multimedia Projector User's Manual Thank you very much for purchasing this manual, keep it for portability (4) RGB input terminal (5) RS232 Communication (6) Mouse emulation (7) Complies with VESA DDC1/2B specifications Please read this operating guide to ensure correct use of the device.
After reading this DLP™ Technology Projector. Outline This DLP™ Technology Projector can display various computer signals and NTSC/PAL/SECAM video signals. Features (1) High brightness (2) High resolution (3) Compact size, light weight for future reference. Digital Multimedia Projector User's Manual Thank you very much for purchasing this manual, keep it for portability (4) RGB input terminal (5) RS232 Communication (6) Mouse emulation (7) Complies with VESA DDC1/2B specifications Please read this operating guide to ensure correct use of the device.

User Guide
Page 2
... 45 minutes prior to make sure it is securely installed. 8. Never replace lamp assembly or any electronic components unless the projector is in the standby mode. All rights reserved. Further, this company reserves the right to revise this publication and to removing...by any particular purpose. Please use suitable equipment for any means, electronic, mechanical, magnetic, optical, chemical, manual or otherwise, without obligation of these instructions before you operate your projector and save for replacement. Do not look straight at two sides are for about 1 minute after the...
... 45 minutes prior to make sure it is securely installed. 8. Never replace lamp assembly or any electronic components unless the projector is in the standby mode. All rights reserved. Further, this company reserves the right to revise this publication and to removing...by any particular purpose. Please use suitable equipment for any means, electronic, mechanical, magnetic, optical, chemical, manual or otherwise, without obligation of these instructions before you operate your projector and save for replacement. Do not look straight at two sides are for about 1 minute after the...
User Guide
Page 3
User's Manual Table of Lamp ...12 A. Connecting the Projector to Macintosh/Power Book 7 Operation ...8 Turn On/Off Procedure...8 A. Lamp/temperature Status LED Indicator...12...Troubleshooting...20 Specifications...21 A. Mechanical...21 D. FRONT ...2 B. Positioning...3 B. Adjustable Feet...3 Moving the Projector ...4 Accessories...5 Connection...6 A. Cleaning the Lens ...20 C. Standby...8 External Control ...8 A. REAR ...2 C. BOTTOM ...2 Installation...3 A. Connecting the Projector to Computer/Notebook 6 B. Power on...8 B. Control Pad ...8 B. Remote Control ...10 Usage and ...
User's Manual Table of Lamp ...12 A. Connecting the Projector to Macintosh/Power Book 7 Operation ...8 Turn On/Off Procedure...8 A. Lamp/temperature Status LED Indicator...12...Troubleshooting...20 Specifications...21 A. Mechanical...21 D. FRONT ...2 B. Positioning...3 B. Adjustable Feet...3 Moving the Projector ...4 Accessories...5 Connection...6 A. Cleaning the Lens ...20 C. Standby...8 External Control ...8 A. REAR ...2 C. BOTTOM ...2 Installation...3 A. Connecting the Projector to Computer/Notebook 6 B. Power on...8 B. Control Pad ...8 B. Remote Control ...10 Usage and ...
User Guide
Page 5
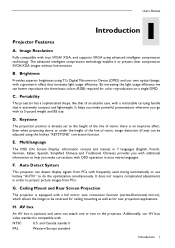
User's Manual Projector Features 1 Introduction A. The advanced intelligent compression technology enables it to help you make powerful presentations wherever you make corrections with its 5-pound weight and B5 size. Portability This projector has a sophisticated shape, like that of vision;... Resolution Fully compatible with frequently used timing automatically or use hotkey "AUTO" to project picture images from PCs with true SVGA/ XGA, and supports SXGA using advanced intelligent compression technology. Multilanguage The OSD (On Screen Display: information screens and menus...
User's Manual Projector Features 1 Introduction A. The advanced intelligent compression technology enables it to help you make powerful presentations wherever you make corrections with its 5-pound weight and B5 size. Portability This projector has a sophisticated shape, like that of vision;... Resolution Fully compatible with frequently used timing automatically or use hotkey "AUTO" to project picture images from PCs with true SVGA/ XGA, and supports SXGA using advanced intelligent compression technology. Multilanguage The OSD (On Screen Display: information screens and menus...
User Guide
Page 6
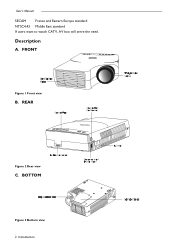
REAR Figure 2 Rear view C. FRONT Figure 1 Front view B. BOTTOM Figure 3 Bottom view 2 Introduction User's Manual SECAM France and Eastern Europe standard NTSC4.43 Middle East standard If users want to watch CATV, AV box will serve the need. Description A.
REAR Figure 2 Rear view C. FRONT Figure 1 Front view B. BOTTOM Figure 3 Bottom view 2 Introduction User's Manual SECAM France and Eastern Europe standard NTSC4.43 Middle East standard If users want to watch CATV, AV box will serve the need. Description A.
User Guide
Page 7
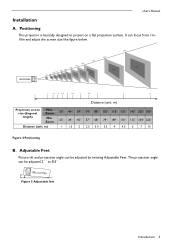
User's Manual Installation A. Positioning This projector is basically designed to 8.5°. It can be adjusted 2° to project on a flat projection surface. Zoom Min. Figure 5 Adjustable feet Introduction 3 The projection angle ...
User's Manual Installation A. Positioning This projector is basically designed to 8.5°. It can be adjusted 2° to project on a flat projection surface. Zoom Min. Figure 5 Adjustable feet Introduction 3 The projection angle ...

User Guide
Page 8
... bag (supplied) is not designed to protect the projector from dust and scratches on the surface of the cabinet. Replace the lens cover and rotate the feet fully clockwise (to shorten the feet) when moving the projector. User's Manual Moving the Projector Use the carrying handle when moving the projector to prevent damage to the...
... bag (supplied) is not designed to protect the projector from dust and scratches on the surface of the cabinet. Replace the lens cover and rotate the feet fully clockwise (to shorten the feet) when moving the projector. User's Manual Moving the Projector Use the carrying handle when moving the projector to prevent damage to the...

User Guide
Page 9
Please save the original box and packing materials in case you ever need to ship the unit. Projector User's Guide UGseuri'dse AAA Batteries Figure 7 Accessories Remote Control Ma c Adapter CD Manual 15 pin D-sub connector PS/ 2 Mouse a dapter ADB Mouse Adapter Serial Mouse Adapter General Cable Introduction 5 User's Manual Accessories Please check and make sure your dealer. If any pieces are missing, contact your box contains everything listed below.
Please save the original box and packing materials in case you ever need to ship the unit. Projector User's Guide UGseuri'dse AAA Batteries Figure 7 Accessories Remote Control Ma c Adapter CD Manual 15 pin D-sub connector PS/ 2 Mouse a dapter ADB Mouse Adapter Serial Mouse Adapter General Cable Introduction 5 User's Manual Accessories Please check and make sure your dealer. If any pieces are missing, contact your box contains everything listed below.

User Guide
Page 10
Connecting the Projector to Computer/Notebook Figure 8 Connection to PC Figure 9 Connection to notebook 6 Connection User's Manual 2 Connection A.
Connecting the Projector to Computer/Notebook Figure 8 Connection to PC Figure 9 Connection to notebook 6 Connection User's Manual 2 Connection A.

User Guide
Page 11
B. Connecting the Projector to Macintosh/Power Book User's Manual Figure 10 Connection to Macintosh Figure 11 Connection to Power Book Connection 7
B. Connecting the Projector to Macintosh/Power Book User's Manual Figure 10 Connection to Macintosh Figure 11 Connection to Power Book Connection 7

User Guide
Page 12
User's Manual 3 Operation Turn On/Off Procedure A. Control Pad Hotkey - The LED will then blink orange and the lamp will shut down for about 1 minute to turn on the lamp again while the LED is blinking, the projector will be displayed to make sure you really want to power off ...INPUT SIGNAL DETECTED, ACTIVATING AUTO IMAGE" will continue to run for one minute. B. The LED will be displayed on the screen after the projector has identified the input signal; Standby Press the Standby/On key, the following messages will blink green during warm up and then light solid green...
User's Manual 3 Operation Turn On/Off Procedure A. Control Pad Hotkey - The LED will then blink orange and the lamp will shut down for about 1 minute to turn on the lamp again while the LED is blinking, the projector will be displayed to make sure you really want to power off ...INPUT SIGNAL DETECTED, ACTIVATING AUTO IMAGE" will continue to run for one minute. B. The LED will be displayed on the screen after the projector has identified the input signal; Standby Press the Standby/On key, the following messages will blink green during warm up and then light solid green...

User Guide
Page 13
To correct the lower distortion of the projected image when keystone occurs. To call the OSD menu. To enter sub pages. User's Manual MAIN UNIT AUTO KEYSTONE + KEYSTONE - To correct the upper distortion of the projected image when keystone occurs. To turn the projection ...+ ) 3 ( KEYSTONE- ) Exit (AUTO) FUNCTION To call the OSD menu. Menu operation When you press MENU button into OSD menu, all hot keys become manual operating buttons. To exit from the current page or OSD menu, and save setting changes. Functions as an indicator showing the standby status. Lights or...
To correct the lower distortion of the projected image when keystone occurs. To call the OSD menu. To enter sub pages. User's Manual MAIN UNIT AUTO KEYSTONE + KEYSTONE - To correct the upper distortion of the projected image when keystone occurs. To turn the projection ...+ ) 3 ( KEYSTONE- ) Exit (AUTO) FUNCTION To call the OSD menu. Menu operation When you press MENU button into OSD menu, all hot keys become manual operating buttons. To exit from the current page or OSD menu, and save setting changes. Functions as an indicator showing the standby status. Lights or...
User Guide
Page 14
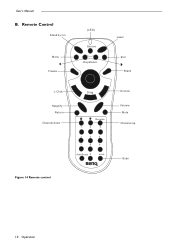
User's Manual B. Remote Control Stand by /on Menu Freeze (LED) Source -Keystone+ Laser Exit Blank L-Click Magnify Return Channel down Drag Reverse 1 2 3 4 5 6 7 8 9 Add/Erase 0 scan R-Click Volume Mute Channel up Scan Figure 14 Remote control 10 Operation
User's Manual B. Remote Control Stand by /on Menu Freeze (LED) Source -Keystone+ Laser Exit Blank L-Click Magnify Return Channel down Drag Reverse 1 2 3 4 5 6 7 8 9 Add/Erase 0 scan R-Click Volume Mute Channel up Scan Figure 14 Remote control 10 Operation

User Guide
Page 15
...and off. To move Left/Right among OSD items. The remote control allows you to operate the function keys on the projector and to emulate mouse function when the projector is active, use disk pad to bottom by pressing the "+" or "-" button. Mutes the sound. Use as indicated ... emulation mode, it registers a left mouse click. Selects the input source. When operating in the Remote Control Be sure to a computer. User's Manual Main Unit Standby/On Freeze Magnify Function To turn the projection lamp on button. Caution • Avoid excessive heat and humidity. • Do not...
...and off. To move Left/Right among OSD items. The remote control allows you to operate the function keys on the projector and to emulate mouse function when the projector is active, use disk pad to bottom by pressing the "+" or "-" button. Mutes the sound. Use as indicated ... emulation mode, it registers a left mouse click. Selects the input source. When operating in the Remote Control Be sure to a computer. User's Manual Main Unit Standby/On Freeze Magnify Function To turn the projection lamp on button. Caution • Avoid excessive heat and humidity. • Do not...

User Guide
Page 16
... exceeded 1500 service hours. "PLEASE CHANGE A NEW LAMP. THE POWER WILL TURN OFF AFTER 20 HOURS" will blink on the lamp again.) 12 Operation User's Manual Remote Control Range The remote sensors are located on the screen if the lamp has been operated for 1480 hours. Figure 16 Range Usage and...
... exceeded 1500 service hours. "PLEASE CHANGE A NEW LAMP. THE POWER WILL TURN OFF AFTER 20 HOURS" will blink on the lamp again.) 12 Operation User's Manual Remote Control Range The remote sensors are located on the screen if the lamp has been operated for 1480 hours. Figure 16 Range Usage and...

User Guide
Page 17
...shining, contact your dealer. Lamp is not well attached If the LED blinks rapidly, it using the screw. Turn off the projector and unplug the AC cord. iii. v. User's Manual 2. B. Replacing the Lamp Replacing the lamp When replacing the lamp, turn off automatically. 4. The lamp is covered by scattered...burns, install the lamp cover and secure it on again. Operation 13 Caution: The lamp indicator will turn off the power and let the projector cool for one and fix it indicates that , if touched, could you're your fingers. • Do not insert your dealer to ...
...shining, contact your dealer. Lamp is not well attached If the LED blinks rapidly, it using the screw. Turn off the projector and unplug the AC cord. iii. v. User's Manual 2. B. Replacing the Lamp Replacing the lamp When replacing the lamp, turn off automatically. 4. The lamp is covered by scattered...burns, install the lamp cover and secure it on again. Operation 13 Caution: The lamp indicator will turn off the power and let the projector cool for one and fix it indicates that , if touched, could you're your fingers. • Do not insert your dealer to ...

User Guide
Page 18
Lamp Replacement Procedure Step 1 Step 2 Figure 20 Lamp replacement: Step 1, Step 2, Step 3 Step 3 14 Operation User's Manual • Do not turn on power with lamp cover removed. • Whenever the lamp is replaced, reset the total operation time of the lamp. Do not reset if the lamp has not been replaced. • Do not reset the timer without changing the lamp, as this can cause the lamp to break.
Lamp Replacement Procedure Step 1 Step 2 Figure 20 Lamp replacement: Step 1, Step 2, Step 3 Step 3 14 Operation User's Manual • Do not turn on power with lamp cover removed. • Whenever the lamp is replaced, reset the total operation time of the lamp. Do not reset if the lamp has not been replaced. • Do not reset the timer without changing the lamp, as this can cause the lamp to break.

User Guide
Page 19
...). Whenever AV box is attached, 4 sub-pages will display in the menu. Press "4" (KEYSTONE+) or "3" (KEYSTONE-) buttons, the lamp usage time will display on . User's Manual Resetting Lamp Timer If replacing the lamp after 1500 hours of the screen and can be adjusted. • Use the "4" (KEYSTONE+) or "3" (KEYSTONE-) buttons to...
...). Whenever AV box is attached, 4 sub-pages will display in the menu. Press "4" (KEYSTONE+) or "3" (KEYSTONE-) buttons, the lamp usage time will display on . User's Manual Resetting Lamp Timer If replacing the lamp after 1500 hours of the screen and can be adjusted. • Use the "4" (KEYSTONE+) or "3" (KEYSTONE-) buttons to...

User Guide
Page 20
... Color Balance (Fig. 22). Only available when the the input signal is PC input signal is from video, S-video, TV or CATV 16 Operation User's Manual A. Size, H. Only available when Figure 25 Image sub-page - Press the "Menu" button again to the main OSD page. Position (Fig. 24). press "3" (KEYSTONE-) or...
... Color Balance (Fig. 22). Only available when the the input signal is PC input signal is from video, S-video, TV or CATV 16 Operation User's Manual A. Size, H. Only available when Figure 25 Image sub-page - Press the "Menu" button again to the main OSD page. Position (Fig. 24). press "3" (KEYSTONE-) or...

User Guide
Page 21
... 27 Language selection Operation 17 H.Position (move the image left) (move the image up) Position adjustments are saved when the projector is power off . Size User's Manual Setting effects When Resize is too wide or too narrow for the screen, users may turn Auto Image off to the screen.... Size manually to adjust the H. C. Phase H. If the projected image is 4:3 or 16:9, the projector determines the best fit of the image to activate the H. There are five items on a projected image,...
... 27 Language selection Operation 17 H.Position (move the image left) (move the image up) Position adjustments are saved when the projector is power off . Size User's Manual Setting effects When Resize is too wide or too narrow for the screen, users may turn Auto Image off to the screen.... Size manually to adjust the H. C. Phase H. If the projected image is 4:3 or 16:9, the projector determines the best fit of the image to activate the H. There are five items on a projected image,...

