User Manual
Page 3
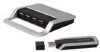
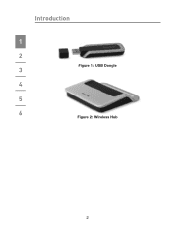
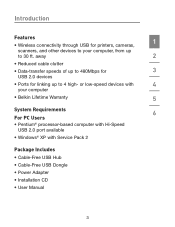
Introduction 1 2 Figure 1: USB Dongle 3 4 5 6 Figure 2: Wireless Hub 2
Introduction 1 2 Figure 1: USB Dongle 3 4 5 6 Figure 2: Wireless Hub 2
User Manual
Page 4
...; Data-transfer speeds of up to your computer • Belkin Lifetime Warranty 5 System Requirements 6 For PC Users • Pentium® processor-based computer with Hi-Speed USB 2.0 port available • Windows® XP with Service Pack 2 Package Includes • Cable-Free USB Hub • Cable-Free USB Dongle • Power Adapter • Installation CD •...
...; Data-transfer speeds of up to your computer • Belkin Lifetime Warranty 5 System Requirements 6 For PC Users • Pentium® processor-based computer with Hi-Speed USB 2.0 port available • Windows® XP with Service Pack 2 Package Includes • Cable-Free USB Hub • Cable-Free USB Dongle • Power Adapter • Installation CD •...
User Manual
Page 5
Introduction Belkin unleashes USB. The Hub is 3 easy to use and gives you the freedom to roam-and stay connected. 4 Please review this User Manual carefully so that you can print, play music, scan, download photos, and burn CDs from anywhere in the room, from your computer-wirelessly. 2 Now you are sure to get the most from up to your Cable-Free USB Hub. 5 6 1 This revolutionary product lets you connect all your USB devices to 30 feet away, without the hassle of connecting cables. Congratulations and thank you for purchasing the Belkin 1 Cable-Free USB Hub.
Introduction Belkin unleashes USB. The Hub is 3 easy to use and gives you the freedom to roam-and stay connected. 4 Please review this User Manual carefully so that you can print, play music, scan, download photos, and burn CDs from anywhere in the room, from your computer-wirelessly. 2 Now you are sure to get the most from up to your Cable-Free USB Hub. 5 6 1 This revolutionary product lets you connect all your USB devices to 30 feet away, without the hassle of connecting cables. Congratulations and thank you for purchasing the Belkin 1 Cable-Free USB Hub.
User Manual
Page 8
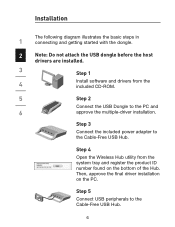
Step 4 Open the Wireless Hub utility from the included CD-ROM. 5 Step 2 Connect the USB Dongle to the Cable-Free USB Hub. 6 Installation The following diagram illustrates the basic steps in 1 connecting and getting started with the dongle. 2 Note: Do not attach the USB dongle before the host drivers are installed...the product ID number found on the PC. Step 5 Connect USB peripherals to the PC and 6 approve the multiple-driver installation. Step 3 Connect the included power adapter to the Cable-Free USB Hub. Then, approve the final driver installation on the bottom of ...
Step 4 Open the Wireless Hub utility from the included CD-ROM. 5 Step 2 Connect the USB Dongle to the Cable-Free USB Hub. 6 Installation The following diagram illustrates the basic steps in 1 connecting and getting started with the dongle. 2 Note: Do not attach the USB dongle before the host drivers are installed...the product ID number found on the PC. Step 5 Connect USB peripherals to the PC and 6 approve the multiple-driver installation. Step 3 Connect the included power adapter to the Cable-Free USB Hub. Then, approve the final driver installation on the bottom of ...
User Manual
Page 10
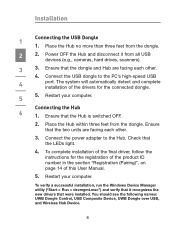
... switched OFF. 2. You should see the following names: UWB Dongle Control, USB Composite Device, UWB Dongle over USB, and Wireless Hub Device. 8 Ensure that the two units are facing each other . 4. Connect the power adapter to the PC's high-speed USB 4 port. Place the Hub no more than three feet from the dongle. The system will...
... switched OFF. 2. You should see the following names: UWB Dongle Control, USB Composite Device, UWB Dongle over USB, and Wireless Hub Device. 8 Ensure that the two units are facing each other . 4. Connect the power adapter to the PC's high-speed USB 4 port. Place the Hub no more than three feet from the dongle. The system will...
User Manual
Page 11
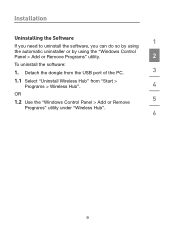
Detach the dongle from the USB port of the PC. 3 1.1 Select "Uninstall Wireless Hub" from "Start > Programs > Wireless Hub". 4 OR 1.2 Use the "Windows Control Panel > Add or Remove 5 Programs" utility under "Wireless Hub". 6 9 Installation Uninstalling the Software 1 If you need to uninstall the software, you can do so by using the automatic uninstaller or by using the "Windows Control Panel > Add or Remove Programs" utility. 2 To uninstall the software: 1.
Detach the dongle from the USB port of the PC. 3 1.1 Select "Uninstall Wireless Hub" from "Start > Programs > Wireless Hub". 4 OR 1.2 Use the "Windows Control Panel > Add or Remove 5 Programs" utility under "Wireless Hub". 6 9 Installation Uninstalling the Software 1 If you need to uninstall the software, you can do so by using the automatic uninstaller or by using the "Windows Control Panel > Add or Remove Programs" utility. 2 To uninstall the software: 1.
User Manual
Page 12
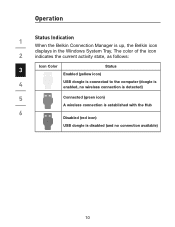
The color of the icon 2 indicates the current activity state, as follows: Icon Color Status 3 Enabled (yellow icon) 4 USB dongle is connected to the computer (dongle is enabled, no connection available) 10 Operation Status Indication 1 When the Belkin Connection Manager is disabled (and no wireless connection is detected) 5 Connected (green icon) A wireless connection is established with the Hub 6 Disabled (red icon) USB dongle is up, the Belkin icon displays in the Windows System Tray.
The color of the icon 2 indicates the current activity state, as follows: Icon Color Status 3 Enabled (yellow icon) 4 USB dongle is connected to the computer (dongle is enabled, no connection available) 10 Operation Status Indication 1 When the Belkin Connection Manager is disabled (and no wireless connection is detected) 5 Connected (green icon) A wireless connection is established with the Hub 6 Disabled (red icon) USB dongle is up, the Belkin icon displays in the Windows System Tray.
User Manual
Page 13
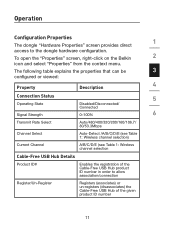
To open the "Properties" screen, right-click on the Belkin 2 icon and select "Properties" from the context menu. The following table explains the properties that can be 3 configured or viewed: Property Description 4 ... Rate Select Auto/480/400/320/200/160/106.7/ 80/53.3Mbps Channel Select Auto-Detect /A/B/C/D/E (see Table 1: Wireless channel selection) Current Channel A/B/C/D/E (see Table 1: Wireless channel selection Cable-Free USB Hub Details Product ID# Enables the registration of the given product ID number 11 Operation Configuration Properties 1 The dongle...
To open the "Properties" screen, right-click on the Belkin 2 icon and select "Properties" from the context menu. The following table explains the properties that can be 3 configured or viewed: Property Description 4 ... Rate Select Auto/480/400/320/200/160/106.7/ 80/53.3Mbps Channel Select Auto-Detect /A/B/C/D/E (see Table 1: Wireless channel selection) Current Channel A/B/C/D/E (see Table 1: Wireless channel selection Cable-Free USB Hub Details Product ID# Enables the registration of the given product ID number 11 Operation Configuration Properties 1 The dongle...

User Manual
Page 15
Operation Table 1: Wireless channel selection 1 Belkin TFC Band Search Pattern Channel Channel Name 2 A TFC1 F1 F2 F3 F1 F2 F3 B TFC2 F1 F3 F2 F1 F3 F2 3 C TFC5 F1 F1 F1 F1 F1 F1 4 D TFC6 F2 F2 F2 F2 F2 F2 E TFC7 F3 F3 F3 F3 F3 F3 5 6 Figure 3: Cable-Free USB Hub Connection Status screen 13
Operation Table 1: Wireless channel selection 1 Belkin TFC Band Search Pattern Channel Channel Name 2 A TFC1 F1 F2 F3 F1 F2 F3 B TFC2 F1 F3 F2 F1 F3 F2 3 C TFC5 F1 F1 F1 F1 F1 F1 4 D TFC6 F2 F2 F2 F2 F2 F2 E TFC7 F3 F3 F3 F3 F3 F3 5 6 Figure 3: Cable-Free USB Hub Connection Status screen 13
User Manual
Page 21
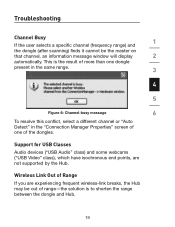
... of the dongles. This is to shorten the range between the dongle and Hub. 19 Support for USB Classes Audio devices ("USB Audio" class) and some webcams ("USB Video" class), which have isochronous end points, are experiencing frequent wireless-link breaks, the Hub may be the master on that channel, an information message window will display... this conflict, select a different channel or "Auto Detect" in the "Connection Manager Properties" screen of one of Range If you are not supported by the Hub.
... of the dongles. This is to shorten the range between the dongle and Hub. 19 Support for USB Classes Audio devices ("USB Audio" class) and some webcams ("USB Video" class), which have isochronous end points, are experiencing frequent wireless-link breaks, the Hub may be the master on that channel, an information message window will display... this conflict, select a different channel or "Auto Detect" in the "Connection Manager Properties" screen of one of Range If you are not supported by the Hub.


