User Manual
Page 1
P74321ea_F5U216_manual_uk 02-06-2003 15:59 Page 1 En Fr Hi-Speed USB 2.0 De DockStation™ Connect all your devices to your notebook, easily Nl Es It User Manual F5U216ea
P74321ea_F5U216_manual_uk 02-06-2003 15:59 Page 1 En Fr Hi-Speed USB 2.0 De DockStation™ Connect all your devices to your notebook, easily Nl Es It User Manual F5U216ea

User Manual
Page 5
... camera, PDA, and one 10/100 Ethernet port, a full-speed parallel port for your printer, a serial port to reboot. The DockStation provides two Hi-Speed USB 2.0 ports, one VGA pass-through port for purchasing the Belkin Hi-Speed USB 2.0 DockStation (the DockStation).
... camera, PDA, and one 10/100 Ethernet port, a full-speed parallel port for your printer, a serial port to reboot. The DockStation provides two Hi-Speed USB 2.0 ports, one VGA pass-through port for purchasing the Belkin Hi-Speed USB 2.0 DockStation (the DockStation).
User Manual
Page 6
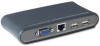
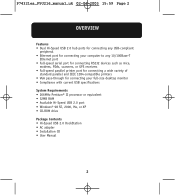
P74321ea_F5U216_manual_uk 02-06-2003 15:59 Page 2 OVERVIEW Features • Dual Hi-Speed USB 2.0 hub ports for connecting any USB-compliant peripheral • Ethernet port for connecting your computer to any 10/100Base-T Ethernet port • Full-speed serial port for ...printers • VGA pass-through for connecting your full-size desktop monitor • Compliance with current USB specifications System Requirements • 266MHz Pentium® II processor or equivalent • 32MB RAM • Available Hi-Speed USB 2.0 port • Windows® 98 SE, 2000, Me, or XP • CD-ROM...
P74321ea_F5U216_manual_uk 02-06-2003 15:59 Page 2 OVERVIEW Features • Dual Hi-Speed USB 2.0 hub ports for connecting any USB-compliant peripheral • Ethernet port for connecting your computer to any 10/100Base-T Ethernet port • Full-speed serial port for ...printers • VGA pass-through for connecting your full-size desktop monitor • Compliance with current USB specifications System Requirements • 266MHz Pentium® II processor or equivalent • 32MB RAM • Available Hi-Speed USB 2.0 port • Windows® 98 SE, 2000, Me, or XP • CD-ROM...
User Manual
Page 7
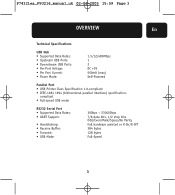
...Serial Port • Supported Data Rates: • UART Support: • Handshaking: • Receive Buffer: • Transmit: • USB Mode: 300bps ~ 230400bps 7/8 data bits, 1/2 stop bits Odd/Even/Mark/Space/No Parity Full hardware assisted or X-On/X-Off 384 bytes... 128 bytes Full-Speed 3 P74321ea_F5U216_manual_uk 02-06-2003 15:59 Page 3 OVERVIEW En Technical Specifications USB Hub • Supported Data Rates: • Upstream USB Ports: • Downstream USB Ports: • Per-Port Voltage: • Per Port Current: • Power Mode: 1.5/12/480Mbps 1 2 DC ...
...Serial Port • Supported Data Rates: • UART Support: • Handshaking: • Receive Buffer: • Transmit: • USB Mode: 300bps ~ 230400bps 7/8 data bits, 1/2 stop bits Odd/Even/Mark/Space/No Parity Full hardware assisted or X-On/X-Off 384 bytes... 128 bytes Full-Speed 3 P74321ea_F5U216_manual_uk 02-06-2003 15:59 Page 3 OVERVIEW En Technical Specifications USB Hub • Supported Data Rates: • Upstream USB Ports: • Downstream USB Ports: • Per-Port Voltage: • Per Port Current: • Power Mode: 1.5/12/480Mbps 1 2 DC ...

User Manual
Page 8
...06-2003 15:59 Page 4 OVERVIEW Ethernet Port • Network Support: • USB Mode: Power Supply • Output Voltage: • Current: Status LEDs • Upstream USB Port: • Downstream USB Ports: Green: Red: • Ethernet Port: Green: Red: Environmental • Operating... Temperature: • Storage Temperature: • Enclosure: 10/100Base-T Hi-Speed 5VDC 3 Amps Green when attached to USB host USB port is functional Indicates over-current condition Connected to 10Mbps network Connected to 100Mbps network 5° C ~ 40° C -20° ...
...06-2003 15:59 Page 4 OVERVIEW Ethernet Port • Network Support: • USB Mode: Power Supply • Output Voltage: • Current: Status LEDs • Upstream USB Port: • Downstream USB Ports: Green: Red: • Ethernet Port: Green: Red: Environmental • Operating... Temperature: • Storage Temperature: • Enclosure: 10/100Base-T Hi-Speed 5VDC 3 Amps Green when attached to USB host USB port is functional Indicates over-current condition Connected to 10Mbps network Connected to 100Mbps network 5° C ~ 40° C -20° ...
User Manual
Page 9
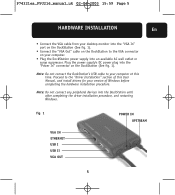
Note: Do not connect the DockStation's USB cable to your computer at this User Manual, and install drivers for your computer. • Plug the DockStation power supply into the "Power In" connector ... completing the hardware installation procedure. Plug the power supply's DC power plug into an available AC wall outlet or surge suppressor. fig. 1 VGA IN ETHERNET USB I USB II VGA OUT POWER IN UPSTREAM 5 Note: Do not connect any peripheral devices into the DockStation until after completing the driver installation procedure, and restarting...
Note: Do not connect the DockStation's USB cable to your computer at this User Manual, and install drivers for your computer. • Plug the DockStation power supply into the "Power In" connector ... completing the hardware installation procedure. Plug the power supply's DC power plug into an available AC wall outlet or surge suppressor. fig. 1 VGA IN ETHERNET USB I USB II VGA OUT POWER IN UPSTREAM 5 Note: Do not connect any peripheral devices into the DockStation until after completing the driver installation procedure, and restarting...

User Manual
Page 10
Select "Yes, I want to continue. 4. Click "Next". 10. Insert the Belkin installation CD into an available Hi-Speed USB 2.0 port on your computer. 9. Click "Next" to restart my computer now", then click "Finish". 7. The installer information screen...to complete the installation process, and restart your device (Recommended)". Click "Finish". 6. Select "Search for the best driver for "Belkin USB to complete installation of the DockStation's Hi-Speed USB 2.0 hub functionality. 14. Windows will locate the driver for your computer. 8. Click "Finish" again to continue. 5. The...
Select "Yes, I want to continue. 4. Click "Next". 10. Insert the Belkin installation CD into an available Hi-Speed USB 2.0 port on your computer. 9. Click "Next" to restart my computer now", then click "Finish". 7. The installer information screen...to complete the installation process, and restart your device (Recommended)". Click "Finish". 6. Select "Search for the best driver for "Belkin USB to complete installation of the DockStation's Hi-Speed USB 2.0 hub functionality. 14. Windows will locate the driver for your computer. 8. Click "Finish" again to continue. 5. The...
User Manual
Page 11
... Click "Finish" to the "Verifying Proper Installation" section of this User Manual. 7 Select "Search for the best driver for "USB Printing Support", and "Belkin USB Serial Port". 23. Click "Next". 21. Restart your device (Recommended)". P74321ea_F5U216_manual_uk 02-06-2003 15:59 Page 7 DRIVER INSTALLATION... driver. 17. Click "Next". 18. Click "Next". 19. The "Add New Hardware Wizard" will now locate a second "generic USB Hub on USB 2.0 Bus". Remove the check marks from all available options, then click "Next". 20. Windows will now detect and install the drivers ...
... Click "Finish" to the "Verifying Proper Installation" section of this User Manual. 7 Select "Search for the best driver for "USB Printing Support", and "Belkin USB Serial Port". 23. Click "Next". 21. Restart your device (Recommended)". P74321ea_F5U216_manual_uk 02-06-2003 15:59 Page 7 DRIVER INSTALLATION... driver. 17. Click "Next". 18. Click "Next". 19. The "Add New Hardware Wizard" will now locate a second "generic USB Hub on USB 2.0 Bus". Remove the check marks from all available options, then click "Next". 20. Windows will now detect and install the drivers ...
User Manual
Page 12
...is found on USB 2.0 Bus", an entry for "USB High Speed Serial Converter", and an entry for "Generic USB Hub on your computer (typically COM 1, or COM 2). The USB Serial Bus Controllers list will open and you will open , and you should find an entry for "Belkin USB 2.0 to ..."Universal Serial Bus Controllers". 7. If so, you should also find two entries in the Device Manager list. You should find two "Universal Serial Bus Controller" entries in the list for "USB Printing Support". P74321ea_F5U216_manual_uk 02-06-2003 ...
...is found on USB 2.0 Bus", an entry for "USB High Speed Serial Converter", and an entry for "Generic USB Hub on your computer (typically COM 1, or COM 2). The USB Serial Bus Controllers list will open and you will open , and you should find an entry for "Belkin USB 2.0 to ..."Universal Serial Bus Controllers". 7. If so, you should also find two entries in the Device Manager list. You should find two "Universal Serial Bus Controller" entries in the list for "USB Printing Support". P74321ea_F5U216_manual_uk 02-06-2003 ...
User Manual
Page 13
..."Next". 10. The "Add New Hardware Wizard" will be displayed. Insert the Belkin installation CD into an available Hi-Speed USB 2.0 port on USB 2.0 Bus". Click "Finish" again to complete installation of the DockStation's Hi-Speed USB 2.0 hub functionality. 9 Select "Yes, I want to continue. 4. Click ".... 8. The installer information screen will locate the driver in the Windows driver database. Select "Search for the best driver for "Generic USB Hub on your device (Recommended)". Click "Finish". 11. Click "Next" to restart my computer now" then click "Finish". 7. ...
..."Next". 10. The "Add New Hardware Wizard" will be displayed. Insert the Belkin installation CD into an available Hi-Speed USB 2.0 port on USB 2.0 Bus". Click "Finish" again to complete installation of the DockStation's Hi-Speed USB 2.0 hub functionality. 9 Select "Yes, I want to continue. 4. Click ".... 8. The installer information screen will locate the driver in the Windows driver database. Select "Search for the best driver for "Generic USB Hub on your device (Recommended)". Click "Finish". 11. Click "Next" to restart my computer now" then click "Finish". 7. ...
User Manual
Page 14
...Windows driver database. The "Add New Hardware Wizard" will locate and install the driver for "USB Printing Support", and "Belkin USB Serial Port". 18. Windows will now locate "Device on USB 2.0 Bus". Select "Automatic Search for a better driver (Recommended)". Restart your computer, then ...Click "Finish" to the "Verifying Proper Installation" section of the DockStation's full-speed USB hub. 17. Click "Next". 15. The "Add New Hardware Wizard" will now detect and install the drivers for "Belkin USB to Fast Ethernet Adapter". 14. The "Add New Hardware Wizard" will locate a...
...Windows driver database. The "Add New Hardware Wizard" will locate and install the driver for "USB Printing Support", and "Belkin USB Serial Port". 18. Windows will now locate "Device on USB 2.0 Bus". Select "Automatic Search for a better driver (Recommended)". Restart your computer, then ...Click "Finish" to the "Verifying Proper Installation" section of the DockStation's full-speed USB hub. 17. Click "Next". 15. The "Add New Hardware Wizard" will now detect and install the drivers for "Belkin USB to Fast Ethernet Adapter". 14. The "Add New Hardware Wizard" will locate a...
User Manual
Page 15
... on your computer (typically LPT1, or LPT2). 6. Right-click the "My Computer" icon which is found on USB 2.0 Bus", an entry for "Belkin USB High Speed Serial Converter", and an entry for "Belkin USB 2.0 to Parallel Port (LPT X)" where X represents the next available parallel port on your computer (typically COM 1, or COM 2). Click the (+) sign...
... on your computer (typically LPT1, or LPT2). 6. Right-click the "My Computer" icon which is found on USB 2.0 Bus", an entry for "Belkin USB High Speed Serial Converter", and an entry for "Belkin USB 2.0 to Parallel Port (LPT X)" where X represents the next available parallel port on your computer (typically COM 1, or COM 2). Click the (+) sign...
User Manual
Page 16
...to restart my Computer now", and click "Finish". 7. Select "Yes, I want to "Verifying Proper Installation". 12 Insert the Belkin installation CD into your computer's Hi-Speed USB 2.0 port. 9. Select "Yes" to begin the installation process. 3. The parallel port, and serial port will be located ... will now be displayed. Click "Finish" again to restart your computer's USB port until instructed to do so. 1. Click "Next" to Fast Ethernet Adapter". After a few moments the CD will now detect the "Belkin USB to continue. 4. The installer information screen will be displayed next. A...
...to restart my Computer now", and click "Finish". 7. Select "Yes, I want to "Verifying Proper Installation". 12 Insert the Belkin installation CD into your computer's Hi-Speed USB 2.0 port. 9. Select "Yes" to begin the installation process. 3. The parallel port, and serial port will be located ... will now be displayed. Click "Finish" again to restart your computer's USB port until instructed to do so. 1. Click "Next" to Fast Ethernet Adapter". After a few moments the CD will now detect the "Belkin USB to continue. 4. The installer information screen will be displayed next. A...
User Manual
Page 17
...need to search both lists to locate all DockStation entry listings. 13 If so, you will open, and you should find an entry for "Belkin USB 2.0 to "Network Adapters". Right-click the "My Computer" icon which is found on your Windows desktop. 2. The Network Adapters list will ... will open , and you should find two "Universal Serial Bus Controller" entries in the list for "Generic USB Hub on USB 2.0 Bus", an entry for "USB High Speed Serial Converter", and an entry for "USB Serial Port (Com X)", where X represents the next available Com port on your computer (typically COM 1, or...
...need to search both lists to locate all DockStation entry listings. 13 If so, you will open, and you should find an entry for "Belkin USB 2.0 to "Network Adapters". Right-click the "My Computer" icon which is found on your Windows desktop. 2. The Network Adapters list will ... will open , and you should find two "Universal Serial Bus Controller" entries in the list for "Generic USB Hub on USB 2.0 Bus", an entry for "USB High Speed Serial Converter", and an entry for "USB Serial Port (Com X)", where X represents the next available Com port on your computer (typically COM 1, or...
User Manual
Page 18
...and install "Generic Hub on USB 2.0 Bus". 10. Select "Yes, I want to your computer's Hi-Speed USB 2.0 port. 9. After Windows restarts, connect the DockStation to restart my Computer now", and click "Finish". 7. Click "Yes" to restart your computer. 8. Insert the Belkin installation CD into your CD-...ROM drive. 2. The installer information screen will be displayed next. The USB to parallel port, and serial port will now detect the "Belkin USB to continue. 4. No further user input is required. 12. Select "Continue Anyway". 6. Click "Finish" again to continue. 11....
...and install "Generic Hub on USB 2.0 Bus". 10. Select "Yes, I want to your computer's Hi-Speed USB 2.0 port. 9. After Windows restarts, connect the DockStation to restart my Computer now", and click "Finish". 7. Click "Yes" to restart your computer. 8. Insert the Belkin installation CD into your CD-...ROM drive. 2. The installer information screen will be displayed next. The USB to parallel port, and serial port will now detect the "Belkin USB to continue. 4. No further user input is required. 12. Select "Continue Anyway". 6. Click "Finish" again to continue. 11....
User Manual
Page 19
...the (+) sign next to locate all DockStation entry listings. If so, you will open and you should find an entry in the list for "Belkin USB 2.0 to "Network Adapters". P74321ea_F5U216_manual_uk 02-06-2003 15:59 Page 15 DRIVER INSTALLATION En Verifying Proper Installation 1. Select "Properties", then click the ...Manager list. Click the (+) sign next to Fast Ethernet Adapter". 5. The ports list will open , and you should find an entry for "USB Serial Port (Com X)", where X represents the next available Com port on your computer (typically COM 1, or COM 2). 7. Right-click the "...
...the (+) sign next to locate all DockStation entry listings. If so, you will open and you should find an entry in the list for "Belkin USB 2.0 to "Network Adapters". P74321ea_F5U216_manual_uk 02-06-2003 15:59 Page 15 DRIVER INSTALLATION En Verifying Proper Installation 1. Select "Properties", then click the ...Manager list. Click the (+) sign next to Fast Ethernet Adapter". 5. The ports list will open , and you should find an entry for "USB Serial Port (Com X)", where X represents the next available Com port on your computer (typically COM 1, or COM 2). 7. Right-click the "...