F5U210 User Manual
Page 2
TABLE OF CONTENTS Introduction 1 Overview 2 System Requirements 2 Assembling your Drive Enclosure 3 Windows 98 SE Driver Installation 8 Windows Me, 2000, XP Driver Installation 10 Safe Removal of Disk from Windows 11 Format the Drive 12 Information 17
TABLE OF CONTENTS Introduction 1 Overview 2 System Requirements 2 Assembling your Drive Enclosure 3 Windows 98 SE Driver Installation 8 Windows Me, 2000, XP Driver Installation 10 Safe Removal of Disk from Windows 11 Format the Drive 12 Information 17
F5U210 User Manual
Page 3
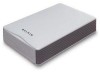
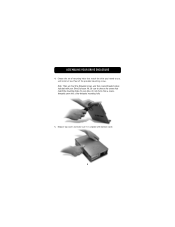
... be equipped with its compact size, make it an ideal tool for purchasing the Hi-Speed USB 2.0 & FireWire External Drive Enclosure Kit from Belkin. Your new Drive Enclosure incorporates the amazing speed and flexibility of -use advantages, along with built-in one compact storage device. INTRODUCTION Congratulations and thank you for the computer...
... be equipped with its compact size, make it an ideal tool for purchasing the Hi-Speed USB 2.0 & FireWire External Drive Enclosure Kit from Belkin. Your new Drive Enclosure incorporates the amazing speed and flexibility of -use advantages, along with built-in one compact storage device. INTRODUCTION Congratulations and thank you for the computer...
F5U210 User Manual
Page 5
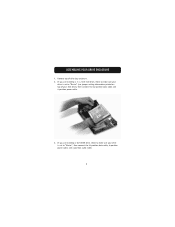
If you are installing a CD/CD-RW drive, check to make sure your drive is set to "Master" (see jumper setting information printed on top of drive bay enclosure. 2. Remove top of your drive is set to make sure your disk drive), then connect the 34-position data cable and 4-position power cable. 3. If you are installing a 3 1/2-inch hard drive, check to "Master", then connect the 34-position data cable, 4-position power cable, and 4-position audio cable. 3 ASSEMBLING YOUR DRIVE ENCLOSURE 1.
If you are installing a CD/CD-RW drive, check to make sure your drive is set to "Master" (see jumper setting information printed on top of drive bay enclosure. 2. Remove top of your drive is set to make sure your disk drive), then connect the 34-position data cable and 4-position power cable. 3. If you are installing a 3 1/2-inch hard drive, check to "Master", then connect the 34-position data cable, 4-position power cable, and 4-position audio cable. 3 ASSEMBLING YOUR DRIVE ENCLOSURE 1.
F5U210 User Manual
Page 6
Do not try to use, and install at least four of mounting holes that match the mounting holes for your Drive Enclosure Kit. Choose the set of the provided mounting screws. ASSEMBLING YOUR DRIVE ENCLOSURE 4. Note: There are four fine-threaded screws, and four coarse-threaded screws included with bottom cover. 4 Replace top cover and make sure it is aligned with your drive. Be sure to choose the screws that match the drive you intend to force a coarsethreaded screw into a fine-threaded mounting hole. 5.
Do not try to use, and install at least four of mounting holes that match the mounting holes for your Drive Enclosure Kit. Choose the set of the provided mounting screws. ASSEMBLING YOUR DRIVE ENCLOSURE 4. Note: There are four fine-threaded screws, and four coarse-threaded screws included with bottom cover. 4 Replace top cover and make sure it is aligned with your drive. Be sure to choose the screws that match the drive you intend to force a coarsethreaded screw into a fine-threaded mounting hole. 5.

F5U210 User Manual
Page 7
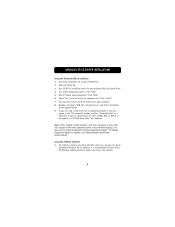
ASSEMBLING YOUR DRIVE ENCLOSURE 6. Insert the tabs on the side. 7. If you are installing a hard disk, it is necessary to install the front panel. Hook the first side rail around front edge of the front panel into the six rectangular-shaped mounting holes on one side of the enclosure, and press the rail into the mounting holes in the installed side rail. 5
ASSEMBLING YOUR DRIVE ENCLOSURE 6. Insert the tabs on the side. 7. If you are installing a hard disk, it is necessary to install the front panel. Hook the first side rail around front edge of the front panel into the six rectangular-shaped mounting holes on one side of the enclosure, and press the rail into the mounting holes in the installed side rail. 5

F5U210 User Manual
Page 8
... the square-shaped connector of the USB cable into the USB port on the rear panel of the Drive Enclosure. (If you want to use the FireWire interface, plug either end of the FireWire cable into the FireWire port on the free end of the ...front panel into the six rectangular mounting holes in the side of the Drive Enclosure.) 6 IMPORTANT NOTE: IF YOU ARE USING WINDOWS 98 OR 98 SE, DO NOT CONNECT THE DRIVE ENCLOSURE TO YOUR COMPUTER UNTIL DRIVER INSTALLATION IS COMPLETED. 10. Insert the mounting tabs on the back of...
... the square-shaped connector of the USB cable into the USB port on the rear panel of the Drive Enclosure. (If you want to use the FireWire interface, plug either end of the FireWire cable into the FireWire port on the free end of the ...front panel into the six rectangular mounting holes in the side of the Drive Enclosure.) 6 IMPORTANT NOTE: IF YOU ARE USING WINDOWS 98 OR 98 SE, DO NOT CONNECT THE DRIVE ENCLOSURE TO YOUR COMPUTER UNTIL DRIVER INSTALLATION IS COMPLETED. 10. Insert the mounting tabs on the back of...
F5U210 User Manual
Page 9
... wall outlet. 13. Proceed to a full-speed USB 1.1 port, the maximum USB bandwidth will be 12Mbps. 12. Power-on the rear panel of the Drive Enclosure, and into the power connector on the drive. 14. Plug the rectangular-shaped connector of the FireWire cable into a Hi-Speed USB 2.0 port on your... using the FireWire interface, plug the other end of the USB cable into the FireWire port on your computer, or FireWire hub). ASSEMBLING YOUR DRIVE ENCLOSURE 11.
... wall outlet. 13. Proceed to a full-speed USB 1.1 port, the maximum USB bandwidth will be 12Mbps. 12. Power-on the rear panel of the Drive Enclosure, and into the power connector on the drive. 14. Plug the rectangular-shaped connector of the FireWire cable into a Hi-Speed USB 2.0 port on your... using the FireWire interface, plug the other end of the USB cable into the FireWire port on your computer, or FireWire hub). ASSEMBLING YOUR DRIVE ENCLOSURE 11.
F5U210 User Manual
Page 10
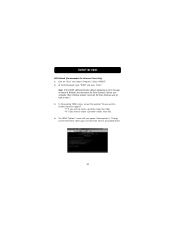
... "My Computer" window as a CD-ROM drive under "My Computer". Click "Finish". 7. If you are using a hard drive that you may now connect the Drive Enclosure to restart my computer now". Select "Yes, I want to your CD-ROM drive. 2. You may need to obtain any recent 1394 updates. 8 Windows will detect...
... "My Computer" window as a CD-ROM drive under "My Computer". Click "Finish". 7. If you are using a hard drive that you may now connect the Drive Enclosure to restart my computer now". Select "Yes, I want to your CD-ROM drive. 2. You may need to obtain any recent 1394 updates. 8 Windows will detect...
F5U210 User Manual
Page 11
..., it will now appear in the "My Computer" window as a CD-ROM drive under "My Computer". Note: If you are using a hard drive with this enclosure, and the new drive does not appear in My Computer, you may need to prepare your Windows display), you may need to partition and format...
..., it will now appear in the "My Computer" window as a CD-ROM drive under "My Computer". Note: If you are using a hard drive with this enclosure, and the new drive does not appear in My Computer, you may need to prepare your Windows display), you may need to partition and format...

F5U210 User Manual
Page 12
... detect "1394/USB Disk" and install the IEEE 1394 mass-storage device class driver, which is built into Windows. If you are using the enclosure with this enclosure, and the new drive does not appear in the "My Computer" window as a CD-ROM drive under "My Computer". Please refer to the "Partition...
... detect "1394/USB Disk" and install the IEEE 1394 mass-storage device class driver, which is built into Windows. If you are using the enclosure with this enclosure, and the new drive does not appear in the "My Computer" window as a CD-ROM drive under "My Computer". Please refer to the "Partition...
F5U210 User Manual
Page 13
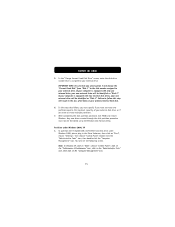
... available through the Microsoft Windows Update web page. 2. You may safely remove this device", unplug the USB cable from the USB port of the Drive Enclosure. Choose the Hi-Speed USB 2.0 external drive that you want to disconnect, then click on "Stop" again. 3. Select the "USB Mass Storage Device" then click...
... available through the Microsoft Windows Update web page. 2. You may safely remove this device", unplug the USB cable from the USB port of the Drive Enclosure. Choose the Hi-Speed USB 2.0 external drive that you want to disconnect, then click on "Stop" again. 3. Select the "USB Mass Storage Device" then click...
F5U210 User Manual
Page 16
... create a partition larger than 2GB. 4. The FDISK "Options" screen will now appear. Select your computer. When Windows restarts, reconnect the Drive Enclosure and go back to Windows and disconnect the Drive Enclosure. FORMAT THE DRIVE DOS Method (Recommended for Advanced Users Only) 1. At the DOS prompt, type "FDISK" and press "Enter". Note...
... create a partition larger than 2GB. 4. The FDISK "Options" screen will now appear. Select your computer. When Windows restarts, reconnect the Drive Enclosure and go back to Windows and disconnect the Drive Enclosure. FORMAT THE DRIVE DOS Method (Recommended for Advanced Users Only) 1. At the DOS prompt, type "FDISK" and press "Enter". Note...
F5U210 User Manual
Page 17
... be identified as "Disk 3". IMPORTANT NOTE: Be sure that you want to create one internal drive, your new external drive will result in the Drive Enclosure, then click on "Start", choose "Settings", then choose "Control Panel". Failure to your external drive. Double-click the "Administrative Tools" icon, then double-click the...
... be identified as "Disk 3". IMPORTANT NOTE: Be sure that you want to create one internal drive, your new external drive will result in the Drive Enclosure, then click on "Start", choose "Settings", then choose "Control Panel". Failure to your external drive. Double-click the "Administrative Tools" icon, then double-click the...